Selecting and refining specific colors or tonal ranges within an image is a fundamental skill for any Photoshop user, whether you're a hobbyist looking to make subtle adjustments or a professional aiming for precise retouching. Adobe Photoshop offers a powerful suite of tools designed to isolate colors with remarkable accuracy, allowing for targeted adjustments to hue, saturation, and brightness. This guide will delve into the various methods available, from the robust "Color Range" command to more specialized techniques, ensuring you can effectively select and modify any color within your images.
The Power of Color Range Selection
The "Color Range" command in Photoshop is a cornerstone for precise color-based selections. It allows you to create selections based on specific colors or tonal ranges present within an image, offering a level of control that often surpasses manual selection tools. This command is particularly adept at isolating intricate details and subtle color variations.
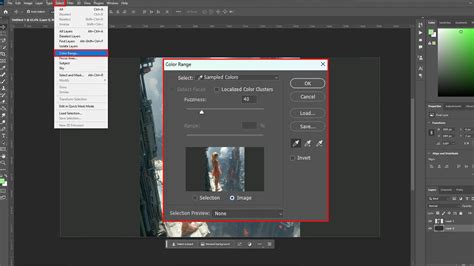
To initiate a "Color Range" selection, navigate to the menu bar and choose Select > Color Range. Once the dialog box appears, you'll notice a "Selection" radio button is typically active by default. With this active, you can utilize the Eyedropper tool directly within the preview area of the dialog box, or click directly on your image behind the dialog, to sample the color you wish to select. As you sample colors, the preview window will dynamically update, illustrating the areas of your image that fall within the selected color range.
Beyond the primary Eyedropper, the "Color Range" dialog offers two crucial additional sampling tools. One is an Eyedropper with a plus sign, designed to add more colors to your existing selection. The other is an Eyedropper with a minus sign, used to subtract colors from your selection. These tools are invaluable for refining your selection, especially when dealing with complex images containing multiple shades or when you need to exclude certain areas.
The default "Color Range" selection operates by sampling colors that you manually choose. However, Photoshop provides several other highly useful selection modes within this command. For instance, if you need to select a color but only from a specific area of the image, you can first make a rough selection using a tool like the Lasso Tool before opening the "Color Range" dialog. This pre-selection acts as a boundary for the "Color Range" command, ensuring your color sampling is confined to the desired region.
Furthermore, the "Selection Preview" dropdown menu within the "Color Range" dialog is a powerful feature. It allows you to visualize your selection in various ways directly on your image, such as displaying it as a grayscale mask or as a rubylith overlay. This visual feedback is critical for understanding exactly which pixels are included in your selection and for making informed adjustments.
Refining Your Color Selection
Once you have an active selection created using "Color Range," the next step is often to modify the selected color. A highly effective and non-destructive method for this is to add a Hue/Saturation adjustment layer. By going to Layer > New Adjustment Layer > Hue/Saturation, or by clicking the adjustment layer icon at the bottom of the Layers panel and selecting Hue/Saturation, you create a dedicated layer for color modifications.
Crucially, when you create a Hue/Saturation adjustment layer immediately after making a selection, Photoshop will automatically generate a layer mask based on that selection. This ensures that any changes you make to the Hue, Saturation, or Brightness sliders in the Properties panel will only affect the pixels within your selected color range.
The Hue slider is your primary tool for changing the color itself. By dragging this slider, you can shift the selected color through the spectrum, effectively replacing the original hue with a new one. The Saturation slider controls the intensity of the color, and the Lightness slider adjusts its brightness. Experimenting with these sliders allows you to achieve a wide range of color transformations.
For finer control, you can right-click on your adjustment layer and select "Edit Adjustments." This option allows you to fine-tune the effect of the Hue/Saturation adjustment, offering more nuanced control over the color transformation. If you need to change other objects in the image to different colors, you can simply repeat the process: create a new adjustment layer and generate a new layer mask based on a new selection.
Alternative Methods for Color Replacement
While "Color Range" combined with Hue/Saturation is a preferred workflow for many, Photoshop offers several other methods for replacing colors, each with its own strengths and applications.
Method 2: The Replace Color Dialog
The "Replace Color" dialog, found under Image > Adjustments > Replace Color, offers a more direct, albeit destructive, way to change colors. It's essential to duplicate your layer before using this tool to protect your original image data. After duplicating the layer, you can make a mask of the area you wish to modify using any selection tool. Then, launch the "Replace Color" dialog.
Within this dialog, you use the Eyedropper tool to sample the color you want to replace. Similar to the Hue/Saturation adjustment layer, you then manipulate Hue, Saturation, and Lightness sliders to achieve the desired outcome. Pressing "OK" applies these changes directly to the selected pixels.
Method 3: The Color Replacement Tool
For a more painterly approach, the "Color Replacement Tool" is available under the Brush tools. This method allows you to manually paint over the image, replacing existing colors with a target color. Again, duplicating your background layer is highly recommended.
To use this tool, select it from the brush options. In the top toolbar, set the "Mode" to "Color." Then, click the foreground color picker and choose your desired target color. Adjust the brush size and paint over the areas where you want to replace the color. The "Color Replacement Tool" intelligently replaces only the targeted color under the brush's crosshair, preserving surrounding details and textures.
Method 4: Blending Modes
Blending modes offer a creative and often non-destructive way to alter colors. Specifically, the "Hue" blending mode is excellent for changing an object's color without affecting its texture or luminosity.
To utilize this method, import your image and duplicate the background layer. In the Layers panel, change the blend mode of the duplicated layer to "Hue." Then, select the Brush Tool, choose your desired foreground color, and paint over the object whose color you wish to change. The "Hue" blend mode will apply the foreground color's hue to the underlying pixels while retaining their original texture and brightness. Other blending modes like "Color" can also be useful for different effects.
The ONLY Photoshop Blend Modes you need to know
Advanced Color Manipulation with Boris FX Optics
For users seeking even more sophisticated color control, third-party plugins like Boris FX Optics offer advanced features. Optics is a powerful creative software and plugin suite that integrates seamlessly with Photoshop and Lightroom, providing a vast array of filters and tools for image manipulation.
One such filter is "Ozone," which allows for highly precise color adjustments based on Ansel Adams's zone system. Ozone divides the image spectrum into 11 zones based on luminance and other color values. This allows you to target and adjust specific color ranges with exceptional accuracy.
To use Ozone in Photoshop:
- Convert to Smart Object: Right-click your image layer and select "Convert to Smart Object." This ensures non-destructive editing.
- Apply Optics Filter: Go to
Filter > Boris FX > Optics. - Create a Mask: Within the Optics interface, use the "Add Mask" icon to create a mask for the object whose color you want to change. The "Mask ML" feature uses AI to automatically identify and select objects.
- Apply Ozone Filter: Navigate to the "Color" category and select the "Ozone" filter.
- Adjust Ozone Settings: The right panel provides parameters for each of the 11 zones. You can select how zones are created using the "Extractor" dropdown (Luminance, Hue, Saturation, etc.). Use "Position" and "Range" to define the target color values precisely. Then, adjust "Hue," "Saturation," and "Brightness" to modify the colors within the selected zone. The "Matte" preview at the bottom helps visualize the masked areas.
- Apply Changes: Once satisfied, click "Apply" to return to Photoshop.
This advanced method, while requiring an additional plugin, offers unparalleled control for complex color grading and replacement tasks.
Handling Specific Scenarios
Replacing White in a Greyscale Line Drawing
A common challenge arises when you have a greyscale line drawing on a white background and wish to change all the white pixels to a specific color. While "Replace Color" might seem intuitive, it can sometimes struggle with pure white.
A highly effective approach in this scenario is to create a new "Solid Color" Fill Layer (found under Layer > New Fill Layer > Solid Color). Choose your desired RGB color for this fill layer. Then, place this fill layer below your clipart layer in the Layers panel. Finally, change the blending mode of your clipart layer to "Multiply." This method allows the color from the fill layer to show through the white areas of your line drawing, effectively changing all the white to your chosen color while keeping the black lines intact. Alternatively, you could create an empty layer and fill it with your desired foreground or background color using the "Edit" menu, though the "Solid Color" Fill Layer is generally recommended for its flexibility.
Selecting a Single Hue for Editing
When the goal is to isolate and edit every instance of a particular hue, such as a specific shade of red on an apple, the "Color Range" command remains a primary tool. As described earlier, you can sample the desired red hue. To further refine the selection, especially if the red varies slightly, you can increase the "Fuzziness" or "Threshold" value within the "Color Range" dialog. This value determines how strictly Photoshop adheres to the sampled color, allowing it to include similar shades.
If your color is very well-defined and you don't require a soft-edged selection, the Magic Wand tool can also be a quick option. However, it's less adept at scanning the entire image for every pixel of a specific color compared to the more sophisticated "Color Range" command. For instance, if you select a light green with a threshold of 50, the Magic Wand might select a broader range of similar greens.
Conclusion
Mastering color selection in Photoshop is a journey that involves understanding the strengths of various tools. From the precise control offered by "Color Range" and Hue/Saturation adjustment layers to the directness of "Replace Color" and the painterly freedom of the "Color Replacement Tool," Photoshop provides a comprehensive toolkit for virtually any color manipulation task. By leveraging these techniques, you can transform images, correct color issues, and bring your creative visions to life with remarkable accuracy and flexibility.