Lightroom presets are revolutionizing the way photographers approach post-production. These powerful tools, essentially one-click edits akin to sophisticated photo filters, allow for the rapid application of pre-defined editing styles. They are instrumental in creating a cohesive and polished aesthetic across an entire body of work, ensuring a uniform look and color palette. While a preset provides a fantastic starting point, it's crucial to understand that users retain full control to make further, nuanced adjustments to their images. The journey of developing these presets often begins with years of dedicated editing, refining specific adjustments, and then packaging them into collections for others to benefit from.
Understanding Adobe Lightroom: The Foundation of Presets
Before delving into the intricacies of presets, it's essential to grasp the software that makes them possible: Adobe Lightroom. Adobe Lightroom (LR) is a comprehensive image organization and editing software developed by Adobe, the same company behind Photoshop and Premiere Pro. It functions as an all-in-one solution for importing, organizing, editing, and sharing digital images in various formats, including RAW, JPEG, and TIFF. This software is the industry standard for professionals aiming to produce the high-caliber images seen across platforms like Instagram and beyond.
The core strength of Lightroom lies in its robust editing capabilities. These functions allow for precise manipulation of key areas such as exposure, white balance, HSL (Hue, Saturation, Luminance) colors, color grading, tone curves, and detail enhancement. It also offers essential Photoshop-like editing features, including spot removal and tone adjustments. Another significant advantage of Lightroom is its integrated workflow, which enables users to manage, edit, and export all their photos within a single system, thereby enhancing consistency and efficiency. Furthermore, Lightroom operates non-destructively, meaning edits are automatically saved in the Lightroom catalog with a complete editing history, eliminating the need for constant manual saving.
Adobe offers two primary versions of Lightroom: Lightroom Classic CC, a feature-rich desktop application, and Lightroom CC, a more streamlined, cloud-based version that synchronizes with Lightroom Mobile.
Lightroom Classic CC vs. Lightroom CC: Choosing Your Editing Environment
In 2017, Adobe expanded its offerings with the introduction of Lightroom Mobile, significantly enhancing on-the-go editing capabilities. This led to the development of Adobe Lightroom CC, a cloud-based version designed to sync seamlessly with the mobile app. Consequently, two distinct Adobe Lightroom environments emerged: Adobe Lightroom Classic CC and Adobe Lightroom CC.
Lightroom Classic CC: The Professional's Powerhouse
Lightroom Classic CC is the established, feature-laden version designed for users who require in-depth editing control. Its desktop-based architecture leverages the power of a robust processor, essential for its extensive array of features. It encompasses fundamental editing tools like exposure, white balance, HSL colors, color grading, tone curves, and presence/detail adjustments, alongside a comprehensive suite of advanced features favored by professionals. Many users prefer the layout and design of Lightroom Classic CC for its greater ability to manage and export large volumes of photography.
Lightroom Classic CC can be acquired as a standalone program or as part of the Adobe Creative Cloud Photography plan, with subscription costs typically starting around US$9.99 per month.
Lightroom CC: The User-Friendly, Cloud-Connected Option
Lightroom CC, often referred to as the "new dog in town," boasts a simplified and intuitive interface, making it an excellent choice for beginners or those who prioritize ease of use without compromising on image manipulation capabilities or preset functionality. Its primary advantage is its cloud-based nature, facilitating seamless synchronization across multiple devices, including mobile phones via Lightroom Mobile.
Lightroom Mobile: Editing on the Go
For individuals who are not professional photographers or primarily use their smartphones for capturing images, Adobe Photoshop Lightroom Mobile is an exceptionally powerful application. It is available for free and serves as a robust photo editor and camera app, designed to enhance smartphone photography. Similar to its desktop counterpart, Lightroom Mobile utilizes intuitive sliders and filters for a simplified editing experience. Key features include the ability to shoot and edit RAW photos within the app, advanced color correction, gradient filters for selective adjustments, healing brushes for object removal, and batch editing capabilities. However, its most significant benefit lies in its compatibility with Lightroom Presets, allowing users to achieve stunning visual transformations with minimal effort.
For those new to photography, who primarily use their mobile devices, or who travel frequently and require on-the-go editing with cloud storage, Lightroom CC and Lightroom Mobile are highly recommended.
What Exactly Are Lightroom Presets?
Lightroom presets are essentially image filters that apply a predetermined set of editing settings to a photograph. These settings can transform images, making them appear brighter, richer, and more visually striking. With presets, editing photos becomes remarkably easy, often requiring just a single click to achieve a specific aesthetic and color palette that might be difficult to replicate with other mobile editing applications.
A significant advantage of using Lightroom presets is their ability to establish a consistent visual style across all your photographs. By purchasing presets from favorite creators or developing your own, you can achieve a unified look without needing to master complex editing techniques. Presets also dramatically save time when batch editing multiple images. Many professional photographers have spent years developing their own custom Lightroom presets, which they use to edit all their social media and blog content, and these can often be purchased.
Mobile presets are designed for use with the Lightroom CC mobile app, compatible with both Apple and Android devices. Desktop presets are intended for Adobe Lightroom Classic, the professional-grade desktop software that requires a subscription. Desktop presets work optimally with RAW photos, which capture the most image data, or high-quality JPEG images, enabling faster editing with a consistent aesthetic.

The Advantages of Using Lightroom Presets
The adoption of Lightroom presets offers several compelling benefits for photographers of all levels.
Speed Up Your Workflow with Presets
In the fast-paced world of photography, time is a critical asset. Lightroom presets significantly accelerate the editing workflow, allowing photographers to achieve a consistent look across numerous images with remarkable speed. While finding the right preset for specific lighting conditions or scenarios is important, once identified, applying it to multiple selected photos is a matter of a single click. Post-preset application, minor tweaks to exposure, contrast, or color are often necessary, but this process is exponentially faster than editing each photo individually from scratch. Investing in high-quality Lightroom presets can dramatically reduce editing hours, freeing up valuable time for shooting, client management, or personal pursuits.
Create Your Own Lightroom Presets
A powerful feature within Lightroom is the ability to create and save your own custom presets based on your unique editing adjustments. This is particularly useful if you develop a specific editing style that works exceptionally well for particular lighting conditions or environments. By saving these settings as a preset, you can easily replicate that look on future images, ensuring brand consistency and saving time.
Tips for Editing with Lightroom Presets
While presets offer a simplified editing process, achieving professional results often involves understanding how to best utilize them and when to make manual adjustments.
Always Shoot in RAW
For the highest quality images and maximum editing flexibility, shooting in RAW format is strongly recommended. RAW files capture all the data recorded by the camera's sensor without compression, meaning no image data is lost. This is invaluable during post-processing, allowing for extensive manipulation of exposure, contrast, highlights, and shadows without a degradation in image quality. For those serious about enhancing their travel photography, starting with RAW files is a fundamental step.
However, if you are primarily shooting with a mobile device, modern smartphone cameras are incredibly capable. While most smartphones shoot in JPEG, a compressed format with less data than RAW, Lightroom presets can still yield excellent results. It's important to note that presets might sometimes over-accentuate colors or contrast on JPEGs, but these effects can be easily managed with further adjustments within Lightroom.
Beginner RAW Photo Editing to Get You Started Like a Pro
Consider Color Theory
Understanding color theory can elevate your editing to the next level. Color theory involves combining specific colors in ways that complement each other, often guided by a color wheel. For instance, turquoise and orange are complementary colors that work exceptionally well together, contributing to the appeal of Mediterranean-inspired photography. Likewise, green and red create a striking contrast. While not strictly essential, incorporating color theory principles can add a sophisticated layer to your travel photos.
How to Use Lightroom Presets: A Step-by-Step Guide
The process of applying and refining presets is designed to be intuitive, whether you're using the desktop or mobile version of Lightroom.
Applying and Adjusting Presets
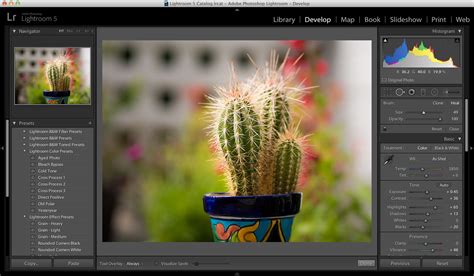
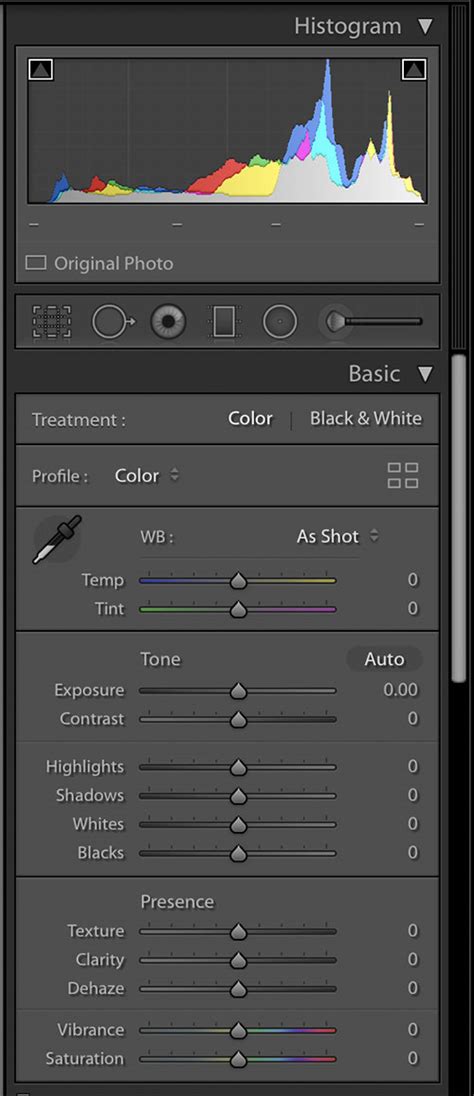
Once a preset is installed, applying it is straightforward. In Lightroom Classic CC, navigate to the Develop module, and on the left-hand panel, you'll find the "Presets" section. Hovering over a preset will often provide a live preview on your image. After applying a preset, it's common practice to make minor adjustments using the Basic panel. This typically involves fine-tuning exposure, adjusting highlights and shadows, and sometimes tweaking blacks and whites or clarity. The Tone Curve panel is also frequently used to refine shadows, mid-tones, and highlights.
Tweak Colors and Tones
After establishing the overall exposure and look, the white balance can be adjusted to match the desired aesthetic. The HSL (Hue, Saturation, Luminance) panel allows for targeted changes to individual colors, often focusing on primary or complementary colors like oranges and blues to perfect skin tones and manage saturation. Color Grading (formerly Split Toning) is another area where subtle adjustments to highlight, mid, or shadow tones can further refine the preset's unique style.
Selective Edits
Selective edits involve making adjustments to specific areas of an image using tools like spot removal, gradient filters, or the brush tool. These allow for targeted enhancements without affecting the rest of the photo. While presets themselves may not include selective edits to allow for creative freedom, they are a powerful tool for refining the image further, such as brightening eyes or adjusting exposure around a subject.
Final Adjustments and Export
The final stage involves reviewing the image for any necessary tweaks, such as exposure levels or color balance. Distractions like power lines or unwanted objects can be removed using Lightroom's spot removal tool or Photoshop. Finally, the image is exported. For platforms like Instagram, cropping to a 4:5 ratio is often recommended as it maximizes the image's visible area on the feed.
The Evolution of Editing: Beyond Static Presets
While Lightroom presets have been a cornerstone of efficient and consistent editing for years, the industry is continuously evolving. The emergence of AI-powered tools represents the next frontier in photo editing. These advanced solutions go beyond applying static, pre-defined rules to every photo. Instead, they analyze each image individually, making intelligent adjustments based on your unique style and the specific content of the image.
Imagen: AI-Powered Editing for the Modern Photographer
Imagen is a prime example of this evolution. It's not about replacing the artist but about providing a smarter, more efficient tool. Traditional presets apply the same settings regardless of the photo's lighting or composition. Imagen, however, uses artificial intelligence to learn your editing style by analyzing a collection of your previously edited photos. This AI builds a "Personal AI Profile" that understands how you handle exposure in various lighting, adjust skin tones, grade colors, and crop images.
This AI-powered platform integrates seamlessly with Adobe Lightroom Classic, Lightroom, and Photoshop. After training your profile, Imagen can edit unedited photos in the cloud at remarkable speeds, often in less than half a second per image. The edits are then directly imported back into your Lightroom catalog.
For newer photographers or those who admire the style of industry leaders, Imagen also offers "Talent AI Profiles." These are AI profiles built by analyzing the complete editing styles of world-renowned photographers, allowing you to apply their sophisticated, AI-powered aesthetic to your own work.
Presets vs. AI Editing: A Comparative Look
| Feature | Lightroom Presets | Imagen AI Editing |
|---|---|---|
| Application | Applies the same saved group of static settings to every photo. | Analyzes each photo individually and applies unique, intelligent adjustments based on the imageâs specific content. |
| Consistency | Provides a good baseline for a consistent look, but requires manual adjustments. | Delivers excellent consistency by adapting the edit to each photo, regardless of lighting or subject. |
| Personalization | Highly personal if created by you; adopts the style of the creator if purchased. | Creates a deeply personalized "Personal AI Profile" that learns from your own past edits and evolves with you. |
| Workflow Role | A single, valuable step in a manual editing process. | Can be a comprehensive workflow solution, including AI-powered culling and editing. |
| Adaptability | Not adaptable; presets for sunny days may perform poorly indoors without correction. | Highly adaptable; edits intelligently adjust to diverse lighting and scene conditions. |
Ultimately, while Lightroom presets offer a significant boost in efficiency and consistency, AI-powered editing solutions like Imagen represent the future of professional post-production. They automate the repetitive, technical aspects of editing, freeing up photographers to focus on their creative vision, client relationships, and the art of capturing compelling stories.