Lightroom Develop Presets are powerful tools that allow photographers to apply a consistent look and feel to their images with a single click. These pre-defined settings act as a starting point for editing, offering a significant time-saving advantage and a pathway to developing a unique photographic style. Whether you're a beginner looking to explore different editing aesthetics or an experienced professional aiming for efficiency, understanding how presets work, how to create them, and how to manage them is crucial for maximizing your Lightroom workflow.
What are Lightroom Develop Presets?
At their core, Lightroom presets are essentially saved sets of editing adjustments. When you make a series of modifications to a photograph in the Develop module - adjusting exposure, contrast, color balance, tone curves, and more - you can package these specific settings into a preset. This preset can then be applied to other photographs, instantly replicating the same look and feel. This capability was a significant feature even when Lightroom was in its beta stages, allowing users to transfer edits between images without the need for them to be from the same photoshoot.
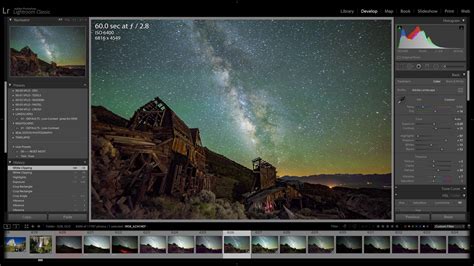
A set of default presets is readily available within the Presets panel of the Develop module. These built-in presets offer a diverse range of styles, from monochromatic looks to vibrant color enhancements, providing immediate options for users to experiment with. By hovering over these default presets, users can often see a live preview of how the preset would affect their current image in the Navigator panel, offering a quick way to visualize the potential outcome before committing to an edit.
The Power of Customization: Creating Your Own Presets
While default presets are a great starting point, the true power of presets lies in the ability to create your own. This allows you to develop a signature style that is uniquely yours. The process begins with making the desired adjustments to your photograph in the Develop module. For instance, you might start by altering the Tone Curve. A common technique for achieving a faded, retro look involves adjusting the Tone Curve by clicking about one-third of the way from the bottom and then dragging the square point on the bottom right of the box upwards while holding the Shift key. This action specifically fades the blacks, imparting a matte-finish aesthetic.
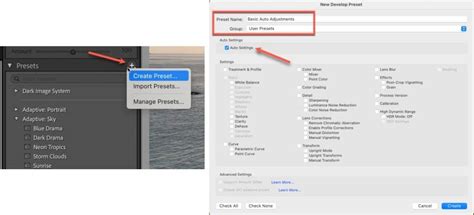
Once you've achieved the look you desire, you can save these settings as a new preset. This is done by navigating to the Presets panel, clicking the plus (+) icon in the panel header, and selecting "New Preset." Alternatively, you can use the keyboard shortcut: Shift + Control + N on a PC or Shift + Command + N on a Mac.
Saving and Organizing Your Presets
When creating a new preset, you'll encounter the "New Develop Preset" dialog box. Here, you have several options that influence how the preset will be applied and managed.
- Naming Your Preset: While creative or artistic names might be appealing for commercial presets, for personal use, it's often more practical to use a name that clearly indicates what the preset does. This aids in quick identification and selection later on.
- Choosing Where to Save: You can create new folders for your presets to keep them organized. For example, if you've created a set of presets focused on tone curves, you might create a folder named "Tone Curves." This hierarchical organization is particularly useful as your preset library grows.
- Inclusion of Settings: By default, all current settings are saved within the preset. However, this can sometimes lead to presets that are too specific and may not work well on images that differ significantly from the one used to create the preset. Lightroom offers more granular control over what settings are included:
- Saving All Settings: This is the default option and includes every adjustment made.
- Excluding Exposure: By choosing to exclude Exposure, any changes to the image's overall brightness will remain intact, allowing the preset to focus on other aspects like color or tone. This is particularly useful for presets that aim to impart a specific color grade without altering the fundamental exposure.
- Saving Specific Settings: You can also choose to save only the settings that are actively making the desired changes, providing even more tailored control.
- Support Amount Slider: When creating or updating a preset, you have the option to enable the "Support Amount Slider." This crucial feature, found in the "New Develop Preset" or "Update Develop Preset" dialog box, allows you to control the intensity of the applied preset using the Amount slider in the Develop module's Presets panel. This adds a dynamic layer of control, enabling you to fine-tune the preset's effect rather than applying it at full strength.
ISO-Based Presets: Tailoring Edits to Camera Settings
Lightroom also provides the capability to create presets based on the ISO setting of your images. This is particularly useful for photographers who shoot in varying lighting conditions and utilize different ISO values. By creating ISO-specific presets, you can apply adjustments that are optimized for the noise characteristics and dynamic range typically associated with particular ISO settings, leading to more consistent and refined results.
Managing and Importing Presets
Lightroom offers robust tools for managing your collection of presets, including importing and exporting them.
Importing Presets
You can import presets in several ways:
- Individual Preset Files (.lrtemplate or .xmp): In the Presets panel of the Develop module, click the plus (+) icon and choose "Import Presets." Navigate to the location of your preset files, select them, and click "Import."
- ZIP Files: Beginning with Lightroom Classic CC 7.5 (August 2018 release), you can bulk import XMP presets and profiles, DCP profiles, and LCP profiles as part of a zip file. Use the same import process as for individual files, selecting the zip archive.
- Via Right-Click: In the Presets panel, you can right-click on a desired preset group and select "Import Presets" to bring in new presets.
Exporting Presets
You can share your custom presets with others by exporting them. Right-click on the preset you wish to export in the Presets panel and select "Export." This will generate a file (typically with an .lrtemplate or .xmp extension) that can be shared.
Showing and Hiding Preset Groups
The "Manage Presets" dialog box allows you to control which preset groups are displayed in your Presets panel. This helps declutter your workspace and makes it easier to find the presets you use most often.
Built-in Presets: Limitations
It's important to note that you cannot export or delete the built-in Lightroom Classic presets or preset groups. These are provided by Adobe and are fundamental to the software's functionality. Custom (user) presets, on the other hand, are stored by default in the Lightroom Classic folder, though you can opt to "Store Presets With Catalog" for easier portability with a specific catalog.
Beyond Basic Adjustments: Understanding Process Versions and Color Management
Lightroom's editing capabilities are underpinned by sophisticated technologies, including process versions and color management, which influence how presets are interpreted and applied.
Process Versions
The "Process Version" refers to the underlying Camera Raw technology that Lightroom Classic uses to adjust and render photos in the Develop module. Different process versions offer varying levels of control and image processing algorithms.
- Process Version 5: This version provides improvements to negative dehaze functionality and enhances image quality for high-ISO raw files.
- Process Version 2012 (PV2012): Images edited for the first time in Lightroom 4 and later versions utilize PV2012 by default. This version introduced new tone controls and advanced tone-mapping algorithms, particularly beneficial for high-contrast images. With PV2012, you gain enhanced control over Highlights, Shadows, Whites, Blacks, Exposure, and Contrast directly within the Basic panel.
- Process Version 2010 (PV2010): Images edited in Lightroom 3 used PV2010 by default.
Understanding process versions can be important when troubleshooting unexpected results from presets, as a preset created with one process version might behave differently when applied to an image with a different version active. You can check and change the process version by navigating to Settings > Process.
Soft-Proofing and Color Management
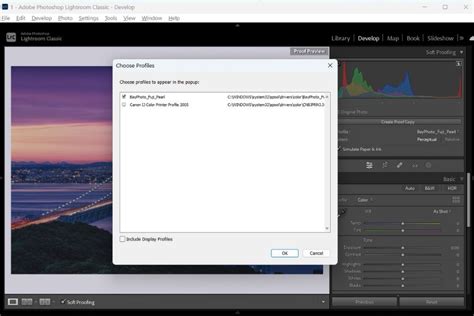
Soft-proofing is a critical capability that allows you to preview how your onscreen photos will appear when printed and optimize them for specific output devices. This is achieved by simulating the output of a particular printer and ink combination.
- Profiles: A profile is a mathematical description of a device's color space. By default, the Lightroom Classic Develop module displays images using your monitor's profile. Soft-proofing allows you to convert from one color space to another, such as from your monitor's RGB space to the CMYK space of a printing press.
- Rendering Intents: When converting colors, you have rendering intents like "Perceptual." Perceptual is generally suitable for images with many saturated, out-of-gamut colors, as it shifts all colors proportionally to fit within the target color space while preserving relative relationships.
- Creating Proof Copies: To edit your photo to bring it within a desired color space for printing, you can click "Create Proof Copy." Lightroom Classic then generates a virtual copy, allowing you to make adjustments specifically for that output without altering your original image. If you begin making edits without creating a proof copy, Lightroom will prompt you, asking if you want to create one to preserve your original.
Advanced Editing and Workflow Tools
Lightroom offers a suite of advanced tools that complement the use of presets and enhance the overall editing workflow.
Snapshots and History
- Snapshots: You can save any state of a photo as a snapshot. This is incredibly useful for capturing specific editing milestones or variations of an edit before committing to further changes. Snapshots are listed alphabetically in the Snapshots panel.
- History Panel: The History panel meticulously records every adjustment made to a photo, including the date and time of import and any applied presets. Each subsequent adjustment is saved as a new state, listed chronologically. When the History panel becomes too extensive, creating snapshots of key states allows you to clear the panel and start fresh while retaining important edits.
Smart Previews for Performance
To improve Lightroom's performance, especially when editing large files or working on less powerful hardware, you can opt to edit Smart Previews of your photos. Smart Previews are smaller, optimized versions of your original files. Even when your originals are available, Lightroom can be set to edit Smart Previews. While this might temporarily display a lower quality image during editing, the final exported output will always be at the full size and quality of the original. This preference can be enabled in Lightroom's preferences.
Reference View for Targeted Editing
The Reference View in the Develop module provides a unique "2-Up" view, allowing you to place a static "Reference" photo alongside your actively editable "Active" photo. This is invaluable when you aim to replicate the look of one image in another. By default, both photos are displayed side-by-side. You can toggle between "Before" and "After" views of your active image by pressing the backslash key (\) or by choosing View > Before/After. While in Reference View, most develop tools are available, with the exception of the Crop tool, which will exit Reference View.
Reference View in Lightroom Classic
The Power of Sync and Auto Sync
Lightroom's synchronization features are essential for applying edits consistently across multiple images.
- Copy and Paste Settings: You can copy the develop settings from one photo and paste them onto others. This is done via Settings > Copy Settings and then navigating to the target photos to paste them.
- Sync Settings: In the Develop module, the Sync button (or Settings > Sync Settings) allows you to synchronize the settings of the current photo with other selected photos in the filmstrip.
- Auto Sync: Enabling Auto Sync (the switch located to the left of the Sync button) applies any adjustments you make in the Active photo to all selected photos in the filmstrip simultaneously. This is a powerful tool for batch editing, ensuring consistency across a series of images shot under similar conditions.
- Match Total Exposures: This command, available in both the Library and Develop modules, helps to equalize the exposure levels across a series of photos that may have varying exposures, leading to a more uniform look.
- Reference Photo Matching: When using Reference View with multiple photos selected, you can enable Auto Sync and then make adjustments to the Active photo to visually match the characteristics of the Reference photo.
The "Tool" and its Applications
Lightroom's "Tool" (often activated by pressing 'W' or selecting it from the Tools menu) allows for intuitive, targeted adjustments by directly manipulating elements within the image. You can select different targets from the "Target Group" pop-up menu in the toolbar. This tool is particularly useful for fine-tuning color and tone by dragging directly on specific areas of your photograph. A dot beneath the tool in the tool strip indicates its usage, with a red dot signifying that the feature requires an update.
HDR Editing Capabilities
Lightroom now supports High Dynamic Range (HDR) editing. By selecting "HDR" in the Basics panel, you can display, edit, and export images in HDR. This feature provides enhanced visualisations in histograms, making it easier to adjust and edit images with a wider range of tones.
Understanding Panel Controls and Visual Feedback
Lightroom's Develop module provides clear visual feedback on applied settings and offers granular control over panel adjustments.
- Individual Eye Indicators: Each panel in the Develop module features an "eye indicator." Clicking this indicator toggles the visibility of the settings within that panel, allowing you to temporarily disable them to see their effect. Holding down the eye icon can reveal a panel switch or an option to reset edits within that panel.
- Before/After Views: The ability to compare your edited image with its original state is fundamental. You can switch between "Before" and "After" views in Loupe view by pressing the backslash key (
\) or choosing View > Before/After. There are also options to view "Before Only," "After Only," or a split view. Buttons are available to copy settings from the "After" view to the "Before" view, or vice versa, and to swap between them. - Tool Strip Indicators: A dot appears under each tool in the tool strip to indicate its usage. A red dot suggests that the feature needs an update.
The Role of Presets in the Creative Process
Lightroom Develop Presets are more than just shortcuts; they are integral components of a creative workflow.
Learning and Exploration
The transparency of Develop Presets makes them excellent learning tools. Because nothing is hidden within a preset, users can examine the specific settings that contribute to a particular look. This allows photographers to deconstruct existing styles, understand the impact of different adjustments, and learn new techniques. For example, understanding how the Tone Curve affects contrast and fades blacks can be learned by analyzing a preset that achieves a matte finish.
Consistency and Style
For photographers who shoot a high volume of similar subjects, such as in event or portrait photography, presets are invaluable for achieving a consistent visual style across all images. This consistency is a mixture of photographic technique and Lightroom editing prowess.
Starting Point for Further Edits
Presets are rarely intended to be the final word on an image's edit. Instead, they serve as an excellent starting point. After applying a preset, photographers can then proceed to the right-hand panels to make further global or local adjustments, fine-tuning the image to perfection.
Sharing and Community
Develop Presets are designed for easy sharing among photographers. This fosters a sense of community and allows for the exchange of creative ideas and workflows. When you purchase or receive a preset from another photographer, you can import it into your Lightroom catalog and even use its settings to create your own derivative presets.
Where Presets Live on Your Computer
Understanding where your presets are stored can be helpful for backup and manual management. Your Lightroom Develop Presets are typically saved in a specific folder on your computer. Navigating to Lightroom Preferences (Edit > Preferences on PC, Lightroom > Preferences on Mac), then clicking the "Presets" tab, and finally selecting "Show Lightroom Presets Folder" will open the relevant directory. Within this folder, you'll find subfolders for different Lightroom modules, including "Develop Presets." When adding downloaded or purchased presets, it's often easiest to open this folder, create a new subfolder for organization, and drag your new presets into it, followed by restarting Lightroom to ensure they are loaded.
Conclusion
Lightroom Develop Presets are a cornerstone of efficient and creative photo editing. From applying quick stylistic changes to establishing a consistent visual identity, their utility is vast. By understanding how to create, import, manage, and leverage presets in conjunction with Lightroom's advanced features like process versions, soft-proofing, and synchronization tools, photographers can significantly enhance their workflow, unlock new creative possibilities, and ultimately, produce more compelling images. They transform the editing process from a series of individual adjustments into a more streamlined and artistic endeavor.