Photoshop's layer system is a cornerstone of its powerful image editing capabilities, allowing for non-destructive workflows and intricate control over individual elements within a design. While merging layers can streamline a project by combining multiple elements into a single unit for easier manipulation, there are often times when the need arises to revert this process and reclaim the distinctiveness of each original layer. This article will delve into the various methods available for unmerging layers in Photoshop, exploring both immediate solutions and preventative strategies for maintaining flexibility in your editing process.
Understanding the Concept of Layers and Merging
Before diving into unmerging, it's crucial to understand what layers are and how merging functions. A layer in Photoshop can be thought of as a transparent sheet in a stack, each containing a different part of your image. This could be a specific object, text, a section of another image, or even adjustments. Each layer can be edited independently without affecting the others, offering immense flexibility.
Merging layers combines two or more selected layers into a single layer. This can be done through the Layer > Merge Layers menu option or by using the keyboard shortcut Ctrl + E (Windows) or Cmd + E (Mac). When layers are merged, their content becomes one, and the order of the original layers dictates their stacking order in the new, combined layer. For transparent layers, a default blend mode is applied, which can be adjusted. Layer merging is a powerful tool for creating seamless composites or for consolidating complex designs.
The Necessity of Unmerging Layers
While merging layers can simplify a workflow, situations arise where unmerging becomes essential. The primary reasons include:
- Separating Elements: You might need to extract text or an image from its background to place it on a new canvas or apply different effects.
- Revisiting Individual Edits: After merging, you might realize a specific element within the merged layer needs further individual adjustment, which is impossible on a single, combined layer.
- Client Approvals: Sometimes, you need to send flattened versions of a design (like JPEGs) for client approval, but you need to retain the original layered PSD for further work. Unmerging allows you to re-access these layers after creating flattened previews.
Methods for Unmerging Layers
Photoshop offers several ways to undo a layer merge, depending on how recently the action was performed and your workflow.
Approach 1: The Undo Command (Ctrl+Z / Cmd+Z)
This is the most immediate and straightforward method, but it's only effective if you've just merged the layers and haven't performed many subsequent actions.
- Open your document in Photoshop.
- If you have just merged layers, you can immediately use the undo function.
- Press
Ctrl + Z(Windows) orCommand + Z(Mac) to undo the last action. If multiple actions were performed after the merge, you can use this shortcut repeatedly to step backward through your editing history until the merge is undone. Alternatively, you can go toEdit > Undo.
Important Note: This method is destructive in the sense that any edits made after the merge will also be undone. Therefore, it's best used for very recent merges.
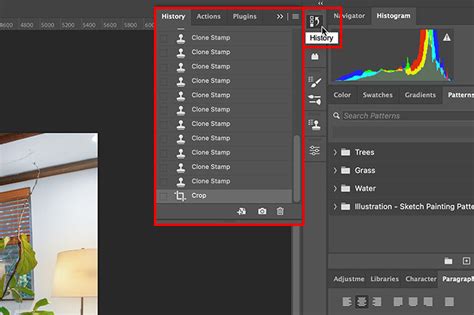
Approach 2: Utilizing the History Panel
The History panel provides a more robust way to revert to a previous state, even if you've performed several actions after merging. It keeps a log of your editing session.
- Ensure the History panel is visible. If not, go to
Window > History. - The panel lists all the steps taken during your current Photoshop session. Scroll down the menu to find the point just before you merged the layers.
- Click on the state preceding the "Merge Layers" action. Photoshop will revert your document to that exact state, effectively unmerging the layers and restoring them as they were before the merge.
Customizing History States: The default setting for the History panel shows 50 steps. You can increase this number for more flexibility by going to Edit > Preferences > Performance and adjusting the "History States" value. However, be mindful that a higher number of history states can consume more RAM and potentially slow down your system's performance.
Approach 3: Layer Masks for Manual Separation
This method is more involved but offers granular control, especially when the "undo" or "history" methods are no longer viable or when you need to precisely separate overlapping elements. This method is quite effective when the contents on the merged layers are not overlapped, as overlapping can distort contents and reduce their quality.
- Open your document in Photoshop.
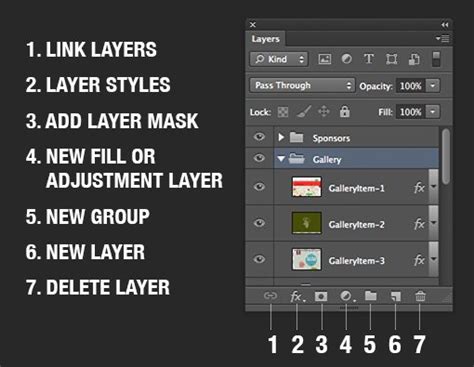
- Go to the
Windowmenu and click onLayersto open the Layers panel. - Duplicate the merged layer for each element you wish to separate. For example, if your merged layer contains a person and a background, you'll need at least two duplicates.
- Add separate layer masks to each duplicate layer and the original. To do this, select a layer and click the "Add layer mask" icon at the bottom of the Layers panel.
- Activate the layer mask. Click on the thumbnail of the layer mask.
- Use the Brush Tool:
- Select the Brush Tool.
- Set your foreground color to black to hide parts of the layer, and white to reveal them.
- On the first duplicate layer's mask, paint with a black brush over everything except the element you want to isolate. For instance, if you want to isolate the person, paint black over the background.
- On the second duplicate layer's mask, paint with a black brush over everything except the background.
- This process effectively brings each element onto its own layer.
Photoshop Tutorial: Layer Masking, Advanced
Merging Layers Safely: Avoiding Destructive Practices
While unmerging is possible, the most efficient approach is to adopt non-destructive merging techniques from the outset. This ensures your original layers remain intact and editable.
Option 1: Grouping Layers
Instead of merging, group layers that you want to manage together. This visually cleans up your Layers panel and allows you to apply transformations or adjustments to the entire group while still retaining individual layer control.
- Select the layers you wish to group in the Layers panel.
- Press
Command + G(Mac) orControl + G(Windows) to create a new group. - Alternatively, you can click the folder icon at the bottom of the Layers panel or right-click on the selected layers and choose "Group Layers."

Option 2: Converting to Smart Objects
Smart Objects are a powerful feature that embeds the content of one or more layers into a single layer while preserving their original editability.
- Select the layers you want to combine.
- Right-click on the selected layers and choose
Convert to Smart Object. - An intelligent object indicator will appear on the layer thumbnail.
- To edit the contents of a Smart Object, double-click its thumbnail. This will open the Smart Object in a new tab where you can edit each individual layer. Save the changes within this tab, and they will update in your main project.
- If you later decide to separate the layers within the Smart Object, right-click on the Smart Object layer and select
Convert to Layers. This will place each individual layer within a group folder.
Smart Objects are an excellent alternative to destructive merging because they allow you to edit or change their contents at any moment without losing the original layer data.
Option 3: Merging into a New Layer
This method allows you to create a merged version of selected layers while keeping the originals untouched.
- Select the layers you intend to merge.
- Press
Command + Option + Shift + E(Mac) orControl + Alt + Shift + E(Windows). This command merges all currently visible layers into a brand new layer at the top of the layer stack, leaving all your original layers intact. - You can then hide the original layers if you wish, or keep them for future edits.
Frequently Asked Questions About Unmerging Layers
Q: How do I unmerge all layers at once?
A: If you have just merged layers, the Edit > Undo Merge Visible or Ctrl+Z/Cmd+Z shortcut will undo the last merge action. If you need to go back further, the History panel is your best tool. For truly unmerging layers that have been merged and saved over time without a History state available, you would need to rely on methods that preserve original layers, like Smart Objects or duplicating before merging.
Q: Can you unmerge layers after saving the Photoshop file?
A: If you've saved the file after merging layers and closed Photoshop, the undo history is lost. In this scenario, your ability to unmerge depends on whether you employed non-destructive methods like Smart Objects or grouping before saving. If you merged destructively and saved, you generally cannot unmerge them without reverting to an older version of the file (if available) or using advanced recovery techniques.
Q: What is the difference between merging layers and flattening an image?
A: Merging layers typically refers to combining selected layers into one or more new layers, while still allowing you the choice to merge only visible layers or specific selections. Flattening an image, on the other hand, combines all visible layers into a single background layer, discarding all layer information and making individual layer editing impossible. Both are generally considered destructive processes.
By understanding these methods and adopting preventative, non-destructive workflows, you can maintain maximum flexibility and control over your Photoshop projects, ensuring that the power of layers remains at your fingertips.