Exporting images from Adobe Lightroom is a critical step in the post-processing workflow, especially when the final destination is a physical print. The settings chosen during the export process directly influence the quality, appearance, and suitability of the image for various printing needs. Incorrect settings can lead to pixelation, loss of detail, or colors that don't match expectations. This guide will delve into the essential Lightroom export settings to ensure your photographs translate beautifully from screen to paper, covering everything from file naming to resolution and sharpening.
The Foundation: File Naming and Organization
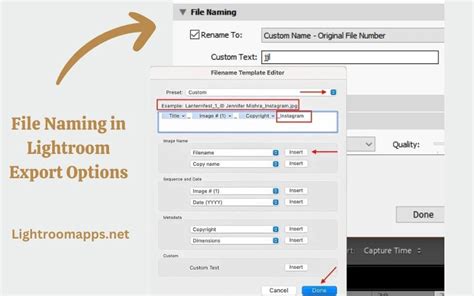
A well-organized workflow begins with proper file management. The first part of the Lightroom Export Dialog box is dedicated to file naming, which is a really important step in maintaining an organized workflow. Even if you’ve already renamed your original images in Lightroom, you can also rename files on export, or choose to keep the filename as it is. This flexibility allows for consistent naming conventions across your projects.
Lightroom offers several convenient options for naming exported files:
- Custom Name - Sequence: This option is ideal for exporting several images at once with the same custom name, followed by a sequential number. You can specify the starting number for the sequence, ensuring a logical order.
- Custom Name - (x of y): Similar to the above, this allows you to export several images at once with the same custom name, but it also includes information indicating how many images are in the sequence and where each individual image fits within that sequence. This is particularly useful for projects with a defined set of images.
- Filename - Sequence: If you prefer to retain the original filenames from your Lightroom Catalog, this option will export the files with their existing names, appended with a sequence number.
For more granular control, the Edit option opens the Filename Template Editor. Here, you can use an existing filename option as a base and then adjust it to suit your specific needs. This is a quick way to make a slight change to a setting. By clicking on any of the options and then clicking edit, that file naming option shows, and you can adjust it to suit your needs. The Example text above the editing box provides a clear preview of what your filename will look like before you commit to the changes.
Optimizing Image Quality for Print: Resolution and Quality Settings
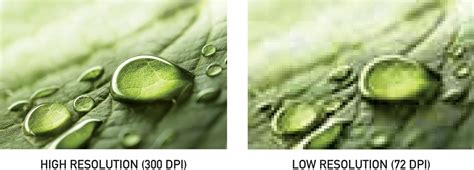
When preparing images for printing, resolution and image quality are paramount. These are important settings for ensuring that an exported photo is the appropriate size for the intended use. If it’s too small it will appear pixellated.
The Resolution setting is fundamental. For web use, a resolution of 72 pixels per inch (ppi) is generally sufficient. However, for print use, a significantly higher resolution is required. The standard recommendation for high-quality prints is 300 ppi. This ensures that the image contains enough detail to be rendered sharply when enlarged to print dimensions.
The Rec. Quality setting directly impacts the file size and the level of compression applied. The higher your quality is set, the bigger the file size will be. While it might be tempting to always set image quality to 100%, you don’t always need image quality to be set to 100%. For most professional printing purposes, a quality setting of 80-90% is often sufficient and can help manage file sizes without a noticeable degradation in visual quality. However, if you are printing very large formats or require absolute maximum fidelity, then 100% quality might be considered. It’s crucial to balance quality with file size, especially if you have a large number of images to export.
The Role of Resizing
Lightroom offers a Resize to Fit option within the export dialog. While it’s possible to leave this box unticked and simply input a resolution of 300 ppi, allowing the image to be printed to any size without losing quality, there are times when resizing can be beneficial. For specific print sizes, pre-resizing the image to the relevant aspect ratio before exporting can help to get maximum quality on export. For example, if you know you are printing an 8x10 inch photograph, you can set Lightroom to resize to those dimensions at 300 ppi. This preemptive resizing ensures that the image is already optimized for the intended print dimensions, preventing potential issues that might arise from the print lab’s resizing algorithms. I’ve never set the print size using pixels, preferring to rely on the ppi setting in conjunction with desired print dimensions.
Output Sharpening: A Delicate Balance for Prints
Sharpening is an essential post-processing step, but its application during export requires careful consideration, especially for printing. The sharpening export setting for printing depends on your print lab. Some professional print labs apply sharpening on their end, some don’t. For consumer print labs, you need to add sharpening, but be careful not to go mad on the sharpening.
If you’ve already sharpened your image as part of your editing process in Lightroom, there’s no need to do so again in the output sharpening section. Over-sharpening can lead to unnatural-looking artifacts, halos around edges, and a loss of fine detail, making the image appear harsh and unappealing. It’s a common misconception that sharpening on export is a way to fix an unsharp image; don’t be tempted to set output sharpening to high as a way of sharpening an unsharp image. This will only exacerbate the problem.
Crucially, check with your print lab before sharpening images on export. Many professional labs have their own sharpening processes and may apply it to your images, potentially leading to over-sharpening if you’ve already applied it. I learned the hard way not to sharpen on export for my print lab when I received a ridiculously sharp and unflattering 40-inch acrylic wall print for a portrait client and had to reorder the item. This experience highlights the importance of communication with your print provider. If your print lab does not apply sharpening, then you can select the appropriate level of output sharpening in Lightroom, typically choosing "Print" as the intended use, and then selecting a "Standard" or "High" amount based on your preference and the type of paper being used.
Sharpening EXPLAINED!!! #lightroom #photoediting #photography #photographer #photoeditor #photoshop
File Formats and Color Space for Printing
When exporting for print, the choice of file format and color space significantly impacts the final output. Within the export dialog box, scroll down to File Settings and click on the Image Format box.
File Formats:
- Original or DNG: Selecting Original or DNG (Digital Negative) is often the best choice for printing. Your photo will be saved as a .dng file, which is a digital negative and therefore a raw file. This preserves the maximum amount of image data, offering the most flexibility for the print lab to work with. If you select Original, you don’t need to make any other changes to export settings, as this essentially exports an uncompressed version of your image.
- TIFF: For maximum compatibility and quality, especially if you're working with a print lab that requires a specific uncompressed format, TIFF is an excellent choice. It supports lossless compression and can embed color profiles.
- JPEG: While commonly used, JPEG is a lossy compression format. For printing, it's generally advisable to export JPEGs at the highest quality setting (100%) to minimize compression artifacts. However, TIFF or DNG are generally preferred for critical print work.
Color Space:
The color space determines the range of colors that can be represented. For printing, it is generally recommended to export in Adobe RGB (1998) or ProPhoto RGB. These color spaces offer a wider gamut of colors compared to sRGB, which is typically used for web display. Using a wider color space ensures that more of the colors captured by your camera are preserved and can be reproduced by the printer. If your print lab specifies a particular color space, always adhere to their recommendations. If unsure, Adobe RGB (1998) is a safe and widely supported choice for print.
Watermarking and Post-Export Actions
Lightroom provides tools to apply watermarks and define actions to be taken after the export process is complete.
Applying Watermarks:
You can apply a watermark to images as part of the Lightroom export process. This export setting applies to digital images only, unless of course you want your watermark to appear on prints. If you want your watermark to be visible on prints, you can set up a custom photo watermark here. This is a great way to protect your work or brand your images before they are sent to the printer. You can choose from text-based watermarks or import your own graphical logo.
Post-Export Actions:
This section gives Lightroom instructions on what to do after you’ve exported your photos, which is a personal preference based on your preferred editing workflow. A common option is Open in Another Application. Once selected, you need to choose an application to open your photos in by clicking the triangle next to the Choose button. A window opens to choose an application. This can be useful for immediately sending files to a print service, opening them in another editing program for further refinement, or archiving them.
Batch Exporting and Presets: Saving Time and Ensuring Consistency
For photographers who handle a large volume of images, such as wedding or portrait photographers, batch exporting is an indispensable feature. Adobe Lightroom first introduced batch exporting from Lightroom in 2020. It is a huge time saver for portrait and wedding photographers who supply clients with a large number of images! By selecting multiple images in the Library or Develop module and initiating the export process, you can apply the same settings to all selected files simultaneously.
This is where export presets become incredibly valuable. Export presets are really easy to set up once you’ve decided on your export settings for a particular purpose. Such a time saver! Once you've dialed in the perfect settings for a specific print size, paper type, or client, you can save these settings as a preset. This allows you to quickly select that preset the next time you need to export images for the same purpose, ensuring consistency and eliminating the need to reconfigure settings each time. To create a preset, simply configure all your desired export settings, and then click the "Add" button under the "Presets" panel in the Export dialog.
The final, and arguably easiest, step in the export process is this last one - hit that Export button! With your settings meticulously configured and your presets ready, the export process becomes a streamlined and efficient part of your workflow.
Avoiding Common Misconceptions
It's important to address some common misconceptions regarding export settings:
- "Higher is always better": While high quality and resolution are crucial for print, simply setting everything to maximum may not always yield the best results and can lead to unnecessarily large files. Understanding the specific requirements of your print lab and the intended print size is key.
- "Sharpening on export fixes blurry photos": As discussed, sharpening on export is for fine-tuning the image's sharpness for the print medium, not for correcting fundamental focus issues or motion blur.
- "Low resolution means bad quality": Low resolution is indeed problematic for print, but for web use, a lower resolution (like 72 ppi) is appropriate and doesn't inherently mean bad digital image quality. It simply means the image is optimized for screen viewing.
- "sRGB is fine for print": While some print labs may accept sRGB, using a wider color space like Adobe RGB (1998) or ProPhoto RGB will generally result in a broader and more accurate color reproduction on print.
By understanding and implementing these Lightroom export settings, you can ensure that your photographs are prepared to the highest standard for printing, translating your digital vision into tangible, high-quality prints.