The transition from iPhone photos to your Mac can sometimes present an unexpected hurdle: the HEIC file format. While this modern, efficient format offers significant advantages in terms of storage space and image quality, its compatibility with older devices and software can be a significant drawback. For users who have recently transferred a large collection of photos, such as over 2,000 images from an iPhone to a Mac, the prospect of converting them one by one is daunting. This guide delves into efficient and hassle-free methods for converting HEIC to JPG on a Mac, ensuring original image quality is retained and offering solutions for both individual files and large batches.
Understanding HEIC: The High-Efficiency Image Container
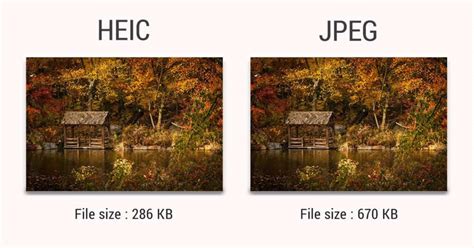
High-efficiency image container (HEIC) is the default format for storing images on iPhones and Macs, adopted by Apple since iOS 11. This format is a testament to technological advancement, utilizing advanced compression techniques to deliver smaller file sizes without compromising image quality. In essence, HEIC offers a way to store brilliant images in a fraction of the space, often outperforming JPEG/JPG in terms of compression and quality retention. Imagine fitting a vast, detailed landscape into a compact suitcase without wrinkling or losing a single detail - that's the essence of HEIC. This high compression, space-saving format takes up very little storage, while maintaining the quality of your images.
Why Convert from HEIC to JPG?
Despite its clear advantages, HEIC is not universally supported. While HEIC boasts excellent compression and quality, it still has a lot of catching up to do when compared to older image formats. JPG, on the other hand, has a long history and has established itself as the go-to image format.
The primary reasons for converting HEIC to JPG stem from compatibility and ease of sharing. Because HEIC isn’t as widely adopted, it is more difficult to share or use it on other devices. While several contemporary editing tools now support the HEIC format, compatibility is not yet universal. For professionals such as artists, designers, or photography enthusiasts who frequently edit their images, converting to JPG often presents a more practical solution. JPG may lose a little image quality during compression, but they can be a user-friendly alternative to HEIC.
Built-in macOS Tools for HEIC to JPG Conversion
For many users, the most accessible solutions are often the ones already present on their operating system. macOS offers built-in tools that can handle HEIC to JPG conversions, though their efficiency can vary, especially with large volumes of files.
Using Preview for Individual Conversions
Preview, the default image viewer on macOS, is a capable tool for converting HEIC files to JPG. This method is straightforward for single images or a small selection.
- Open the HEIC file: Navigate to the HEIC image you wish to convert and open it with Preview.
- Initiate Export: In Preview, click on ‘File’ in the menu bar, then select ‘Export.’
- Choose Format and Save: From the ‘Format’ dropdown menu, select ‘JPEG.’ You can also adjust the quality slider to balance file size and image detail. Then, click ‘Save.’
While this process is effective for individual files, users have reported that using Preview for batch conversion can be very slow, with the Mac fan spinning wildly, and it occasionally crashes when dealing with a large number of photos.
Changing Default Save Settings on macOS
To proactively save new images as JPGs, macOS allows you to change the default format.
- Saving or downloading a new image onto your Mac: You can also change the default for screenshots on your Mac from HEIC to JPG. This setting primarily affects new captures and downloads, not existing HEIC files.
Advanced and Third-Party Solutions for Batch Conversion
When dealing with thousands of HEIC files, the limitations of built-in tools become apparent. Fortunately, several third-party applications and online services offer more robust and efficient batch conversion capabilities.
Dedicated Mac Applications for HEIC Conversion
Several applications are designed specifically for the task of converting HEIC files, offering speed, reliability, and often, the ability to preserve original image quality.
TunessBro HEIC Converter for Mac
TunessBro HEIC Converter for Mac is frequently recommended as a highly effective application for this purpose. It is designed to handle large volumes of HEIC files efficiently, making it ideal for users who have transferred extensive photo libraries. The application prioritizes maintaining the original image quality during the conversion process, addressing a common concern among users who want to avoid compressed and blurred results.
iMazing Converter
iMazing Converter is a free, lightweight application developed by iMazing, known for its robust iOS management tools. This app is crafted with the community in mind, focusing on essential features for converting HEIC photos to JPEG or PNG, and HEVC videos to MP4. A significant advantage of iMazing Converter is that all processing is done strictly on your device; nothing is transferred to the cloud, and no internet connection is required, ensuring user privacy.
Here's how to convert HEIC to JPEG using iMazing Converter:
- Download and Install: Download and install iMazing Converter. If you are already an iMazing user, the converter is packaged within the main iMazing application and can be launched from the Tools menu.
- Launch and Import: Launch iMazing Converter. Drag and drop HEIC files, or folders containing them, directly into the application's window.
- Specify Settings: Choose your desired output format (JPEG or PNG) and adjust quality and resolution settings as needed.
- Convert: Click ‘Convert’ and select a target location to save the converted files. The application will show the progress of the conversion, which may take some time for large batches.
This method ensures you have JPEG files that are more compatible with a wider range of devices and software.
DocuFreezer and ImageMagick
For users seeking more flexible and robust conversion tools that don’t rely on an internet connection, options like DocuFreezer and ImageMagick are excellent choices.
- DocuFreezer: This application is a versatile tool that can convert various file formats, including HEIC, to more common ones like JPG. It is designed for ease of use and batch processing.
- ImageMagick: A free, open-source command-line tool, ImageMagick is ideal for users comfortable with terminal commands. It offers extensive control over image manipulation and conversion, making it a powerful option for batch processing and custom workflows. While it requires a steeper learning curve, its flexibility is unparalleled.
Online Conversion Tools: Convenience with Caveats
Online converters offer a quick and convenient way to convert a few HEIC files without installing any software. However, they often come with limitations that can make them impractical for large-scale conversions.
- File Number Limits: Many online tools have restrictions on the number of files you can convert at once or the total file size.
- Upload/Download Hassle: Uploading large numbers of photos and then downloading the converted files can be time-consuming and cumbersome.
- Privacy Concerns: For sensitive images, uploading them to third-party servers may raise privacy concerns.
Despite these drawbacks, for occasional conversions, some popular online tools include:
- Convertio: A versatile online converter that supports a wide range of file formats.
- CloudConvert: Similar to Convertio, CloudConvert is a robust online platform supporting numerous formats, including HEIC to JPG.
- Canva: While primarily a design tool, Canva’s upload feature can be used to convert HEIC files to JPG. Choose ‘Uploads’ on the left sidebar, then either select your image from your device or drag and drop the HEIC photo onto the converter.
Cloud-Based Image Management Solutions
For professionals and businesses, cloud-based services offer powerful solutions for managing and converting images at scale.
Cloudinary
Cloudinary is a robust cloud-based service tailored for image and video management. It’s not just about storing your media; it’s engineered to transform, optimize, and deliver your content seamlessly.
Using Cloudinary for HEIC to JPG conversion:
- Create an Account: If you’re new to Cloudinary, the first step is to create an account.
- Upload HEIC Images: Once inside your dashboard, navigate to the ‘Media Library’ tab and click the ‘Upload’ button. Cloudinary automatically detects the format of your uploaded image.
- Convert via URL: To convert an HEIC image to JPG, all you need to do is deliver or fetch the image via a URL and set the format to ‘.jpg’. Your converted JPG image will then be available in the Media Library.
- Detailed View and Transformations: Click on the image thumbnail for a detailed view. Cloudinary also offers granular control over transformation and optimization settings, allowing you to fine-tune your converted images.
This method is particularly useful for developers and those who need to integrate image conversion into their workflows programmatically.
Cloudinary + n8n: Upload Binary Files and Get a Public Image URL
Proactive Camera Settings: Preventing Future Conversions
To save yourself the trouble of converting later, you can change your iPhone’s camera settings to capture photos in JPG format by default.
- Navigate to Settings: On your iPhone, go to ‘Settings.’
- Select Camera: Scroll down and tap on ‘Camera.’
- Choose Formats: Tap on ‘Formats.’
- Select Most Compatible: Under the ‘Photo Capture’ section, select ‘Most Compatible.’ This will ensure that your iPhone captures photos in JPG format, which is universally compatible.
When Apple released iOS 11, it introduced new file formats: HEIF/HEIC for photos and HEVC for videos. These formats offer superior quality at much smaller file sizes than their predecessors, JPEG and MP4. However, many older computers, apps, and devices do not support these new formats. By choosing ‘Most Compatible,’ you instruct your iPhone to convert HEIC to JPG during the transfer process to your Mac.
It's important to note that some users have reported that toggling the transfer setting to "Automatic" under Phone > Settings > Photos does not always work as expected, and everything is imported in the format it was taken in. Therefore, explicitly setting the camera format to "Most Compatible" is a more reliable approach for ensuring JPG output.
Navigating the HEIC vs. JPG Landscape
While HEIC offers superior efficiency, the practicalities of sharing and compatibility often make JPG the preferred format for many users. Understanding the differences between HEIC and JPG can help you make informed decisions about when and how to convert.
- Universality and Compatibility: JPG has been the standard for decades, ensuring broad compatibility across virtually all devices and platforms. HEIC, while gaining traction, is still relatively new and not as universally supported.
- Ease of Sharing: Due to its widespread support, sharing JPG files is generally seamless. HEIC files may require conversion before they can be viewed or used by recipients using non-Apple devices or older software.
- Image Quality vs. File Size: HEIC excels at providing high quality with smaller file sizes, thanks to advanced compression. JPG, while still capable of good quality, may involve some loss during compression, and its file sizes are generally larger than HEIC for equivalent quality.
- Editing and Tools: While support for HEIC in editing software is growing, JPG remains the more consistently supported format, offering a more reliable workflow for professionals and hobbyists alike.
Ultimately, the choice between HEIC and JPG often boils down to your specific needs and the ecosystem you operate within. For maximum compatibility and ease of use, especially when sharing photos or using them with a wide range of applications and devices, converting HEIC to JPG on your Mac is a practical and often necessary step. By utilizing the methods outlined in this guide, you can efficiently manage your photo library and ensure your images are accessible and usable across all your platforms.