The ability to effectively crop and straighten an image is fundamental to compelling photography. Adobe Lightroom Classic, a powerhouse for photo organization and editing, offers a robust and versatile Crop Tool that goes far beyond simply trimming unwanted edges. This tool is not just about removing distractions; it's a crucial element in refining composition, achieving specific aspect ratios for various outputs, and correcting skewed horizons or perspectives. Understanding its nuances can significantly elevate the impact of your photographs. For the purposes of this article, we will be focusing on Lightroom Classic, though similar functionalities are available in Lightroom CC.
Accessing and Activating the Crop Tool
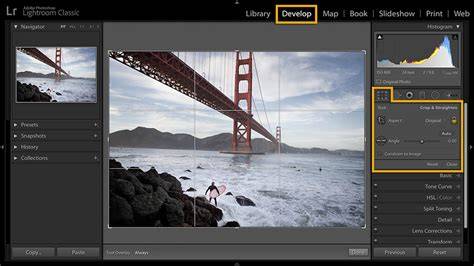
Initiating the cropping process in Lightroom Classic is straightforward. You can select a photo in the Library module that you intend to crop or straighten. Subsequently, navigate to the Develop module and locate the Crop tool within the tool strip positioned on the right side of the interface. Alternatively, and often more efficiently, you can simply press the "R" key on your keyboard. This action will activate the Crop tool and display the crop boundary around your selected image.
When you first select the Crop tool, you can click and drag within the image area to define an initial crop. Once this initial crop is established, you can precisely resize it by manipulating the handles that appear along the edges and corners of the crop marquee.
Straightening and Leveling Your Images
One of the most common and critical uses of the Crop tool is to correct tilted horizons or misaligned vertical lines. If your example photo is tilted a bit and the horizon is not level, Lightroom Classic provides several intuitive methods to rectify this.
For photos with an obvious horizon line, the most direct approach is to utilize the Angle tool within the Crop & Straighten panel. Simply select the Angle tool and then drag it along a portion of the tilted horizon in your photo. By doing this, you are instructing Lightroom Classic to recognize this line as the intended horizontal plane, and the software will automatically rotate the image to make it level.
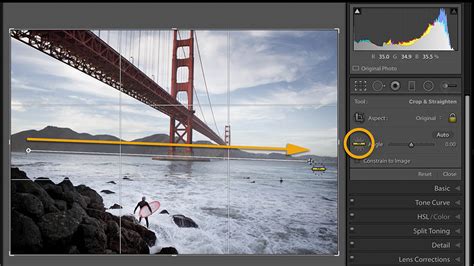
Another effective method for straightening involves manual rotation. Once the Crop tool is active, hover your cursor just outside the crop boundary. The cursor will transform into a curved, double-ended arrow. At this point, you can click and drag to rotate the photo within the frame until the horizon appears level.
Beyond the Angle tool and manual rotation, Lightroom Classic offers an "Auto" button within the Crop & Straighten panel. Clicking this button prompts Lightroom Classic to perform an automatic leveling adjustment, which is similar in function to clicking the "Level" button found in the Transform panel. This auto-leveling feature works best when the image possesses distinct horizontal or vertical lines that the software can detect.
Understanding Crop Aspect Ratios and the Lock Icon
The Crop tool in Lightroom Classic is also instrumental in adhering to specific aspect ratios, which are essential for various print, web, or video outputs. Before you begin resizing the crop area, it's important to note the state of the "Lock" icon within the Crop & Straighten panel.
If the lock is closed, it means that when you drag the crop boundary, the width and height will change together, maintaining the original proportion of your image. This is useful if you want to simply reframe your shot without altering its inherent aspect ratio.
However, if you wish to crop your photo to a different proportion, you need to open the Lock icon by clicking on it. Once unlocked, you gain the flexibility to drag the crop boundaries independently, allowing you to create custom aspect ratios.
For those who need to crop to preset proportions commonly used in the industry, Lightroom Classic offers a convenient menu. Click on the word "Original" in the Crop & Straighten panel. This action will open the Aspect menu, where you can select from a range of standard-size aspect ratios, such as 1:1 (square), 4:5, 5:7, or 16:9, among others.
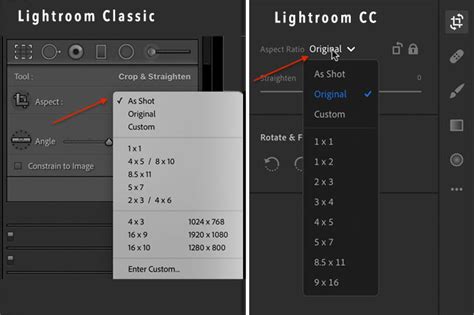
When you select a preset aspect ratio, the crop boundary will adjust accordingly to match the chosen proportion. You can also choose "Enter Custom…" from this list to define your own specific aspect ratio. Lightroom Classic conveniently saves the last five custom aspect ratios you have entered, making them readily accessible for future use.
Advanced Cropping Techniques and Overlays
Lightroom's Crop Tool, officially referred to as the Crop Frame Tool, is primarily employed to eliminate unwanted portions of an image or to straighten a crooked horizon. However, it also incorporates a powerful, albeit sometimes overlooked, feature: Overlays. These overlays serve as compositional guides, helping to eliminate guesswork when framing your shot.
To access these compositional aids, initiate any image crop by activating the Crop tool (R). Then, press the "O" key on your keyboard. Each press of the "O" key will cycle through different Crop Overlay options, offering various grid layouts. These can include the Rule of Thirds, the Golden Ratio, the Golden Spiral, and grid lines. If you want to change the orientation of the selected overlay (e.g., from horizontal to vertical lines), you can hold down the Shift key while pressing "O".
A helpful tip when evaluating cropping choices using overlays is to dim your screen. While cycling through the overlays by pressing "O", you can also press the "L" button to dim the surrounding interface. This allows for a clearer assessment of how the composition works within the selected overlay. The goal is always to create a composition that guides the viewer's eye through the image, rather than leading it to the edges.

Lightroom also provides overlays that specifically display different aspect ratios, which are invaluable for determining if an image will work well for a particular print size or for generally improving its composition. For instance, an image that might appear less dynamic in a 3:2 ratio could be significantly enhanced when cropped to a 4:3 ratio.
By default, the Crop Tool displays an overlay, and this can be set to "Always Show" via the Tools > Tool Overlay menu. This ensures that your chosen compositional guide is consistently visible as you work.
Non-Destructive Editing and Workflow Considerations
A crucial aspect of Lightroom's Crop Tool, and indeed all adjustments within the software, is its non-destructive nature. This means that your original photo remains untouched. The cropping you perform is essentially a set of instructions that Lightroom applies during the export process, dictating which parts of the image will be included in the final output. Unlike some other editing software, you can always revisit and modify your crop at any time, providing immense flexibility.
The very first tool you'll notice in the Crop Panel is the "Crop Frame Tool" icon, often appearing as a right angle with another in the background, located next to the word "Angle." This icon itself doesn't fundamentally change the cropping mechanism but can influence how you initiate a crop. When this icon is active, you can click and drag to draw a crop.
Lightroom Crop Overlays - Golden Ratio Crop Guide + More! (HIDDEN Crop Tools!)
When working with multiple images, you can apply the same crop aspect ratio to several photos simultaneously. While in the Library module's Grid view, click the disclosure triangle to the right of "Saved Preset" in the Quick Develop panel. From the list that appears, you can select the desired Crop Ratio to apply to all selected images.
While the order in which you apply adjustments can be a matter of personal preference and workflow, many photographers find it beneficial to address leveling and perspective correction before finalizing the crop. The Transform panel in Lightroom offers powerful tools for correcting perspective distortion and leveling, and these adjustments can sometimes result in an automatic crop. Therefore, it's often recommended to perform Lens Corrections, then Transform adjustments, and finally, use the Crop Panel for fine-tuning composition or aspect ratio. This workflow ensures that you're cropping to the final, corrected image rather than working with distorted or misaligned content.
Advanced Options and Keyboard Shortcuts
Lightroom Classic offers several advanced options for manipulating the crop marquee. For instance, if you want to crop from the center of the image, you can hold down the Option key (on a Mac) or the Alt key (on a Windows machine) and drag a corner handle of the Crop marquee.

At the bottom left of the Crop panel, you'll find a checkbox labeled "Constrain to Image." When this box is checked, all cropping actions will occur strictly within the boundaries of the original image. If you uncheck this box, Lightroom will allow adjustments to extend beyond the image borders, and in such cases, blank space will be added to the actual image to accommodate the crop.
For those who prefer keyboard shortcuts, several are available:
- R: Activates the Crop tool.
- O: Cycles through different Crop Overlay options.
- Shift + O: Changes the orientation of the selected overlay.
- Escape: Dismisses the crop tool without applying the crop.
- Option-drag (Mac) / Alt-drag (Win) a corner handle: Crops from the center.
- Ctrl + [ (Cmd + [ on Mac): Rotates the image 90 degrees to the left.
- Ctrl + ] (Cmd + ] on Mac): Rotates the image 90 degrees to the right.
- Reset Button (at the bottom of the crop panel): Undoes the current crop.
While there's no single "best" way to crop, as it heavily depends on the specific image and your creative intent, becoming intimately familiar with each tool and its capabilities will empower you to approach any image with confidence and achieve the desired results. Whether you're simply removing distractions, adhering to a specific print size, or meticulously straightening a skewed horizon, Lightroom's Crop Tool is an indispensable asset in your photographic workflow.