Inconsistent volume levels within a video project can significantly distract viewers, leading to a less professional and engaging final product. One clip may be too loud, while another is too quiet, creating an uneven listening experience. This is precisely where audio normalization becomes an indispensable tool. DaVinci Resolve, a powerful and versatile video editing software, offers several straightforward methods to achieve this crucial audio balancing. When combined with quality recording equipment, such as a professional microphone like the Hollyland LARK MAX 2, which is designed to reduce noise and capture clear voice recordings, the process of audio normalization becomes even more efficient and effective, allowing creators to spend more time on storytelling and less time on technical audio fixes.
Audio normalization is fundamentally the process of adjusting the overall volume of your audio so that all parts of the recording play at a consistent loudness. For instance, if you have a voiceover that is considerably quieter than your background music, normalization can intelligently raise the voice level to match the music, ensuring clarity and balance. For those who desire more granular control over specific moments within their audio, employing keyframes presents an excellent and precise method for achieving desired volume adjustments. Each click on the audio track to add a keyframe allows for meticulous control over the volume at that exact point in time.
Understanding the Fundamentals of Audio Normalization
At its core, audio normalization is about ensuring that your audio does not contain any segments that are either too quiet or too loud, thereby maintaining a consistent perceived loudness throughout the duration of your project. It's important to understand that audio normalization is not the same as optimizing audio for other aspects of sound quality. While normalization focuses on volume consistency, it does not inherently fix poor recording quality, such as background noise or distortion. However, by ensuring a uniform volume, normalization lays a critical foundation for a clean, clear, and professional-sounding project. This process is particularly useful when dealing with multiple audio clips that exhibit varying volume levels, a common scenario in video post-production.
The primary purpose of normalization is to ensure that the audio doesn't have segments that are too quiet or too loud, thereby creating a smooth and even listening experience for the audience. An inconsistent audio experience can detract from the overall quality of the content and diminish viewer engagement. Therefore, normalization serves as a crucial solution to enhance audio quality issues related to volume fluctuations.
Target Loudness Standards for Different Platforms
Different platforms and broadcasting standards often have specific target loudness levels to ensure a consistent experience for their audiences. For instance, most online platforms utilize -14 LUFS (Loudness Units Full Scale) as the target loudness for music or general content. This standard helps prevent audio from being excessively loud or too quiet when played back across various devices and services.
For streaming platforms like Netflix, a target level of -16 dBFS (decibels relative to full scale) in Sample Peak mode is often recommended. This mode focuses on the peak amplitude of the audio samples. In contrast, for traditional TV and radio broadcasting, a target of -23 dBFS in True Peak mode is more common. True Peak metering accounts for inter-sample peaks, which can occur during digital-to-analog conversion and might cause clipping even if the sample peaks are within limits. Understanding these standards is crucial for delivering audio that meets industry expectations and provides an optimal listening experience for the intended audience.
LUFS Explained – SIMPLE! (Mastering for Spotify)
Methods for Audio Normalization in DaVinci Resolve
DaVinci Resolve offers a range of tools to help you normalize audio, catering to different needs and levels of desired control. Whether you prefer a quick, automated approach or a more hands-on, precise method, Resolve has you covered.
1. Normalizing Audio with Keyframes for Precise Control
For users who require meticulous control over specific moments in their audio, using keyframes is an excellent and highly effective method. This approach allows you to manually adjust the volume at precise points in the timeline, offering unparalleled flexibility.
- Step 1: Open DaVinci Resolve and navigate to the Edit page.
- Step 2: Select the audio clip you wish to work with in your timeline.
- Step 3: Visually identify areas within the audio clip's waveform that exhibit peaks that are too high or too low. These are often indicated by sudden spikes or dips in the waveform.
- Step 4: To create a keyframe, click directly on the white line that represents the audio level in those specific areas. Each click adds a keyframe, marking a point where you can control the volume.
- Step 5: Once keyframes are placed, you can drag them up to increase the volume or down to reduce it, effectively shaping the audio's loudness over time. This allows for smooth transitions and targeted adjustments.
This method is particularly useful for dialogue where a speaker's volume might naturally fluctuate, or for smoothing out transitions between different audio elements.
2. Quick Normalization Without Keyframes
If your audio clip has fairly consistent volume levels and only requires a general boost or reduction, or if you prefer a quicker, more automated method, DaVinci Resolve's built-in Normalize feature is an ideal solution. This approach works well when precise, point-by-point adjustments are not necessary.
- Step 1: Select the audio clip you want to normalize in your timeline.
- Step 2: Right-click on the selected audio clip to open the context menu.
- Step 3: Choose the "Normalize Audio Levels" option from the menu.
- Step 4: In the normalization window that appears, you will typically have options for normalization mode. For general purposes, "Sample Peak" is a common choice.
- Step 5: If you are targeting specific platforms, you can set the desired target level. For instance, for streaming platforms like Netflix, a target level of -16 dBFS in Sample Peak mode is often recommended.
- Step 6: Click "Normalize" to apply the adjustments to the entire selected audio clip.
This method automatically analyzes the audio and adjusts its overall level to meet the specified target, providing a quick and efficient way to balance volume.
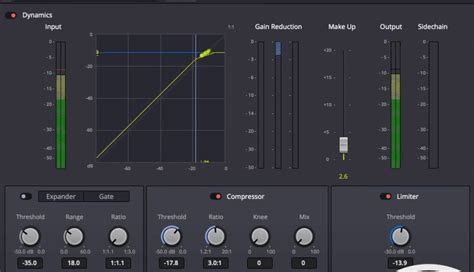
3. Utilizing the Dynamics Panel for Smoother Adjustments
When your audio varies significantly, exhibiting a soft sound in one place and a harsh or loud sound in another, the Dynamics panel in DaVinci Resolve offers a powerful way to smooth out these inconsistencies. This method is especially beneficial when working with live dialogue or recordings featuring dynamic speakers whose vocal intensity can change rapidly.
- Step 1: Open the Mixer panel. This is typically found in the Fairlight page or accessible through the workspace menus.
- Step 2: Within the Mixer, locate and click the "Dynamics" button for the track containing your audio. This will open the Dynamics processing section.
- Step 3: The Dynamics panel usually includes tools like a compressor and a expander/gate. By carefully adjusting the parameters of these tools, you can effectively control the dynamic range of your audio. A compressor will reduce the volume of loud passages, while an expander can increase the volume of quiet passages, helping to create a more uniform loudness.
- Step 4: Watch your meters closely while making adjustments. The meters will provide visual feedback on the audio levels and how the Dynamics processing is affecting them. This real-time feedback is crucial for achieving the desired balance without introducing artifacts.
The Dynamics panel provides a more sophisticated level of control over audio levels, allowing for subtle yet effective shaping of the sound to achieve a professional and polished result.
4. Normalizing Multiple Clips Simultaneously
DaVinci Resolve also allows for efficient batch processing of audio. If you have multiple audio clips that require normalization, you can often apply the process to them all at once, saving considerable time.
- Step 1: Select multiple audio clips in either the Edit page or the Fairlight page. You can do this by holding down the Ctrl (or Cmd on Mac) key while clicking on each clip.
- Step 2: Once all desired clips are selected, right-click on any of the selected clips.
- Step 3: From the context menu that appears, choose the "Normalize Audio Levels" option.
- Step 4: Configure the normalization settings as needed (e.g., Sample Peak, target levels) and click "Normalize" to apply the changes to all selected clips simultaneously.
This feature is a significant time-saver for projects with numerous audio segments that need consistent volume balancing.
Troubleshooting Common Issues with Audio Normalization
While DaVinci Resolve's audio normalization features are robust, users may occasionally encounter issues. Fortunately, these problems are usually straightforward to resolve.
Display Scaling Problems on Windows
Some users on Windows systems might experience visual glitches or unexpected behavior with DaVinci Resolve's interface, which can sometimes interfere with audio tools.
- Solution: To address this, you can adjust your Windows display scaling settings. Try disabling the "Override high DPI scaling" setting in the application's compatibility properties, or alternatively, reduce the display scaling on Windows to 100%. This ensures that DaVinci Resolve interprets the display resolution correctly.
Manual Level Adjustment as a Workaround
If you encounter specific issues with the automated normalization functions, a reliable workaround is to manually adjust the audio levels.
- Solution: This involves directly manipulating the audio level line on the timeline. You can achieve this by clicking and dragging the level line up or down to increase or decrease the volume at specific points, similar to the keyframe method but often used for simpler, more immediate adjustments.
Normalizing Clips Individually
When working with multiple clips, sometimes normalizing them as a group can lead to unexpected results.
- Solution: If you encounter problems when normalizing a batch of clips, try normalizing them one at a time. This can help isolate whether the issue lies with a specific clip or the grouping process itself.
Render Timeline Effects Issue on the Deliver Page
Occasionally, effects applied to the timeline might not render correctly, which could indirectly affect how audio levels are perceived or processed during export.
- Solution: To fix this, navigate to the Deliver page. In the Video tab settings, ensure that the "Render timeline effects" option is enabled. This guarantees that all visual and audio effects applied within the timeline are correctly processed during the final render.
Checking Project Settings and Software Updates
Ensuring your software and project are configured correctly is fundamental to avoiding many technical issues.
- Solution: Verify that your project settings within DaVinci Resolve are configured correctly, especially those related to audio. Additionally, always ensure you are using the latest version of DaVinci Resolve, as software updates often include bug fixes and performance improvements that can resolve a wide range of issues.
Beyond DaVinci Resolve: Alternative Audio Enhancement Tools
While DaVinci Resolve offers powerful built-in audio normalization capabilities, other software and tools can also be useful for audio enhancement, especially for specific tasks like noise reduction or vocal isolation.
Filmora's Auto Normalization
Filmora is another video editing software that features an Audio Normalization tool designed to automatically analyze and adjust the volume of selected clips.
- How it works:
- Import your video or audio file into Filmora.
- Select the clip and navigate to the "Audio" > "Basic" tab in the property panel.
- Locate the "Auto Normalization" option and click the button to activate it.
- If you are not satisfied with the result, you can simply click the button again to reset and reapply the normalization.
While Filmora offers a simpler solution for normalization, DaVinci Resolve generally provides more advanced and professional-grade audio editing features.
EaseUS Online Vocal Remover
For tasks like removing background noise or isolating vocals, online tools can be very effective and user-friendly. EaseUS Online Vocal Remover is one such tool.
- Features: This free online tool utilizes AI audio enhancer features to clean up audio files and make them sound more professional. It allows users to remove background music from videos online for free.
- Limitations: There is a file size limit of 350 MB for each file, and users can process multiple files within this constraint.
While these tools can be helpful for specific audio clean-up tasks, DaVinci Resolve remains the go-to solution for comprehensive audio post-production within a video editing workflow.
Conclusion: Achieving Professional Audio with DaVinci Resolve
By implementing the various methods for audio normalization in DaVinci Resolve, you are well on your way to ensuring that your audio consistently hits the mark in terms of loudness and clarity. Achieving consistent audio quality is a vital part of video post-production, and audio normalization plays a significant role in improving this quality. This guide on normalizing audio in DaVinci Resolve aims to help you create a professional and immersive listening experience for your audience. Whether you are a content creator, podcaster, or filmmaker, mastering these audio techniques will undoubtedly elevate the overall quality and impact of your projects. The ability to ensure that dialogue, music, and sound effects are smooth and balanced throughout a project is a hallmark of professional video production.