Photoshop offers a versatile array of tools for creating and manipulating gradients, essential elements for adding depth, visual interest, and smooth transitions in graphic design and image editing. From subtle color shifts to dramatic overlays, gradients are a cornerstone of digital artistry. This tutorial delves into the fundamental aspects of using Photoshop's Gradient Tool, exploring its capabilities for drawing, selecting, and applying gradients across various design elements. We will cover how to utilize preset gradients, understand their behavior, and lay the groundwork for more advanced customization in future explorations.
Understanding the Gradient Tool's Role in Photoshop
Gradients are a fundamental component in Photoshop, finding application in numerous features. The Gradient Tool itself is a primary method for drawing these blends directly onto layers or selections, facilitating seamless transitions between different elements. Beyond direct application, gradients are integral to creating smooth transitions within layer masks, effectively blending one layer into another. They can be used to fill text and shapes with dynamic color schemes, or to colorize photographs through the Gradient Map adjustment. Furthermore, the Gradient Overlay layer style provides a non-destructive way to add color effects and depth to any layer. This tutorial focuses on the core functionality of the Gradient Tool, the most straightforward and often most impactful gradient feature within Photoshop.
Accessing and Selecting Gradients: The Gradient Picker
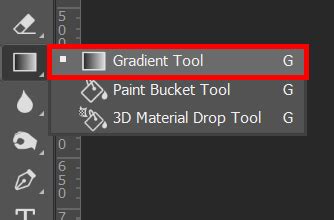
The Gradient Tool is conveniently located within the main Tools panel, typically found on the left side of your Photoshop interface. Selecting it by clicking its icon activates its associated options in the Options Bar at the top of the screen. Once the Gradient Tool is active, the next crucial step is selecting a gradient. Photoshop offers two primary methods for this: the Gradient Picker and the Gradient Editor. The Gradient Picker is designed for quick selection of pre-defined, ready-made gradients. In contrast, the Gradient Editor, as its name suggests, provides a powerful environment for customizing existing gradients or creating entirely new ones from scratch. For this introductory guide, our focus will be on the Gradient Picker.
To choose from Photoshop's extensive library of preset gradients, or those you may have previously created and saved, click the small arrow situated to the right of the gradient preview bar within the Options Bar. This action unfurls the Gradient Picker, presenting a visual array of gradient thumbnails. To select a gradient, simply click on its corresponding thumbnail. You can then confirm your selection by pressing Enter (Windows) or Return (Mac) on your keyboard, or by clicking on any empty space within the Options Bar, which will close the picker.
By default, Photoshop displays a limited set of preset gradients. However, the software includes a wealth of additional gradient sets, categorized by themes such as color harmonies, metals, pastels, and more. To access these, look towards the bottom half of the menu that appears when you click the arrow next to the gradient preview bar. Here, you will find a list of these supplementary gradient sets. Clicking on the name of any set, such as the "Photographic Toning" set, will prompt Photoshop to ask whether you wish to replace the current gradients with the newly selected ones. Choosing "Append" will add the new gradients below the existing ones, rather than overwriting them. Upon appending, the Gradient Picker will update to reflect the newly loaded set. For the purposes of this tutorial, we will revert to and utilize the original default gradients, so Photoshop will prompt you again to confirm the replacement of the current gradients with the defaults.
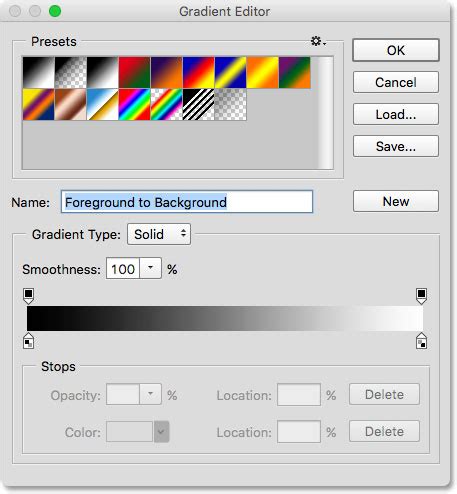
The Foreground to Background Gradient: A Fundamental Blend
Before diving into the mechanics of drawing gradients, it's beneficial to understand one of the most fundamental and frequently used presets: the Foreground to Background gradient. As its name implies, this gradient dynamically derives its colors from your current Foreground and Background color selections. These colors are readily visible in the color swatches located near the bottom of the Tools panel. The upper-left swatch represents your Foreground color, while the lower-right swatch displays your Background color. Because this gradient is directly tied to your active color choices, it offers the most straightforward method for customization and is exceptionally useful for a wide range of applications.
Drawing Gradients with the Gradient Tool
Applying a gradient in Photoshop using the Gradient Tool is an intuitive process that involves a simple click-and-drag action. To begin, click anywhere within your document to establish the starting point of your gradient. Then, while keeping your mouse button depressed, drag away from this initial point to define the endpoint of the gradient. As you drag, a thin line will appear, visually indicating the direction and extent of the gradient. For instance, clicking on the left edge of your document and then dragging horizontally to the right edge will define the path for a horizontal gradient.
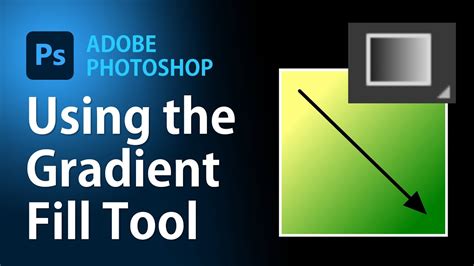
During the drag operation, only this directional line is visible. To achieve a perfectly horizontal gradient, you can press and hold the Shift key as you drag. This action constrains the movement of your cursor to precise horizontal increments. Once you are satisfied with the placement and direction, release the mouse button, and Photoshop will render the gradient across the designated area.
The "Reverse" option, located in the Options Bar, offers a simple way to invert the gradient's color progression. If you were to draw the exact same gradient with "Reverse" selected, the colors would appear on the opposite sides of the gradient path. For example, a black-to-white gradient would become white-to-black.
Gradients are not limited to horizontal or vertical orientations; they can be applied in any direction. To draw a gradient from top to bottom, click near the top of your document and drag downwards towards the bottom. Similar to drawing a horizontal gradient, holding the Shift key while dragging will help ensure a perfectly vertical gradient. It's important to release the mouse button before releasing the Shift key to maintain the precise vertical alignment.
When using the Foreground to Background gradient, changing the gradient's colors is as simple as selecting new Foreground and Background colors. This action opens Photoshop's Color Picker, allowing you to choose any hue. Once new colors are selected, drawing another gradient will apply these updated colors.
To draw a gradient diagonally, click in one corner of your document, for instance, the bottom left, and drag towards the opposite corner, the upper right. Photoshop will seamlessly replace the previous gradient with the new one without requiring an explicit undo or deletion. The colors of this gradient can be altered at any time by clicking on the Foreground and/or Background color swatches in the Options Bar and selecting new colors. For a quick reset to the default black and white gradient, simply press the letter 'D' on your keyboard, a handy shortcut that stands for "Defaults."
The Importance of Layers for Gradient Application
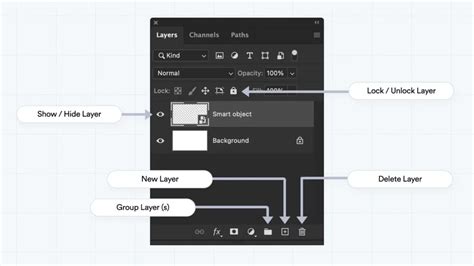
While drawing gradients directly onto the Background layer might suffice for simple tasks, adopting a layer-based workflow in Photoshop is a more robust and flexible approach. Placing each element on its own separate layer allows for greater control and non-destructive editing. To create a new layer for your gradient, you can click the "New Layer" icon at the bottom of the Layers panel. Alternatively, holding the Alt (Windows) or Option (Mac) key while clicking the "New Layer" icon will first open the New Layer dialog box, allowing you to name the layer before it's added. For instance, creating a new layer named "Gradient" above the Background layer provides a dedicated space for your gradient work.
The distance you drag with the Gradient Tool directly influences the transition area of the gradient. A shorter drag creates a more abrupt transition, while a longer drag results in a smoother, more gradual blend. To illustrate, consider using the default black and white Foreground to Background gradient. Drawing a gradient from the left edge to the right edge of the document with a relatively short drag will produce a more sudden shift from black to white. Conversely, a longer drag over the same distance will create a much softer transition. If you need to undo a gradient application, navigate to the Edit menu at the top of the screen and select "Undo Gradient" (or use the keyboard shortcut Ctrl+Z on Windows / Command+Z on Mac).
When working with layers, the gradient will be applied to the currently selected layer. This ensures that your gradient is isolated and can be easily modified or removed without affecting other elements in your composition.
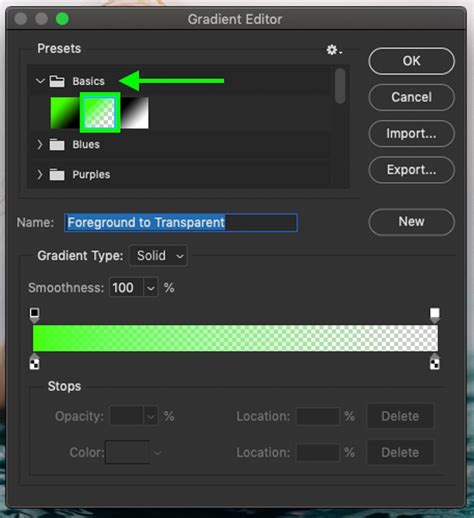
Exploring the Foreground to Transparent Gradient
Beyond the Foreground to Background gradient, the Foreground to Transparent gradient offers unique capabilities. This gradient draws its color from the current Foreground color, but instead of transitioning to the Background color, it fades to transparency. This makes it exceptionally useful for creating subtle fades, vignettes, or for darkening specific areas of an image.
To select the Foreground to Transparent gradient, double-click its thumbnail in the Gradient Picker. Similar to the Foreground to Background gradient, its color is determined by your Foreground color swatch. To change the gradient's color, simply select a new Foreground color before drawing.
The true distinction of the Foreground to Transparent gradient lies in its behavior when drawn over existing content. When you draw this gradient, any areas that fade to transparency will reveal the content of the layers beneath it. If you have a white Background layer, the transparent areas will appear white. However, if you have an image layer beneath, those transparent areas will reveal the image. This characteristic is crucial for understanding its application in creating effects like darkening photo edges or skies.
Another key difference is how Photoshop handles multiple applications of the Foreground to Transparent gradient. Unlike other gradients that might overwrite previous ones, the Foreground to Transparent gradient, when drawn again over an existing one, adds to it rather than replacing it. This additive behavior allows for building up transparency or opacity in specific areas.
Understanding Gradient Styles
Photoshop's Gradient Tool offers five distinct styles that dictate how the gradient is rendered: Linear, Radial, Angle, Reflected, and Diamond. These styles provide creative control over the direction and shape of the color blend.
To experiment with these styles, it's helpful to reset your document to a clean state. Press Ctrl+Alt+Z (Windows) / Command+Option+Z (Mac) multiple times to undo previous actions until you have a blank, white document. Then, press 'D' to reset your Foreground and Background colors to black and white, ensuring a clear demonstration of the gradient's progression.
Linear Gradient
The Linear gradient, which we've already encountered extensively, creates a straight-line transition from the starting point to the endpoint. The direction of your drag directly determines the orientation of this line.
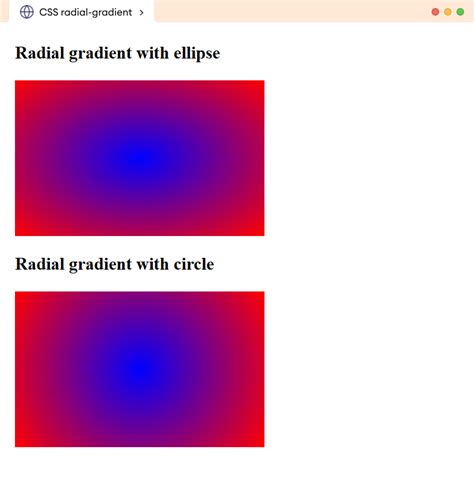
Radial Gradient
The Radial gradient originates from a central point and radiates outwards in a circular pattern. The starting point of your drag acts as the center of the circle, and the gradient transitions from the center to the edges. This style is excellent for creating spotlight effects or circular color fades.
Angle Gradient
The Angle gradient, also known as a conical gradient, sweeps colors in a counterclockwise arc around the starting point. It's like a compass where the colors rotate around the center. The direction of your drag influences the angle of this sweep.
Reflected Gradient
The Reflected gradient is essentially a mirrored version of the linear gradient. It applies the gradient from the starting point outwards, and then mirrors that same gradient on the opposite side of the starting point, creating a symmetrical effect.

Diamond Gradient
The Diamond gradient creates a diamond or square-shaped blend radiating outwards from the starting point. The shape of the blend is determined by the distance you drag from the initial click.

Enhancing Gradients with Dither and Transparency
Two important options in the Options Bar for refining gradients are "Dither" and "Transparency."
The "Dither" option, when enabled, introduces a small amount of noise into your gradients. This noise helps to smooth out the transitions between colors, effectively reducing or eliminating "banding." Banding occurs when distinct lines or steps appear between color bands in a gradient, indicating an insufficient number of intermediate colors to create a smooth blend. Dithering simulates a greater range of colors, making the gradient appear more continuous and natural.
The "Transparency" option is particularly relevant for gradients that incorporate transparency, such as the Foreground to Transparent gradient. When enabled, it ensures that the transparency levels within the gradient are accurately rendered, allowing underlying layers to show through as intended.
Beyond the Basics: Blend Modes and Opacity
While this tutorial focuses on the fundamental gradient application, it's worth noting that the Gradient Tool also offers "Mode" (Blend Mode) and "Opacity" options in the Options Bar. These settings control how the applied gradient interacts with the existing pixels on the layer. Understanding blend modes is crucial for achieving sophisticated layering and blending effects, allowing gradients to interact with underlying content in various creative ways. The Opacity option functions similarly to the Opacity slider in the Layers panel, controlling the overall transparency of the gradient itself. These advanced options open up a world of possibilities for integrating gradients seamlessly into complex designs.
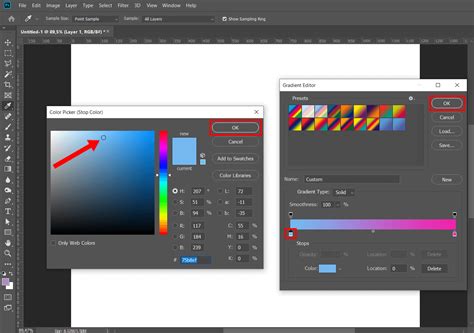
Customizing Gradients with the Gradient Editor
While the Gradient Picker provides access to a vast array of presets, the true power of Photoshop's gradient system lies in the Gradient Editor. This is where you can meticulously craft your own unique gradients, defining every aspect of their color progression and transparency.
To access the Gradient Editor, click on the gradient preview bar itself within the Options Bar (not the small arrow that opens the picker). This will launch the Gradient Editor dialog box. At the top of this dialog, you'll see a preview of the currently selected gradient. Below this preview are the tools for customization.
The core of the Gradient Editor consists of "Color Stops" and "Opacity Stops." Color Stops are represented by small squares located beneath the gradient preview bar. Each Color Stop defines a specific color within the gradient and its position. You can add new Color Stops by clicking directly on the gradient bar below the preview. Double-clicking a Color Stop will open the Color Picker, allowing you to select a new color for that stop. The "Location" field associated with each Color Stop allows you to numerically define its position along the gradient, from 0% to 100%.
Opacity Stops are similar but control the transparency of the gradient at specific points. They are represented by small squares located above the gradient preview bar. You can add Opacity Stops by clicking on the bar above the preview. Double-clicking an Opacity Stop or using the "Opacity" slider allows you to set the transparency level, ranging from 0% (fully transparent) to 100% (fully opaque).
The diamond-shaped icon located between two Color Stops is the "Midpoint" or "Location" slider. This slider controls where the transition between two adjacent colors begins and ends. Adjusting these midpoints allows you to fine-tune the blend between colors, creating sharper or softer transitions.
You can name your custom gradients in the "Name" field at the top of the editor and then click "New" to save them as presets. These custom gradients will then appear in your Gradient Picker for easy access in future projects.
Saving and Loading Gradient Sets
Photoshop allows you to manage your gradients by saving them into sets. This is particularly useful when you have a collection of custom gradients that you frequently use for specific types of projects. To save a gradient, create it in the Gradient Editor, name it, and click "New." Then, in the Gradient Picker, you can click the gear icon (or the three-line menu depending on your Photoshop version) to access options like "Save Gradients…" This will allow you to export your custom gradients as an .grd file.
To load previously saved gradient sets, you can access the same menu in the Gradient Picker and choose "Load Gradients…" Navigate to the location of your .grd file and select it. The loaded gradients will then appear in your Gradient Picker, usually appended to the existing presets. This ensures that your favorite color blends are always readily available.
Conclusion: Embracing the Power of Gradients
The Gradient Tool in Photoshop is a powerful and versatile instrument that can significantly enhance your design workflow. By mastering the selection of presets, understanding the behavior of different gradient types like Foreground to Transparent, and exploring the creative possibilities offered by various gradient styles, you can add depth, dimension, and visual appeal to your projects. Furthermore, the ability to create and save custom gradients using the Gradient Editor unlocks limitless creative potential. As you continue your journey with Photoshop, remember that gradients are not merely color transitions; they are fundamental tools for storytelling and visual communication.