Creating realistic flame effects in Adobe Photoshop can transform a static image into a dynamic and visually striking composition. Whether you aim to depict the cozy warmth of a winter fire, the eerie glow of a haunted house candle, or the destructive power of a post-apocalyptic blaze, Photoshop offers a powerful suite of tools to achieve these effects. This tutorial will guide you through the process, breaking down the creation of believable flames step-by-step, from foundational techniques to advanced refinements.
The Foundation: Working with Layers for Fire
As with most special effects in digital art, the key to creating convincing flames in Photoshop lies in the strategic use of layers. Think of each individual flame as a distinct element that needs its own space to develop. By working in layers, you can naturally build flames on top of one another, allowing for depth, variation, and the ability to edit each component independently. This approach ensures that your fire effect appears organic and integrated into your image, rather than a flat overlay.
To begin, open the image you wish to incorporate flames into. The immediate next step is to create a new layer for your first flame. This isolation is crucial for controlling the effect and making adjustments without impacting other elements of your artwork.
Crafting the Initial Flame: The "Flame" Filter and Path Manipulation
Photoshop's built-in "Flame" filter is a powerful starting point for generating flame shapes. While it might seem straightforward, its true potential is unlocked when combined with precise path drawing.
Drawing the First Flame Path: Utilize the Pen tool to meticulously draw the path for your initial flame. This path will dictate the shape and direction of the generated flame. Precision here is paramount for a naturalistic outcome.
Applying the Flame Filter: Once your path is defined, navigate to the
Filtermenu. From there, selectRender, and then chooseFlame.Configuring Flame Characteristics: The "Flame" dialog box will appear, presenting you with a range of options to customize your flame. Here, you can adjust critical characteristics such as:
- Color: Experiment with different color presets or define your own hues to match the desired intensity and temperature of the fire. Reds, oranges, and yellows are typical, but blues and purples can indicate extreme heat.
- Opacity: Control the transparency of the flame. Lower opacity can create wisps of smoke or less intense parts of the fire, while higher opacity builds the core intensity.
- Turbulence: This setting governs the erratic and unpredictable movement of the flames. Higher turbulence results in more chaotic and dynamic-looking fire, while lower turbulence can create more stable, licking flames.
The filter is designed to render realistic flames on user-defined paths, meaning the path you created will directly influence the output.
"One Flame Along Path": For more control, specifically select the "One Flame Along Path" option within the Flame filter. This ensures the filter adheres strictly to the path you've drawn.
Spreading the Fire: Building Complexity with Multiple Flames
A single flame rarely creates a convincing fire effect. To build a realistic inferno, you need to layer multiple flames, each with its own subtle variations.
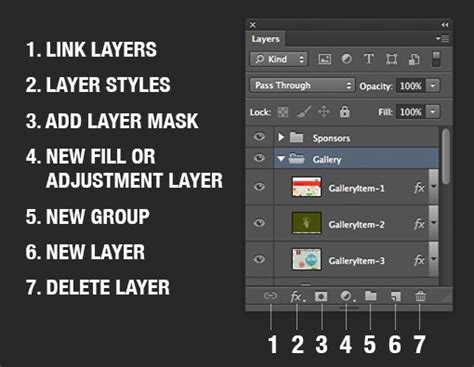
New Layer for Each Flame: For every new flame you wish to add, create a new layer. This reinforces the principle of working non-destructively and provides maximum flexibility.
Path and Filter Repetition: Repeat the process of drawing a path with the Pen tool and applying the "Flame" filter. Each new path can be slightly different in shape, size, and direction, contributing to a more organic and less repetitive look.
Keyboard Shortcut for Efficiency: Once you've set the path with the Pen tool, you can efficiently re-apply the Flame filter to that path by tapping
CMD+F(on Mac) orCTRL+F(on Windows). This is a significant time-saver when generating multiple flames.
Enhancing Realism: Adjustment Layers and Non-Destructive Editing
While the Flame filter provides a base, achieving true photorealism often requires further manipulation. This is where the power of adjustment layers comes into play. Working non-destructively means you can edit or scrap your changes as you go, and also save the original image for future use, preserving your original assets.
Understanding Non-Destructive Editing: Non-destructive editing is a cornerstone of professional Photoshop workflows. It allows for maximum flexibility, enabling you to revisit and modify any effect or adjustment at any time without permanently altering the underlying pixels.
Creating Adjustment Layers: To create an adjustment layer, click the "New Adjustment Layer" icon at the bottom of the Layers panel. This icon typically looks like a half-filled circle. From the dropdown menu, choose the type of adjustment you wish to make. Alternatively, you can go to
Layer > New Adjustment Layerand select an option.Color and Tone Adjustments: Adjustment layers are ideal for fine-tuning the color and tone of your flames to make them blend seamlessly with the surrounding environment. Common and highly effective adjustment layers include:
- Levels: Use the Levels adjustment to control the tonal range of your flames. You can deepen shadows, brighten highlights, and adjust midtones to create a more intense or subtle glow. This is particularly useful for making the flames appear to emit light.
- Curves: Curves offer even more granular control over tonal and color adjustments. You can precisely manipulate the brightness and contrast of specific color channels (Red, Green, Blue) to sculpt the look of your flames, adding variations in heat and color intensity.
- Hue/Saturation: This adjustment layer allows you to modify the overall color cast and saturation of the flames. You can shift the hues to create cooler or warmer flames, or reduce saturation for a more muted effect, or increase it for a more vibrant and energetic look.
Placement and Integration: After applying your flames and making initial adjustments, take time to play around with the placement of each flame layer. Nudge them slightly, adjust their scale, and rotate them until they fit into your photo in the most believable way. Consider how the flames would naturally interact with the object they are consuming or emanating from.
Fire / Burning Effect in Photoshop
Advanced Techniques for Enhanced Believability
To truly elevate your flame effects from good to exceptional, consider these advanced techniques:
Smoldering Ashes and Embers: For scenes like a post-apocalyptic setting, adding smoldering ashes and glowing embers can significantly enhance the realism. These can be created using custom brushes, particle effects, or even by manipulating small, distorted flame elements on separate layers.
Light Interaction: Flames emit light. To make your flames appear to realistically illuminate their surroundings, create new layers set to blending modes like "Screen" or "Linear Dodge (Add)". On these layers, paint soft, warm-colored glows that emanate from the fire. Use a soft brush with low opacity and flow for a natural falloff.
Smoke Simulation: Realistic fire is almost always accompanied by smoke. You can create smoke effects using cloud filters, custom smoke brushes, or by manipulating blurred shapes. Remember that smoke also interacts with light and can obscure parts of the fire, adding another layer of depth.
Distortion and Heat Haze: The intense heat from a fire causes the air to distort. To simulate this, you can use the "Displace" filter on a separate layer filled with a gradient or noise. Apply a subtle displacement to create a shimmering heat haze effect around the flames.
Color Grading: Ultimately, the success of your flame effect hinges on its integration with the overall image. Use a final adjustment layer, such as a Color Balance or Photo Filter, to ensure the colors of your flames and their emitted light complement the existing color palette of your photograph.
The Importance of Reference and Practice
Jesús Ramirez, a digital graphics expert, speaker, and educator specializing in Adobe Photoshop, and founder of the Photoshop Training Channel, emphasizes the importance of understanding the real-world phenomenon you are trying to replicate. For creating convincing flames, studying actual fire â its movement, its color variations, how it interacts with different fuels, and the smoke it produces â is invaluable. Observing a flickering candle in a spooky house, a roaring fire in a cozy wintertime retreat, or smoldering ashes in a post-apocalyptic scene can provide crucial insights that translate into more believable digital creations.
The "Selections and Masking Mastery Course" by Jesús Ramirez offers a comprehensive deep dive into essential Photoshop skills, including those crucial for isolating and manipulating elements like flames. This complete course includes 2.5 hours of step-by-step lessons, 6 structured modules, downloadable practice files, and custom Photoshop brushes, all designed to elevate your digital graphics expertise. Mastering selections and masks is fundamental to precisely controlling where your effects are applied, ensuring they integrate seamlessly with your base image.
By combining Photoshop's powerful tools with a keen eye for real-world detail and a commitment to non-destructive workflows, you can create stunningly realistic flame effects that will captivate your audience. The process encourages experimentation and iterative refinement, making each creation a unique masterpiece.