Adobe Photoshop offers a robust set of tools for digital artists and designers, with brush strokes being fundamental to its creative capabilities. Whether you're aiming for razor-sharp precision or expressive, painterly textures, understanding and manipulating Photoshop's brush stroke techniques is key. This guide delves into the intricacies of brush strokes, from built-in smoothing features to advanced customization and application on text and paths, aiming to equip users of all levels with the knowledge to elevate their designs.
The Power of Stroke Smoothing: Achieving Clean Lines
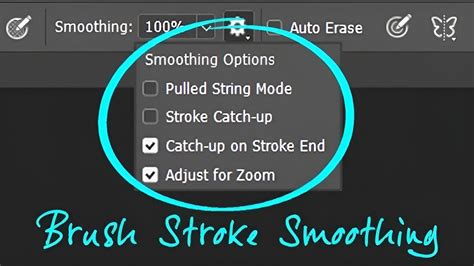
Adobe Photoshop includes a stroke smoothing feature that helps you draw cleaner, more precise strokes with supported tools like the Brush, Pencil, Mixer Brush, and Eraser. Photoshop intelligently adjusts your stroke as you paint to reduce shakiness and produce a more polished line. This feature is particularly handy when drawing freehand or using a mouse instead of a stylus, where natural hand tremors or lack of pressure sensitivity can lead to jagged lines.
You can customize the level of smoothing using a slider and choose from different smoothing modes based on how you work. The primary control is the "Smoothing amount," a slider that allows you to set a value between 0 and 100. Lower values apply minimal correction, preserving the raw, unedited feel of your stroke, while higher values apply more aggressive smoothing, resulting in exceptionally clean and flowing lines.
Beyond Smoothness: Introducing Texture to Vector Paths
While Photoshop's smoothing is excellent for creating clean lines, sometimes these lines can feel too perfect or sterile. This is where the ability to introduce texture becomes invaluable. One of the great advantages of using vectors is that they produce beautiful clean and smooth lines that you can scale to any size without loss of quality. However, to add a more organic or artistic feel, you can apply textured brush tips to these paths.
To achieve this, you can follow a structured approach:
Create a New Document and Add Text: Begin by creating a new Photoshop document, for example, 600 x 300 pixels. Add your desired text; using a bold font like Arial Bold at a large size (e.g., 200 pixels) with a strong foreground color like red can make the path creation process more visible.
Convert Text to a Work Path: Transform your text into a vector path by navigating to
Layer > Type > Create Work Path. This action converts the editable text into a series of anchor points and paths that can be manipulated and stroked.Select the Brush Tool and a Textured Tip: Choose the Brush Tool (BE) from the toolbar. In the Brush options bar at the top of the screen, select a textured brush tip. The "Fuzzball" brush is a good starting point for this tutorial, offering an inherent textured quality.
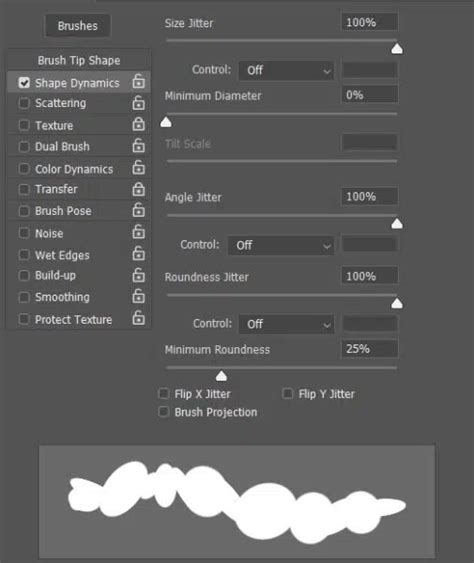
Customize Brush Settings for Dramatic Effects: The true power lies in customizing the brush settings. Open the Brushes palette by choosing
Window > Brushesor pressing F5. Here, you can make dramatic changes by playing around with various settings. Sometimes, altering just one or two settings can yield the desired effect, while other times, you might want to go completely "bananas" and make extensive modifications.Shape Dynamics: Click on "Shape Dynamics" on the left-hand side of the Brushes palette. For a more dynamic and varied stroke, set the "Size Jitter" to 100%, the "Minimum Diameter" to 80%, and the "Angle Jitter" to 30%. These settings introduce randomness in size, minimum diameter, and angle, creating a less uniform and more organic stroke.
Scattering: Next, click on the word "Scattering." This control allows you to spread out the brush tip's instances along the stroke, adding to its texture and distribution.
Color Dynamics: Click on "Color Dynamics." Setting the "Foreground/Background Jitter" to about 70% will introduce variations in color along the stroke, using the foreground and background colors you have selected, adding depth and visual interest.
Apply the Stroke to the Path: Once your brush is customized, you need to apply it to the vector path.
Open the Paths Palette: Open the Paths palette by choosing
Window > Paths.Select the Work Path: Click on the "Work Path" to select it. You should see the path outline appear on your document window.
Stroke the Path: With the Work Path selected, you can now stroke it. The stroke will be rendered in pixels, so ensure you have a layer ready to receive this pixel data. In some cases, you might choose to stroke the path using a default brush tip, but for textured effects, the customization done in the previous steps is crucial.
Integrating Brush Strokes with the Pen Tool
The Pen Tool is a cornerstone for creating precise paths in Photoshop. Combining its precision with the artistic potential of brushes allows for a wide range of creative outcomes. To add a brush stroke to a path created with the Pen Tool:
- Select the Pen Tool: Choose the Pen Tool from the toolbar.
- Draw Your Path: Carefully draw the desired path using the Pen Tool.
- Select the Brush Tool: Switch to the Brush Tool.
- Choose Brush Style: Select the brush style and settings you want to use for the stroke.
- Return to the Pen Tool and Stroke Path: Go back to the Pen Tool, right-click directly on your path, and select ‘Stroke Path’. A dialog box will appear.
- Select "Brush": From the drop-down menu, choose ‘Brush’. Click ‘OK’.
Your path will now be stroked with the brush style you previously selected, effectively translating the vector path into a pixel-based brush stroke.
Exploring Free Resources and Creative Effects
For those looking to expand their brush library without starting from scratch, numerous online platforms offer free brush stroke vectors for Photoshop. Always remember to check the licensing terms before using any free resources to ensure compliance with their usage rights.
Creating interesting effects with brush strokes in Photoshop involves a continuous process of experimentation. This includes:
- Varying Brush Styles, Sizes, and Colors: Don't limit yourself to a single brush. Explore the vast array of available brushes, from default options to custom downloads, and experiment with different sizes and color palettes.
- Utilizing Blending Modes and Opacity: Play with the blending modes of your brush stroke layers and adjust their opacity. This can dramatically alter how the brush stroke interacts with the layers beneath, leading to unique textures, transparencies, and color interactions.
- Layer Masks for Control: Applying brush strokes on different layers and then using layer masks provides granular control over the final appearance. Masks allow you to selectively reveal or hide parts of the brush stroke, enabling complex compositing and nuanced effects.
- Customizing Brush Settings: As demonstrated earlier, the Brush Panel is your playground. Adjusting settings like spacing, angle, roundness, scattering, texture, dual brush, color dynamics, and transfer can yield an almost infinite number of brush stroke variations.
Every Photoshop Custom Brush Setting Explained
Tips for Effective Brush Stroke Usage
To maximize the effectiveness of brush strokes in your Photoshop workflow, consider these practical tips:
- Vary Brush Size and Hardness: For different effects, consciously vary the size and hardness of your brush. A soft brush can create smooth, blended transitions, while a hard brush produces sharp, defined edges.
- Utilize a Graphics Tablet: For more precise control over brush strokes, especially when it comes to pressure and tilt sensitivity, a graphics tablet is highly recommended. It mimics the feel of traditional art tools more closely than a mouse.
- Experiment with Brush Settings: Don't shy away from exploring the Brush Panel. Experimenting with different settings in conjunction with your chosen brush tip can unlock unexpected and powerful creative possibilities.
- Employ Layers for Flexibility: Always remember to use different layers for different brush strokes. This practice maintains flexibility in your design, allowing you to easily edit, reposition, or delete individual strokes without affecting others.
Customizing Your Brush Strokes: A Deep Dive
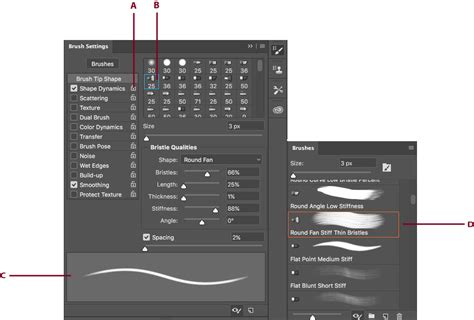
The ability to customize brush strokes in Photoshop is where true artistic expression takes flight. The Brush Panel is the central hub for this customization:
- Basic Brush Settings: You can change the fundamental properties like size, hardness, spacing, angle, and roundness of the brush tip.
- Advanced Dynamics: Dive deeper into settings like scattering, texture, dual brush (combining two brush tips), color dynamics (varying color based on foreground/background, hue, saturation, brightness, and purity), and transfer (controlling opacity and flow jitters).
- Brush Tip Shape: Beyond the standard round brushes, Photoshop offers a vast library of brush tip shapes, including textured, artistic, and custom-made options. You can even import your own images to use as brush tips.
Creating Specific Effects with Brush Strokes
Photoshop brushes are incredibly versatile and can be used to emulate a wide range of traditional art mediums and effects:
Painting Effect
Yes, you can use brush strokes to create a convincing painting effect in Photoshop. By selecting appropriate brush styles that mimic traditional media (like oil, acrylic, or pastel), varying their sizes and colors, and crucially, by adjusting the direction and pressure of your strokes (especially with a graphics tablet), you can achieve an effect that closely resembles traditional painting.
Text Effects
Applying brush strokes to text in Photoshop can add a unique, artistic flair.
- Create Text: Use the Text Tool to create your desired text.
- New Layer and Painting: Create a new, empty layer above your text layer.
- Brush Over Text: Use the Brush Tool to paint over the text area.
- Clipping Mask: To confine the brush strokes only to the shape of the text, right-click on the brush stroke layer and select "Create Clipping Mask." This will ensure the brush strokes only appear where the text exists.
Grunge Effect
To create a grunge effect with brush strokes:
- Grunge Brush Presets: Utilize pre-made grunge brush presets, which often feature distressed textures and irregular shapes.
- Custom Brush Creation: Alternatively, create your own grunge brushes by adjusting the texture and dual brush settings in the Brush Panel to simulate wear, tear, and imperfection.
- Layer Blending: Apply the brush strokes on a separate layer and experiment with blending modes such as "Multiply," "Overlay," or "Soft Light." Adjusting the opacity of these layers can further enhance the gritty, weathered look.
Watercolor Effect
Achieving a watercolor effect with brush strokes is also possible:
- Watercolor Brush Presets: Many Photoshop extensions and online resources offer watercolor brush presets designed to mimic the flow, transparency, and granulation of actual watercolors.
- Custom Brush Adjustments: You can create your own watercolor-like brushes by adjusting the scattering, texture, and transfer settings in the Brush Panel. Focus on settings that promote soft edges, gradual fading, and a sense of fluidity.
- Layer Opacity: Applying the brush strokes on a separate layer and significantly reducing the layer's opacity is crucial for simulating the translucent nature of watercolor washes.
Saving and Reusing Custom Brushes
The ability to save your custom brush strokes is essential for maintaining a consistent workflow and for easily recalling your favorite tools.
- Customize Your Brush: After adjusting the settings in the Brush Panel to your satisfaction, you've created a custom brush.
- Save as New Brush Preset: Go to the Brush Panel menu (the icon with horizontal lines, usually in the top-right corner of the panel) and select ‘New Brush Preset’.
- Name Your Brush: Give your brush a descriptive name and click ‘OK’.
Your custom brush will now be saved and will appear in the Brush Preset Picker, ready for future use.
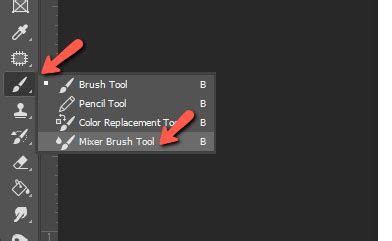
Advanced Brush Techniques: The Mixer Brush
Jennifer Farley, a designer and illustrator, highlights the power of the Mixer Brush tool for creating effects that mimic traditional painting, particularly with wet paint. This tool allows for blending colors on the canvas and varying paint wetness across a stroke.
- Loading Paint: To load paint into the Mixer Brush's reservoir, Alt-click (Windows) or Option-click (Mac OS) on the desired color area of your image.
- Tool Options: The options bar for the Mixer Brush offers controls for "Load the brush after each stroke" (to replenish paint), "Clean the brush after each stroke" (to prevent color contamination), and "Wet" (controlling paint wetness). Parameters like "Mix" control the ratio of canvas paint to reservoir paint, and "Flow" dictates how quickly paint is applied.
- Wet Paint Mixer Brush Technique: Jennifer Farley has developed a series of tutorials focusing on this technique, including custom palette maker brushes designed to create color blends specifically for the wet paint mixer brushes. Her work has even led to a partnership with Adobe, resulting in a free Pastel-inspired brush sampler for Photoshop users.
Photoshop Art Brushes vs. Regular Brushes
Photoshop Art brushes work a little differently from regular brushes. While standard brushes primarily apply color and texture based on their shape and settings, Art brushes often incorporate more complex dynamics, including variations in shape, color, and even the ability to respond to stylus pressure in more sophisticated ways. When used with a graphics tablet, Art brushes can provide a more natural and intuitive feel for digital painters, closely replicating the nuances of traditional art instruments.
An example of this advanced application involves placing an image onto a wood texture background. By moving the image to its own layer above the wood texture, and then using a large brush size with the Shift key to create straight lines between points, one can begin to integrate the image onto the textured surface in a stylized manner, demonstrating how brush strokes can be used to create artistic borders or integrate elements into a scene.
This exploration of Photoshop brush stroke techniques reveals a powerful and versatile set of tools. From achieving pristine lines with smoothing to imparting rich textures and emulating traditional art forms, Photoshop's brushes offer a boundless canvas for creativity. By understanding the fundamental settings, exploring advanced customization, and experimenting with specialized tools like the Mixer Brush, users can elevate their digital artistry to new heights.