Adding a matte effect over the top of your image can be lovely, as it's a great way to soften an image and make it look more unique. This effect gives your photos a gentle, muted, and timeless feel, inspired by analogue films, depicting a soft, washed-out, and muted look. The matte effect features muted color tones and is obvious with a soft look. It can be easily replicated in Photoshop using adjustment layers and the Camera Raw filter.
Understanding the Matte Effect
The matte effect, often associated with a "crushing blacks" trend, aims to mimic the appearance of a photograph printed on matte paper. Matte paper is completely flat and lacks any sheen, creating a distinctive look, particularly in the blacks and shadows of the print. This is achieved in Photoshop by flattening out the blacks in an image, typically through Curves and Levels adjustments. The appeal of the matte look lies in its ability to lend a soft, vintage, and timeless quality to digital images.
Selecting the Right Image for a Matte Effect
It should go without saying that you have to choose the right image for any photo effect that you are trying to replicate. Without the right photo, it would be very hard to get the effect right. For matte effects, it is advisable to look at images having high contrast, generally those images that are a bit on the brighter side. To get a soft feel, you need to lift the shadows of the image.
Core Techniques for Creating a Matte Effect in Photoshop
The matte effect can be achieved through various methods in Photoshop, primarily focusing on manipulating the tonal range of an image.
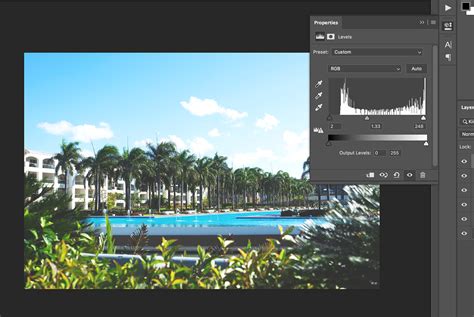
Using Levels Adjustment for a Faded Effect
One of the fundamental ways to introduce a matte look is by lifting the shadows. Go to Layer > New Adjustment Layer > Levels. Once the Levels adjustment layer is created, move the black slider to the right until you start seeing a faded effect appear in the photo. This action directly impacts the darkest tones, making them less absolute and contributing to the characteristic matte appearance.
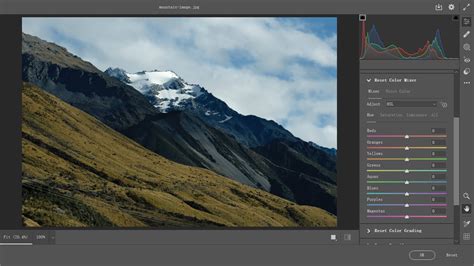
The Power of Curves Adjustment
The Curves tool is a cornerstone for achieving precise tonal control and is instrumental in creating the matte black effect.
Method 1: Basic Curves Adjustment
- In Photoshop, open the image you chose to work with.
- Go to the "Adjustments Panel" and create a "New Curves Adjustment Layer."
- You will see that Photoshop already has two points on the line - one on the far left (representing black points) and one on the far right (representing white points).
- To create a matte effect, pull the left end of the line (the black point) upwards. This lifts the shadows, making the blacks appear less deep and introducing the desired matte quality.
- You can also create a slightly different look by adding more points to the curve. For instance, to achieve a specific "Matte Black" without losing too much contrast, you might adjust the black point to an output of 23.
- Click on the "Curve" to add a new point and make the curve a bit smoother. Tweak the position of the points until you get a "Matte Black" without losing contrast. A common adjustment might involve setting an input of 57 and an output of 51 for a smoother transition.
Method 2: Advanced Curves for Film-like Appearance
For a more pronounced film-like matte effect, a popular trend involves "crushing blacks." This is a specific application of the Curves tool.
- Create a "New Curves Adjustment Layer."
- Click on the "Black Point" (the point on the far left of the curve) and drag it upwards. You can aim for an "Output" value of around 23 to begin with.
- Add another point to the curve. You can then adjust this point to refine the contrast and overall look. For example, setting an input of 57 and an output of 51 can help maintain some definition while still achieving the matte aesthetic.
- Experiment with adding and positioning multiple points on the curve to fine-tune the specific matte look you desire, ensuring you don't lose too much critical contrast in the image.
3 Secret Curves Tricks Photoshop Never Told You About | Part 3
Leveraging the Camera Raw Filter
The Camera Raw filter in Photoshop offers a powerful and integrated way to apply and refine the matte effect, especially when combined with other adjustments.
- Go to Layer > New Adjustment Layer > Camera Raw Filter.
- Within the Camera Raw filter, navigate to the "Effects" panel.
- To add a bit of grain, which often complements a matte or vintage look, increase the "Grain" value. This can enhance the analogue film feel.
- You can also make further tonal adjustments within the Camera Raw filter. For instance, you can subtly lift the shadows or adjust contrast to further enhance the matte appearance.
- If you want to adjust some of the effect settings later, simply click on the down arrow of the image layer to reveal the layer effects and then double-click on "Camera Raw Filter" to open the Camera Raw window again.
Adding Warm Tones for a Vintage Feel
The vintage effect often goes well with warm tones added on top of the image. This can be achieved using a Solid Color adjustment layer.
- Go to Layer > New Adjustment Layer > Solid Color.
- Choose a color that complements the matte look. For instance, a warm amber tone or a muted red like
#d83d2dcan add depth and character. - Change the blend mode of the Solid Color layer to achieve the desired effect. Modes like "Color," "Soft Light," or "Overlay" can blend the color into the image in a pleasing way.
- You can play around with the color using the Solid Adjustment layer. Warm amber tones would be a great choice for enhancing the vintage feel.
Refining the Matte Effect: Adjusting for Specific Subjects
While a general matte effect can be applied broadly, it's important to recognize that not all images respond the same way. A landscape with many green tones will not work the same as a portrait of a person.
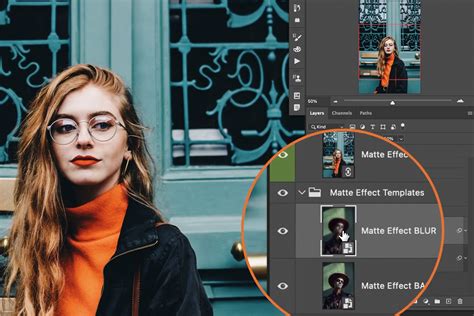
Reducing the Matte Effect on Subjects
Sometimes, a matte Photoshop action can be a little too heavy on the subject, making them appear darker or out of focus. If you find this is the case, you can selectively reduce the matte effect.
- After applying a matte action or adjustment layer, locate the layer mask associated with it (often a white rectangle).
- With the layer mask highlighted, select a black brush with a soft edge.
- Set the brush opacity to a low value (e.g., 10-30%).
- Carefully brush over your subject, or any area where you want to reduce the matte effect. This will non-destructively remove the effect from those specific areas, making the subject brighter and sharper without altering the overall matte aesthetic of the background.
- If you remove too much, simply switch your foreground color to white and brush over the area again to restore the effect.
Using Color Lookup Tables (LUTs)
Color Lookup Tables (LUTs) can also be used to quickly apply a cinematic matte effect.
- Create a "New Color Lookup Adjustment Layer."
- Browse through the "Presets" and choose one that complements your image and the desired matte look. Options like "Fuji ETERNA 250D Kodak 2395" can provide a filmic quality.
- Remember to ensure your image is in "RGB Color" mode (Image > Mode > RGB Color) for LUTs to function correctly.
Considerations for Different Image Types
The effectiveness of a matte effect can vary depending on the image content.
- Landscapes: Matte effects can soften harsh lighting and give landscapes a dreamy, ethereal quality.
- Lifestyle and Fashion: These effects can add a trendy, editorial feel, particularly when combined with specific color grading.
- Portraits: Matte effects can create a timeless, painterly look, but care must be taken not to obscure facial features or reduce skin tones too drastically.
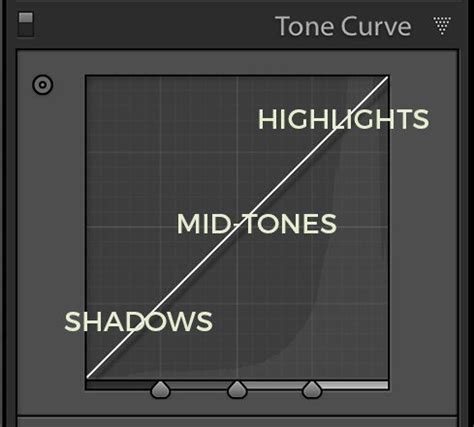
Lightroom Equivalents
For users who primarily work in Lightroom, the principles remain the same, though the tools are accessed differently.
- Tone Curve: In Lightroom, you will need to change the Tone Curve settings. Click on the little box on the bottom right corner of the Tone Curve panel to switch from the parametric curve to the point curve.
- Point Curve Adjustments: Once in the point curve mode, you can manipulate the curve just as you would in Photoshop. Pulling up the black point on the curve will lift the shadows and create the matte effect. You can add additional points to refine the curve.
By understanding these techniques and practicing with different images, you can master the art of creating a beautiful and unique matte black effect in Photoshop, adding a distinctive touch to your photography.