DaVinci Resolve is a powerful and versatile video editing software, used by both professionals and beginners alike. Understanding and effectively managing your project's resolution is a crucial step in the editing process, impacting everything from visual quality to playback performance. While it's always best practice to set your project's resolution from the outset, there are common scenarios where you might need to change it mid-project. This guide will walk you through the various methods for changing resolution in DaVinci Resolve, ensuring your video looks precisely as intended for its final destination.
Understanding Video Resolution and Aspect Ratios
Before diving into the "how-to," it's essential to grasp what video resolution and aspect ratios mean.
Video Resolution refers to the number of pixels that make up the image displayed on your screen. More pixels generally translate to a clearer, more detailed image. Common resolutions include:
- Standard Definition (SD): Typically around 480p, with resolutions like 640x480.
- High Definition (HD): Encompasses 720p and 1080p. 1080p, also known as Full HD, is 1920x1080 pixels.
- Ultra High Definition (UHD): Includes 4K and 8K resolutions. 4K resolution is commonly 3840x2160 pixels (often referred to as 2160p), while 8K is 7680x4320 pixels.
- 2K: This term can be ambiguous. In the film industry, 2K typically means 2048x1080.
Higher resolutions offer superior quality; for instance, 4K provides significantly more detail than 1080p, with 8K representing the current pinnacle of consumer resolution standards.
Aspect Ratio is the proportional relationship between the width and height of an image or screen. It's often expressed as a ratio (e.g., 16:9). You can calculate the aspect ratio by dividing the width of the video by its height. For example, a video with a resolution of 1920x1080 pixels has an aspect ratio of 1920 ÷ 1080 ≈ 1.778, which is commonly rounded to 16:9.
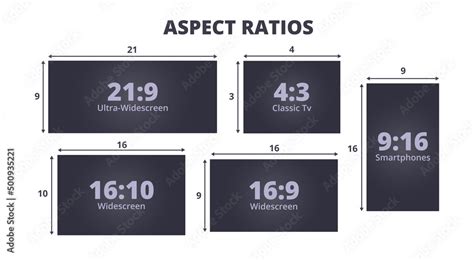
The choice of aspect ratio is critical and depends heavily on where your work will be displayed. Historically, different eras and media have favored distinct ratios:
- 4:3: In the early days of filmmaking, this was the standard film size, often adhering to principles of pleasing visual aesthetics. Thomas Edison's Motion Picture Patents Company declared 4:3 as the standard for American films in 1909. A similar ratio, 1.37:1 (known as the Academy ratio), also emerged.
- 16:9: This has become the international standard for high-definition television and is the preferred aspect ratio for streaming videos today. It offers a balance between the older 4:3 and the wider 2.35:1.
- 2.35:1 (Widescreen): This aspect ratio gained prominence in the 1940s as movie theaters sought to offer a more immersive experience to compete with the rise of television.
- 9:16: This vertical aspect ratio, common for short-form social media content, provides a narrow frame that can present unique compositional challenges but is ideal for mobile viewing.
It's worth noting that on television screens, pixel ratios can sometimes deviate from a 1:1 ratio, meaning a video with a 16:9 aspect ratio viewed on a computer might appear horizontally stretched on a TV.
Method 1: Changing Timeline Resolution via Project Settings
This is the most common and recommended approach, especially when starting a new project or when you need to establish a consistent resolution for all timelines within a project.
Step 1: Access Project SettingsIn the DaVinci Resolve interface, look for the gear icon in the bottom-right corner. Clicking this icon will open the Project Settings menu.
Step 2: Navigate to Master SettingsThe Project Settings window typically defaults to the Master Settings tab. If not, select it from the tabs at the top of the window.
Step 3: Locate Timeline ResolutionWithin the Master Settings, you will find an option labeled "Timeline Resolution." This is where you define the resolution for your project.
Step 4: Select a New ResolutionClick on the dropdown menu next to "Timeline Resolution." You can choose from a list of common presets, such as 1920x1080 (HD), 3840x2160 (Ultra HD/4K), or 1080x1920 (Vertical). You also have the option to customize the resolution according to your specific needs by inputting custom height and width values.
Step 5: Save ChangesOnce you have selected your desired resolution, click the "Save" button at the bottom of the Project Settings window to apply the changes to your project.
This method sets the default resolution for all new timelines created within this project. If you are working on a device with limited processing power, consider reducing the preview window resolution for smoother playback.
Method 2: Changing Resolution for an Individual Timeline
Sometimes, you might need to work with a specific timeline that has a different resolution than the project's master settings. This is particularly useful for tasks like creating vertical videos or integrating footage with varying resolutions.
Step 1: Access the Media PoolIn the DaVinci Resolve interface, ensure the Media Pool is open. It's usually located in the top-left section of the interface.
Step 2: Locate Your TimelineWithin the Media Pool, find the specific timeline you wish to modify.
Step 3: Access Timeline SettingsRight-click on the timeline in the Media Pool. From the context menu that appears, select "Timelines" and then "Timeline Settings."
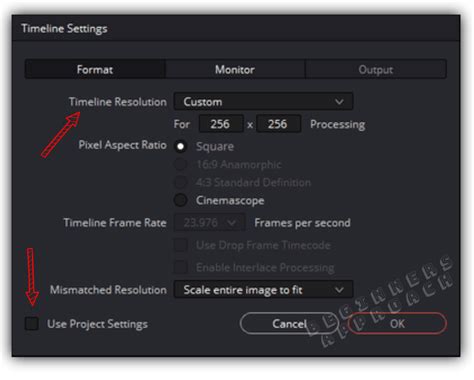
Step 4: Uncheck "Use Project Settings"The Timeline Settings window will open. You'll notice that most options are grayed out because they are locked to the project's Master Settings by default. To gain control, you must uncheck the box labeled "Use Project Settings" at the bottom left of the window.
Step 5: Set the New ResolutionWith "Use Project Settings" unchecked, the resolution options will become accessible. Click the dropdown menu next to "Timeline Resolution" to choose from common presets like 1920x1080 (HD), 3840x2160 (Ultra HD/4K), 1080x1920 (Vertical), or a custom resolution.
Step 6: Review Mismatched Resolutions (Optional but Recommended)Before pressing "OK," navigate to the "Format" tab within the Timeline Settings. Here, you'll find the "Mismatched Resolution" option. This setting dictates how DaVinci Resolve handles clips whose resolution doesn't match your new timeline resolution. The main options are:
- Center Crop with No Resizing: This maintains the original clip's size without any scaling, potentially leaving black bars if the clip's aspect ratio differs from the timeline.
- Scale Full Frame with Crop: This scales the clip proportionally based on its shorter edge to match the timeline's shorter edge. This ensures the entire frame is filled, but parts of the clip might be cropped.
- Scale Entire Image to Fit: This is the default option. It scales the clip proportionally based on its longer edge to match the timeline's longer edge. This ensures the entire clip is visible without cropping, but black bars might appear if the aspect ratios don't align perfectly.
- Stretch Frame to All Corners: This option non-proportionally stretches the clip to fill the entire timeline resolution, which can distort the image.
Choosing the right "Mismatched Resolution" setting is crucial for maintaining visual integrity.
Step 7: Apply ChangesOnce you've configured your settings, click "OK" to apply the changes to your timeline. DaVinci Resolve will add this new "timeline" to your media pool with the specified resolution.
Method 3: Quick Resolution Change in the Cut Page
For rapid adjustments, especially when working with social media formats, the Cut page offers a streamlined way to change your timeline's aspect ratio.
Step 1: Open the Cut PageClick on the "Cut" page icon, usually located at the bottom of the DaVinci Resolve interface.
Step 2: Access the Timeline Resolution MenuIn the Cut page viewer, look towards the top-right corner, just below the "Fullscreen" button. You'll find a button that often displays the current resolution (e.g., "1920 x 1080"). Click the arrow next to it.
Step 3: Select a Preset or Custom SettingsA dropdown menu will appear with several preset resolutions, such as 3840x2160 (4K), 1920x1080 (HD), 1080x1920 (Vertical), and 1080x1080 (Square). Simply click on your desired preset. Alternatively, you can select "Custom Timeline Settings" from the same dropdown to access the full Timeline Settings panel as described in Method 2.
Step 4: New Timeline CreationSelecting a preset resolution from the Cut page will automatically create a new timeline in your Media Pool with that resolution.
This method is exceptionally convenient for quickly switching between common aspect ratios without navigating through the full Project Settings. Some users leverage tools like TourBox's macro functions to create single-click shortcuts for changing aspect ratios, further streamlining this process.
How to Edit Shorts & Reels in DaVinci Resolve (Start to Finish)
Optimizing Performance With Resolution Settings
Changing your timeline resolution isn't just about output; it can significantly impact your editing experience, especially on less powerful hardware.
- Edit in Proxy Mode: DaVinci Resolve allows you to create lower-resolution proxy files for your footage. This dramatically reduces the processing power required for playback, leading to smoother editing, even with high-resolution footage. You can enable proxy mode from the playback menu.
- Use Optimized Media: Similar to proxies, optimized media generates lower-resolution versions of your clips that are optimized for real-time playback. This is particularly useful for highly compressed footage.
- Timeline Proxy Resolution: Within the playback settings, you can set a "Timeline Proxy Resolution." This allows you to work at a lower resolution (e.g., 720p) for smoother editing while still rendering your final output in your desired higher resolution (e.g., 4K). This is a fantastic way to balance performance and final quality.
Best Practices for Resolution in DaVinci Resolve
To ensure a smooth workflow and optimal results, consider these best practices:
- Set Timeline Resolution Early: It's highly recommended to set your project's timeline resolution before you begin editing. Changing it mid-project can sometimes lead to unexpected scaling issues or require re-editing certain sections.
- Consider Your Output Platform: Always set your timeline resolution based on where your final video will be displayed.
- For YouTube, 1080p is a standard, but uploading in 4K can lead to better compression quality, even if most viewers watch in 1080p.
- For film and commercial work, sticking to 4K or higher resolutions is generally preferred.
- For client previews, exporting in a lower resolution can save time and storage space.
- Understand Scaling Options: When mixing footage with different resolutions or aspect ratios, pay close attention to the "Image Scaling" settings within Project Settings or Timeline Settings. "Scale Entire Image to Fit" is often the best default for maintaining aspect ratio integrity.
- Hardware Considerations: If you experience performance issues, consider if your hardware can handle the chosen resolution. Utilizing proxies or optimized media can be a lifesaver.
- DaVinci Resolve Free vs. Studio: While the free version of DaVinci Resolve supports up to 4K resolution for output, the Studio version offers support for higher resolutions, including 8K.
Frequently Asked Questions About Resolution in DaVinci Resolve
- How do I change resolution in DaVinci Resolve?You can change it via Project Settings (Master Settings > Timeline Resolution) for the entire project, or on an individual timeline by right-clicking the timeline in the Media Pool and selecting Timeline Settings. The Cut page also offers quick preset changes.
- Can I edit in 1080p and export in 4K?Yes. Many editors use a 1080p timeline for smoother editing performance and then export their final project in 4K for delivery, leveraging upscaling.
- What's the maximum resolution in DaVinci Resolve?DaVinci Resolve Studio supports up to 8K resolution. The free version is typically limited to 4K.
- Why does my footage look blurry after scaling?This can often be due to the Image Scaling settings. Ensure you are using an appropriate setting like "Scale Entire Image to Fit" to avoid distortion or excessive cropping. Also, check if you are using proxies, which are inherently lower resolution.
- What resolution is best for YouTube?YouTube supports both 1080p and 4K. Uploading in 4K is often recommended for better compression and image quality, even if viewers watch in HD.
- Does DaVinci Resolve free support 4K?Yes, the free version of DaVinci Resolve allows you to set your timeline and export your final video in 4K resolution.
Mastering resolution management in DaVinci Resolve is key to balancing visual fidelity with editing performance. By understanding the different methods and best practices, you can ensure your video projects are optimized for both creation and final delivery.