Adobe Photoshop is an indispensable tool for digital artists and designers, offering a vast array of functionalities to manipulate images. Among its most fundamental and frequently used features is the Brush Tool, which allows for a wide range of creative expression. Effectively controlling the size, hardness, opacity, and other attributes of the brush is crucial for achieving desired results, whether you're painting, retouching, or creating complex digital artwork. This tutorial delves into the various methods for changing brush size and explores other essential brush settings, providing a comprehensive guide for users of all skill levels.
The Art of Brush Size Adjustment: Shortcuts and Precision
One of the most common tasks when working with Photoshop's brush tools is adjusting the brush size. Fortunately, Photoshop offers several efficient ways to accomplish this, with keyboard shortcuts being the fastest and most preferred method for many users.
Keyboard Shortcuts for Brush Size
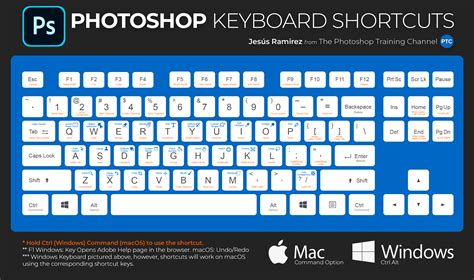
The primary keyboard shortcuts for changing brush size are the bracket keys.
- Decrease Brush Size: Press the
[key. - Increase Brush Size: Press the
]key.
These keys can be held down to continuously decrease or increase the brush size until the desired dimension is reached. This method is particularly useful for rapid adjustments during the painting process.
It's important to note that these bracket keys are specifically for size adjustment and do not affect brush hardness. For users with international keyboards where the bracket keys might be difficult to access or require multiple key presses, Photoshop provides customization options. Under Edit > Keyboard Shortcuts, you can choose Shortcuts For: Tools to reassign these functions to keys that are more convenient for your keyboard layout.
Precise Size Control via the Options Bar
While keyboard shortcuts are fast, they may not always offer the precision required for specific artistic needs. For more controlled adjustments, the Options Bar, located at the top of the Photoshop interface when the Brush Tool is selected, provides a direct slider for size modification.
- Select the Brush Tool: Press
Bon your keyboard. - Locate the Size Slider: In the Options Bar, you will see a thumbnail of your current brush tip, often accompanied by a numerical value indicating its current size. Directly below this, a slider allows you to precisely adjust the brush size by dragging it left or right.
For users who prefer to input a specific numerical value for brush size, this method allows for greater accuracy. Furthermore, you can often see the current size displayed numerically, offering an immediate visual confirmation of your adjustment.
Brush Settings Panel for Advanced Size Management
For even more granular control and to ensure that your chosen brush size is saved with your brush preset, the Brush Settings panel is the go-to resource.
- Open the Brush Settings Panel: You can access this panel by navigating to
Window > Brush Settingsor by double-clicking the Brush Tool icon in the toolbar. - Adjust Size: Within the Brush Settings panel, you'll find various options. For size, you'll typically adjust it within the
Brush Tip Shapesection. - Capture Brush Size in Preset: When defining or modifying a custom brush, ensure that the
Capture Brush Size in Presetoption is checked. This ensures that the size you've set will be saved as part of that specific brush preset, making it readily available for future use.
This panel also offers the opportunity to save custom brushes with their specific attributes, including size, which is invaluable for maintaining a consistent workflow and reusing specialized tools.
Modulating Brush Hardness: Softening and Sharpening Edges
Brush hardness is another critical attribute that significantly impacts the appearance of your strokes. It determines the transition between the painted area and the surrounding pixels, ranging from a sharp, defined edge to a soft, blended one.
Mouse-Based Hardness Control
Photoshop offers an intuitive, mouse-driven method for adjusting brush hardness directly on the canvas, which is particularly useful for quick, on-the-fly modifications without needing to access menus.
- Mac Users: Hold down
Option + Right Clickand drag your mouse vertically. Dragging upwards decreases hardness (creating a softer brush), while dragging downwards increases hardness (creating a harder brush). - Windows Users: Hold down
ALT + Right Clickand drag your mouse vertically. Similar to the Mac, dragging upwards softens the brush edge, and dragging downwards hardens it.
This method provides immediate visual feedback as you adjust the brush, making it an efficient way to fine-tune the edge of your strokes.
Keyboard Shortcuts for Brush Hardness
While the bracket keys [ and ] control brush size, Photoshop also offers specific keyboard shortcuts for hardness using curly brackets:
- Decrease Brush Hardness: Press the
{key. - Increase Brush Hardness: Press the
}key.
These shortcuts allow for incremental adjustments to hardness, complementing the size shortcuts for a comprehensive keyboard-driven workflow. Similar to the size shortcuts, these can be customized under Edit > Keyboard Shortcuts if needed, especially for users with non-US keyboard layouts.
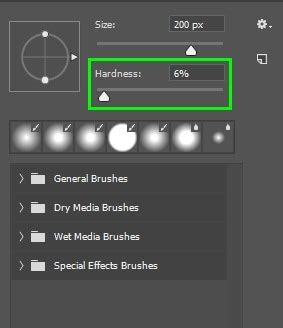
Hardness Slider in the Options Bar
Just as you can adjust brush size via a slider in the Options Bar, hardness can also be controlled there.
- Select the Brush Tool: Press
B. - Locate the Hardness Slider: In the Options Bar, below the size slider, you will find a corresponding slider for hardness. Dragging this slider to the left will decrease hardness, and dragging it to the right will increase it.
This provides another visual and direct method for setting the brush hardness before you begin painting.
Beyond Size and Hardness: Essential Brush Tool Properties
While size and hardness are paramount, Photoshop's Brush Tool offers a wealth of other properties that can be manipulated to achieve a vast spectrum of effects. Understanding these attributes unlocks the full potential of digital painting and retouching.
Opacity and Flow: Controlling Color Intensity
Opacity and Flow are two distinct yet related settings that govern how much color is applied with each stroke.
- Opacity: This setting determines the overall transparency of the paint stroke. A lower opacity means the paint will be more transparent, allowing underlying layers or colors to show through.
- Flow: This setting controls the rate at which paint is applied with each "dab" of the brush. A lower flow means that multiple passes with the brush are needed to build up the color intensity to its maximum.
Quick Opacity Adjustment:Tapping a numeric key on your keyboard (1-9) will set the brush opacity to that percentage (e.g., 5 sets it to 50%). Tapping two numbers quickly (e.g., 5 then 4) will set the opacity to that exact percentage (e.g., 54%). Pressing 0 clears the input and sets opacity to 100%, while tapping 0 twice sets it to 10%. These shortcuts can also be customized under Edit > Keyboard Shortcuts.
Flow Adjustment with Mixer Brush:For the Mixer Brush tool, Shift + tapping a numeric key changes the "Flow" value, offering a similar rapid adjustment capability for this specific tool.
Pressure Sensitivity:For users employing pressure-sensitive graphics tablets (like Wacom tablets), both Opacity and Size can be linked to pen pressure. Icons in the Options Bar allow you to toggle this pressure sensitivity on or off. When enabled, the pen's pressure dictates the opacity or size of the stroke. When disabled, these properties are controlled by the brush preset or manual adjustments. Custom keyboard shortcuts can be assigned to toggle these pressure-sensitive options on and off.
Blend Modes: Interacting with Underlying Pixels
The blend mode of a brush determines how the paint interacts with the pixels of the layers below. Photoshop offers numerous blend modes, each resulting in a unique visual effect, from simple darkening and lightening to complex color interactions.
Cycling Through Blend Modes:To quickly cycle through the available blend modes for a painting tool, hold down the Shift key and tap the + (plus) or - (minus) keys. This moves forward or backward through the list of blend modes, allowing for rapid experimentation. Customization of this shortcut is also possible via Edit > Keyboard Shortcuts.
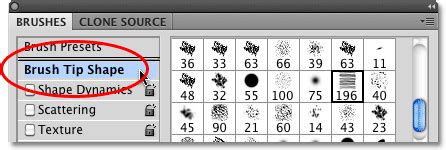
Brush Tip Shape and Spacing: Creating Patterns and Dotted Lines
The "Brush Tip Shape" section within the Brush Settings panel is where you can fundamentally alter the appearance of the brush tip itself.
Spacing:By adjusting the Spacing slider to the right, you increase the distance between individual brush tip impressions. This is how you can transform a solid brush stroke into a dotted line or a series of repeating marks. Experimenting with different spacing values can create unique textured effects.
Roundness and Angle:Modifying the Roundness and Angle of the brush tip can also introduce variation and character to your strokes, especially when combined with jitter settings in other brush parameters.
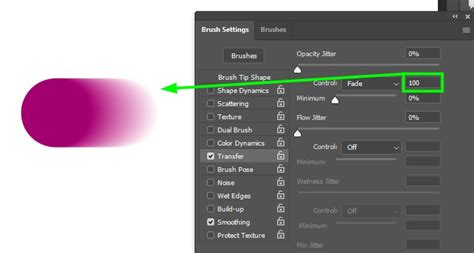
Applying Color Per Tip: Vibrant Variations
Photoshop allows for color to be applied on a "per stroke" or "per tip" basis. When "Apply Per Tip" is checked in the Color Dynamics section of the Brush Settings, the Hue, Saturation, and Brightness jitter settings will affect each individual impression of the brush tip within a stroke. This can lead to vibrant, multi-colored strokes where each part of the stroke has a slightly different hue, saturation, or brightness, creating a dynamic and organic feel.
Advanced Brush Techniques and Tools
Beyond basic adjustments, Photoshop provides sophisticated methods for creating and applying brushes, as well as tools that leverage brush-like functionalities.
Creating Straight and Smooth Lines
Shift Key for Straight Lines: To draw a perfectly straight line, select the Brush Tool, hold down the
Shiftkey, and then drag your cursor to create the stroke. Photoshop will automatically constrain the line to a horizontal, vertical, or 45-degree angle.Paths for Fluid, Precise Strokes: For highly controlled and fluid strokes, the Pen Tool is invaluable.
- Create a path using the Pen Tool.
- Ensure your desired painting tool is configured with the correct settings (brush size, opacity, etc.).
- Open the Paths panel (
Window > Paths). - From the panel's fly-out menu, select
Stroke Path. - Choose the desired tool from the dropdown menu.
- Simulate Pressure: To mimic the effect of pen pressure on a path stroke, select the path in the Paths panel, choose
Stroke Pathfrom the fly-out menu, and check theSimulate Pressureoption. This will create a stroke that tapers at the beginning and end, resembling a hand-drawn line.
Defining Custom Brushes
Photoshop's ability to create custom brushes is a powerful feature that allows artists to define their own unique tools.
- Select the Area: Use any of Photoshop's selection tools (Marquee, Lasso, etc.) to select the area of your image that you want to turn into a brush.
- Define Brush Preset: Go to
Edit > Define Brush Preset. - Name Your Brush: Give your new brush a descriptive name.
- Save with Attributes: To save the custom brush with its current attributes (like shape dynamics, scattering, etc.), open the Brush Settings panel, make any desired modifications, and then click the "New Brush Preset" icon at the bottom of the panel.
After defining a custom brush, you can further refine its behavior by adjusting options like Shape Dynamics and Scattering in the Brush Settings panel and then saving the modified brush again.
Recently Used Brushes and Modified Presets
Photoshop keeps track of your workflow by displaying the seven most recently used brushes. This allows for quick access to brushes you've been working with. Additionally, Photoshop can indicate if the currently used brush preset has been modified since it was loaded, helping you avoid accidental changes or to know when to save a modified preset.
Specialized Tools and Their Brush-like Functions
While the Brush Tool is central, other tools in Photoshop also utilize brush concepts.
Mixer Brush Tool
The Mixer Brush tool is designed to simulate the behavior of real-world paint mixing. It can pick up color from the canvas and blend it with the foreground color, offering a very organic painting experience. As mentioned earlier, Shift + numeric keys can be used to adjust its "Flow."
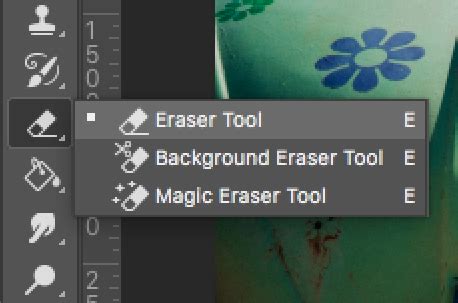
Eraser Tool with Special Modes
The Eraser Tool, while designed for removal, has a unique "Block" mode that transforms the eraser into a square shape, useful for pixel-level editing. More intriguingly, holding Option (Mac) or Alt (Windows) with the Eraser tool allows you to erase with history. By default, Photoshop takes a snapshot of the document at the top of the History panel upon opening. Holding Option/Alt with the Eraser tool will then paint with this initial snapshot, effectively reverting parts of the image. You can change which history state the Eraser uses by clicking in the well to the left of any desired state in the History panel before using the Option/Alt + Eraser combination.
Paint Bucket Tool: Fills and Patterns
The Paint Bucket Tool is used to fill areas with either the foreground color or a selected pattern. Its behavior can be modified by its blend mode. Setting the blend mode to "Behind" and then clicking on a transparent area allows you to fill that transparent area with the foreground color, which can be useful for certain compositing tasks.
Gradient Tool: Smooth Color Transitions
The Gradient Tool creates smooth transitions between multiple colors. It offers various styles, including Linear, Radial, Angle, Reflected, and Diamond. Within the Gradient Editor, double-clicking on a gradient stop opens the color picker, allowing for precise color selection for each point in the gradient.
How To Use The Gradient Tool In Photoshop (UPDATED)
Customization for Global Workflows
Photoshop's flexibility extends to its shortcut customization, which is particularly relevant for users working with non-US keyboard layouts or specialized hardware like Wacom tablets. Issues can arise when Photoshop expects a single keystroke for a shortcut, but a non-US keyboard requires multiple keys to produce that character (e.g., a bracket). In such cases, customizing shortcuts under Edit > Keyboard Shortcuts is essential. For tablet users, assigning keys like Alt or Option to a tablet's custom buttons can further streamline the process of adjusting brush size and hardness without needing to move a hand away from the tablet.
Ultimately, mastering the various methods for controlling brush size, hardness, and other properties in Photoshop is key to efficient and expressive digital creation. Experimenting with these tools and shortcuts will help you discover the techniques that best suit your individual workflow and artistic style.