In the realm of photography, capturing scenes with extreme contrasts in lighting, a common desire among many photographers, presents a significant challenge. The dynamic range of a scene-the difference between its brightest and darkest areas-can often exceed the capabilities of a camera sensor. This is where High Dynamic Range (HDR) photography and specifically, Lightroom's Merge to HDR feature, become invaluable tools. HDR techniques allow photographers to overcome these limitations, producing images that retain detail in both the brilliant highlights and the deep shadows, resulting in a more visually compelling and realistic representation of the scene.
The Necessity of HDR: Bridging the Dynamic Range Gap
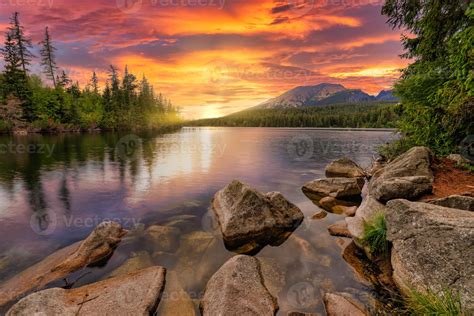
Our eyes possess a remarkable ability to perceive a far broader spectrum of brightness levels than most camera sensors can capture in a single exposure. When faced with high-contrast scenes-such as a landscape at sunset, a sunlit exterior with deep interior shadows, or a brightly lit architectural facade-a single photograph often results in blown-out highlights or completely black shadows, losing critical detail. HDR photography addresses this by merging multiple exposures of the same scene, each captured at different brightness levels, to create a composite image with an expanded dynamic range. This process effectively bridges the gap between what our cameras can capture and what our eyes perceive, leading to images with balanced exposure and a more natural appearance.
The primary motivation for creating HDR images is to capture and display a wider range of brightness levels in a single photograph. It retains details in both the brightest highlights and the darkest shadows, resulting in a more realistic and visually pleasing image. Many real-world scenes have a high contrast between their brightest and darkest areas. Without HDR, you might have to choose between properly exposing the highlights or the shadows, leading to lost details in the other. HDR allows you to balance the exposure, so you can see both the details in a bright sky and those in a shaded landscape, for example. Furthermore, HDR can be used to create images that closely resemble what the human eye sees, which is especially valuable in architectural and interior photography where maintaining the integrity of lighting conditions is essential.
Understanding Bracketing for HDR
The foundation of HDR photography lies in capturing a series of bracketed exposures. This involves taking multiple shots of the same scene with varying exposure settings. The number of bracketed images and the separation between their exposures (stops) can influence the final HDR result.
For scenes with a dynamic range less than 3.0 stops in total separation (e.g., -1.5, 0, +1.5 stops), it's often sufficient to use only the darkest and brightest exposures to generate an HDR. In such cases, the middle exposure, or the zero exposure, is not strictly necessary for a quality exposure blend. Photographers employing a ± 1.5 exposure bracket can therefore forego the middle exposure. This simplification not only speeds up the rendering process but also improves the chances of successful alignment in the resultant HDR by minimizing the potential for camera movement between exposures. For those who typically shoot with a wider bracket, such as a 5-shot ± 4.0 stop sequence, there's an opportunity to reduce the number of shots to four for merging and processing HDR, further streamlining the workflow.
To ensure minimal movement between shots, it is highly recommended to use a tripod. Consistency in exposure for every shot taken within a scene is also crucial. While shooting RAW files is generally preferred over JPEGs for their greater editing flexibility, Lightroom's HDR DNGs offer a significantly wider innate dynamic range compared to regular RAW files.
Lightroom's Merge to HDR: A Seamless Workflow
Adobe Lightroom offers a powerful and integrated solution for merging bracketed exposures into a single HDR image, eliminating the need for external plugins or additional software, thereby saving both time and money. This built-in feature does an excellent job of creating natural-looking HDR images, avoiding the garish and over-saturated results that can sometimes be associated with HDR processing.
The process of merging bracketed exposures in Lightroom is remarkably straightforward, even for those new to photo editing.
Step-by-Step Guide to Merging HDR in Lightroom
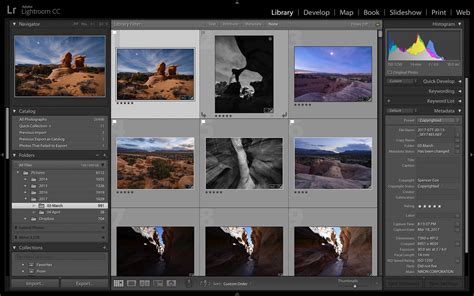
Select the Bracketed Photos: Begin in the Library module of Lightroom. Navigate to your bracketed RAW files. Hold down the Ctrl (Windows) or Command (Mac) key and click on each of the bracketed exposures you wish to merge to select them.
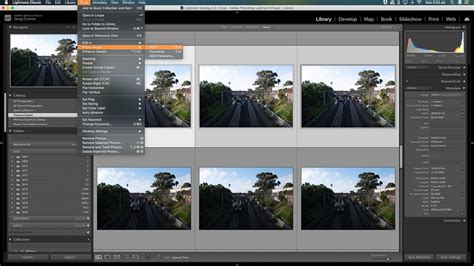
Initiate Photo Merge: Right-click on one of the selected images. From the context menu, navigate to "Photo Merge" and then select "HDR."
The HDR Merge Preview Window: Upon selecting "HDR," an "HDR Merge Preview" window will appear. This window presents a preview of the potential HDR image and offers several key settings to optimize the merge process.
- Auto Align: This option is invaluable if there was any slight movement between your bracketed shots. It's particularly useful if you shot handheld and even minor camera shake occurred. Enabling Auto Align ensures that Lightroom corrects for any discrepancies in framing, aligning the images as if they were perfectly still.
- Auto Settings (Auto Tone): This function provides a starting point for an evenly toned merged image, similar to the Auto settings found in the Develop module's Basic Panel. While it can offer a quick optimization, many photographers prefer to leave this unchecked to maintain full control during the subsequent editing stages in the Develop module.
- Deghost Amount: This setting addresses "ghosting," a common artifact where moving elements within a scene (like leaves blowing in the wind, moving vehicles, or people walking) appear unnaturally semi-transparent or create faint outlines in the merged HDR image. The Deghost Amount slider offers options from "None" to "Low," "Medium," and "High." It's advisable to start with "Low" deghosting to achieve a clean merged image and then progressively increase the setting if necessary, previewing the effect within the dialog box. If your scene was entirely static, leaving this at "None" will generally yield the cleanest HDR DNG file with fewer artifacts.
- Create Stack: Selecting the "Create Stack" option will automatically group your original bracketed files and the newly created HDR image into a single stack. The merged HDR image will be conveniently placed at the top of this stack, keeping your workflow organized.
Create the HDR Image: Once you have adjusted the settings to your satisfaction, click the "Merge" button. Lightroom will then process the selected images, creating a new HDR DNG file. This file will typically have the suffix "-HDR" appended to its original filename and will be placed in your filmstrip, usually with the original bracketed set stacked together. The process may take some time, especially if you have selected a large number of images for merging.
Editing Your HDR Image in Lightroom
The HDR DNG file generated by Lightroom serves as a powerful starting point for further editing. It possesses a greatly extended dynamic range, allowing for more extreme tonal adjustments than a standard RAW file. All the editing tools available in Lightroom's Develop module function exactly as they do on regular images, offering complete creative control.
How to Create an HDR Image in Lightroom
- Basic Adjustments: Begin in the Develop module. Start with fundamental adjustments such as Exposure, Contrast, Highlights, Shadows, Whites, and Blacks. Tweak these settings to achieve your desired overall tonal balance. You might find that the merged photo is too light or too dark, and these sliders are your first line of defense.
- Tone Curve: For more precise control over the tonal range, utilize the Tone Curve panel. This allows you to fine-tune the relationship between the highlights, midtones, and shadows, sculpt the image's contrast, and impart a specific mood.
- HSL/Color Panel: Enhance the vibrancy and richness of your image by adjusting individual colors using the HSL/Color panel. You can selectively saturate or desaturate specific color ranges, alter hues, and adjust luminance to make your colors pop.
- Detail Panel: Sharpen your image to bring out fine details and reduce any unwanted noise that may have been amplified during the HDR process.
- Local Adjustments: Employ graduated filters, radial filters, and adjustment brushes to selectively modify specific areas of your image. This is where you can fine-tune exposure, clarity, color, and other parameters in localized regions, allowing for nuanced enhancements. For instance, you might want to subtly darken a bright sky further or lift the shadows in a particular foreground element.
- Creative Touches: Apply any final creative adjustments, such as vignetting to draw attention to the subject, cropping to improve composition, or adding other stylistic treatments to achieve your unique vision.
The editing version of an HDR image can look significantly different from the original merged file, demonstrating the extensive possibilities for refinement. Even with scenes that don't present extreme tonal ranges, merging two exposures can effectively capture details that might otherwise be lost.
Optimizing Your HDR Workflow
While Lightroom’s built-in HDR merge is robust, a few practices can further enhance your results:
- Shoot RAW: Always shoot in RAW format. This provides the maximum amount of data for post-processing and is essential for successful HDR merging.
- Manual Mode: Use manual mode for consistent exposure settings across your bracketed shots. Adjusting only the shutter speed is often the best approach for maintaining consistent exposure.
- Tripod Usage: For the cleanest HDR results and to minimize the need for extensive deghosting, always use a tripod. This ensures that the camera remains perfectly still between exposures.
- Exposure Intervals: For most scenarios, four to five bracketed exposures at 2-stop intervals are usually sufficient to cover the entire dynamic range without introducing redundant frames.
- Pre-Merge Editing: It is best to carry out the HDR Merge process with files that haven’t yet been significantly edited in the Develop module. While Lightroom does retain some adjusted settings, it primarily works with the original image data. Applying extensive edits before merging can sometimes lead to unexpected results or limitations in how those adjustments are carried over to the final HDR DNG.
Understanding HDR Output and Display
Lightroom's Merge to HDR feature creates a 32-bit DNG file, often referred to as a "superRAW," which boasts a significantly extended dynamic range. This DNG file can be processed in Lightroom just like any other DNG or RAW file, but with a key difference: the Exposure slider in the Develop module offers a much wider range, typically from -10 to +10 stops, compared to the standard -4 to +4 stops.
The advent of High Dynamic Range (HDR) displays signifies a new era in visual fidelity, offering greater brightness and contrast than Standard Dynamic Range (SDR) displays. Lightroom for mobile (Android) has introduced High Dynamic Range Output, enabling users to capture, enhance, and export HDR photos. This feature is currently supported on specific Google Pixel devices and offers HDR editing controls on a broader range of Android devices.
When an HDR photo is viewed on an SDR display, it must be adjusted or "tone-mapped" to preserve its appearance as closely as possible. The High Dynamic Range section within Lightroom's histogram provides additional options for previewing a photo on an SDR display and adjusting its appearance. These settings can be copied and pasted to Presets and Synced across images.
It is important to note that software support for HDR photos is still evolving. While Lightroom supports HDR editing, other applications on macOS, such as Finder, Preview, and Safari, may not yet fully support reading or displaying HDR content, even if they can handle newer file formats like AVIF or JPEG XL.
The Artistic Dimension of HDR
Beyond its technical ability to capture detail, HDR photography offers a powerful avenue for artistic expression. By merging bracketed exposures, photographers can choose how to render a scene creatively, emphasizing certain aspects or tonal ranges to convey a specific mood or narrative. HDR isn't solely about achieving realism; it can be used to create surreal, dreamy, or dramatic images that transcend the limitations of human perception, allowing photographers to express their unique vision.
When to Use HDR and When Not To
While Lightroom's HDR Merge feature is a potent tool, it's not a panacea for all photographic challenges. You won’t need this HDR merge technique all the time; it’s still simpler and often more effective to shoot with a single RAW file in most common lighting conditions. HDR is particularly beneficial for:
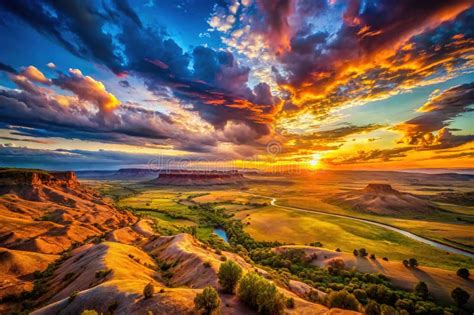
- High-contrast scenes: Landscapes at sunrise or sunset, backlit subjects, or scenes with extreme variations in light.
- Scenes requiring balanced detail: When you need to retain detail in both the brightest sky and the deepest shadows simultaneously.
- Creative expression: To achieve a dramatic or stylized look that goes beyond standard dynamic range.
However, HDR won't fix a badly composed, poorly lit, or otherwise uninteresting image. Over-reliance on HDR can lead to unnatural-looking results. If you eliminate all shadows completely and pull them down to mid-tones, then do the same with the highlights, you can end up with a "mushy" image lacking contrast and depth. The goal is to enhance, not to create an artificial representation that detracts from the scene's natural beauty.
In conclusion, Lightroom's Merge to HDR feature provides photographers with a powerful, accessible, and cost-effective way to overcome the limitations of dynamic range. By understanding the principles of bracketing, utilizing the straightforward merge process, and applying thoughtful post-processing, you can unlock a new level of detail and creative potential in your high-contrast images.