Many Procreate beginners struggle with adding color without destroying their linework. One common sentiment among new digital artists is the initial confusion surrounding layers, leading to the frustration of constantly ruining sketches. Fortunately, Procreate offers several straightforward and flexible methods for coloring, catering to a wide range of artistic goals, from loose, expressive illustrations to precise, flat designs. This guide will explore the primary approaches, detailing their advantages, disadvantages, and offering practical tips for seamless execution. We will delve into the nuances of each technique, ensuring a solid understanding of how to effectively fill your line art with vibrant color.
The Foundation: Preparing Your Line Art
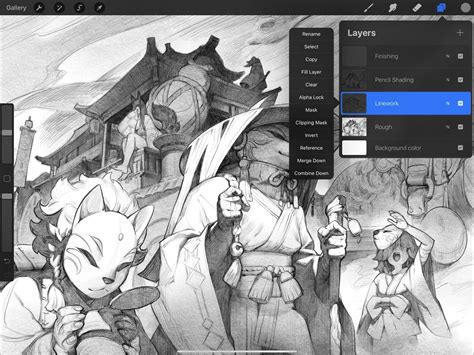
Before diving into coloring, it's crucial to prepare your line art layer. A fundamental step for many coloring techniques is to lock your line art. This prevents accidental edits or smudges while you're working on the color layers. To do this, navigate to the Layers panel by tapping the double-square icon at the top right of your screen. Once the panel is open, locate your line art layer. Swipe this layer to the left and select the "Lock" option. This simple action ensures the integrity of your linework throughout the coloring process.
Method 1: Painting Directly on a New Layer - The Expressive Approach
This method feels most natural for artists aiming for a painterly, expressive look, particularly effective for fashion illustrations where a sense of depth and texture is desired. It closely resembles traditional illustration techniques using markers or watercolors.
Steps to Direct Painting:
- Lock Your Line Art: As mentioned, ensure your line art layer is locked to prevent accidental modifications.
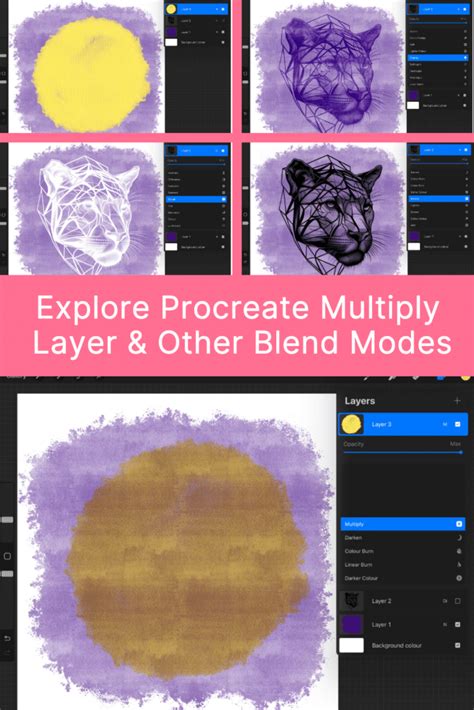
- Create a New Multiply Layer: Above your locked line art layer, tap the "+" button in the Layers panel to create a new layer. Tap the layer's thumbnail, which usually displays an "N" (for Normal blend mode), to open the layer properties. Here, you will change the Blend Mode to "Multiply." This blend mode is essential because it allows the colors on this new layer to show through your linework while keeping the lines themselves dark.
- Choose Your Brush: Access the Brush Library by tapping the paintbrush icon in the top right corner. Procreate offers various categories like Inking, Painting, and Airbrushing, each containing a multitude of brushes. Experiment with different strokes on your canvas until you discover a brush that resonates with your artistic style. For a loose, transparent feel that allows for effective layering, a custom brush like the "Watery Marker" can be an excellent choice, mimicking professional markers.
- Select Your Colors: The Color menu is accessed by tapping the color circle in the top-right corner of your screen. You have several options for color selection:
- Color Wheel: Drag your finger around the wheel to pick a hue.
- Sliders: Utilize the Disc, Classic, Value, or Harmony tabs for more precise control over your color choices.
- Saving Colors: To build a custom palette for your project, navigate to the "Palettes" tab within the Color menu. Tap the "+" icon in the top-right menu and select "Create New Palette." You'll find a new "untitled" palette at the top of your library. Tap on the empty squares within this palette to add your chosen swatches, creating a personalized color library.
- Importing Palettes: For even greater convenience, you can import custom palettes. In the Color menu, go to "Palettes," tap the "+" icon, and then choose "New from File," "New from Photos," or "New from Camera." This allows you to import
.swatchesfiles or extract colors directly from an image on your iPad, making them readily available in your palette library.
- Paint Your Design: Begin painting directly onto your Multiply layer. The colors will appear beneath the dark lines of your locked line art layer, creating a cohesive illustration.
Pros of Direct Painting:
- Painterly and Expressive: This method naturally lends itself to a rich, organic look.
- Ideal for Shading and Blending: It's excellent for rendering subtle shading, seamless blending, and creating believable fabric textures.
- Traditional Feel: It offers an experience akin to working with physical markers or watercolors.
Cons of Direct Painting:
- Time-Consuming: Achieving a polished look can take more time compared to other methods.
- Requires a Steady Hand: While Procreate's stabilization features can assist, a degree of control is needed.
- Difficult Colorway Changes: Making significant color adjustments later in the process can be more challenging.
For those looking to incorporate patterns or prints into their sketches, a dedicated step-by-step guide on adding prints in Procreate can be incredibly beneficial.
Method 2: Color Drop (Fill Tool) - Precision and Speed
Color Drop is Procreate's powerful drag-and-drop fill tool, renowned for its ability to create clean, flat coloring. This is particularly useful for technical illustrations like fashion flats, where accuracy is paramount.
Option A: Closed Shapes with a Reference Layer
This option is ideal when your line art forms completely enclosed shapes.
- Ensure Closed Shapes: Verify that your line art is a continuous, unbroken outline with no gaps.
- Lock Your Line Art Layer: Swipe left on your line art layer and select "Lock."
- Create a New Fill Layer: Tap the "+" button to create a new, blank layer above your locked line art. This layer will serve as your "Reference Layer" for the Color Drop.
- Color Drop:
- Active Color: Drag the active color swatch from the top-right circle and drop it into the area you wish to fill.
- Palette Swatches: You can also drag swatches directly from the Palettes menu. Open the Color panel, go to "Palettes," and tap-and-drag a swatch into your canvas.
- Important: You must drop the color into each separate closed area on your reference layer individually. For instance, on a t-shirt sketch, you would fill the body of the shirt and each sleeve as distinct actions.
Option B: Open Shapes with a Filled Outline Layer
Many fashion sketches, due to their expressive nature, often have intentional gaps or textured lines that make Option A impractical. In such cases, this method, often preferred by experienced designers, becomes invaluable.
- Lock Your Sketch Layer: As before, lock your line art layer.
- Create a New Layer Below: Tap "+" to create a new layer and drag it below your locked sketch layer.
- Draw an Outline Shape: Select your desired color from the Color menu. On this new layer, carefully draw an outline that completely encloses the area you want to fill, ensuring it connects all the open edges of your sketch. This new outline acts as a containment for the Color Drop.
- Color Drop: Now, drag your active color from the top-right circle and drop it into the area enclosed by the outline you just drew. The color will fill precisely within these boundaries.
Pros of Color Drop:
- Speed and Precision: Extremely fast for filling large areas accurately.
- Editable Linework: Keeps your linework separate from the color, allowing for easy edits.
- Efficient Colorways: Excellent for quickly generating multiple color variations of flat designs.
Cons of Color Drop:
- Requires Closed Outlines (Option A): If using the reference layer method, perfect outlines are essential.
- Residual Color: If filling on the same layer as your line art without a reference layer, color can sometimes "spill" or leave halos. Using a separate layer for fills mitigates this.
- Less Natural for Rendering: It's less suited for organic shading and texture compared to direct painting.
Common Mistakes to Avoid with Color Drop:
- Spilling Across the Canvas: This typically occurs when your outlines are not completely closed. Always zoom in and use a brush to patch any tiny gaps before attempting Color Drop.
- Residual Color Halos: If you attempt to fill directly on your line art layer, previous colors might linger. Always use a separate layer for your fills to prevent this.
Bonus Techniques for Enhanced Coloring
Procreate offers additional tools and features that can significantly enhance your coloring workflow.
Turn on Vertical Symmetry Guide
For symmetrical designs, such as garments, Procreate's Vertical Symmetry Guide can save a considerable amount of time by allowing you to draw or color on both sides simultaneously.
- Access Actions: Tap the wrench icon (Actions menu).
- Canvas Settings: Navigate to the "Canvas" tab.
- Drawing Guide: Toggle on "Drawing Guide" and then tap "Edit Drawing Guide."
- Symmetry Options: Choose "Symmetry" and under "Options," select "Vertical." The name of your active layer will now display "Assisted," indicating that symmetry is active.
Add Shadows and Highlights
Once your base colors are laid down, you can add depth and dimension with shadows and highlights without disturbing your existing linework or flat fills.
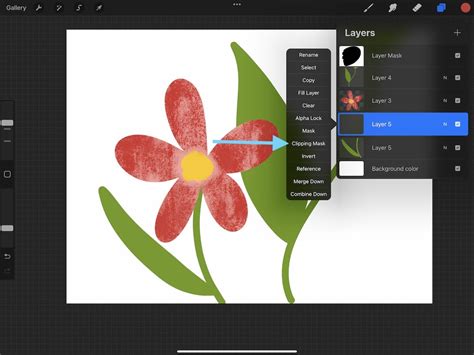
- Create a New Layer: In the Layers panel, tap "+" to create a new layer positioned above your base color layer.
- Apply Clipping Mask: Tap on this new layer and select "Clipping Mask." A clipping mask ensures that anything you paint on this layer will only appear within the boundaries of the layer directly below it, effectively acting like a stencil.
- Set Blend Mode: Tap the "N" on the new layer to access Blend Modes. For shadows, select "Multiply." For highlights, "Overlay" or "Screen" are good choices.
- Paint: Using darker tones on a Multiply layer will create shadows, while lighter tones on an Overlay or Screen layer will add highlights.
- Separate Layers: For maximum flexibility, create separate layers for shadows and highlights. This allows you to apply different blend modes to each and adjust them independently without affecting the other.
How to Use Alpha Lock, Clipping Mask & Layer Mask in Procreate - Procreate Tips
Method 3: Recoloring Made Easy - Iterating Through Colorways
Fashion designers frequently need to present multiple color options for the same sketch. Procreate's layer system makes this process incredibly efficient, eliminating the need to repaint from scratch.
Options for Recoloring:
- Replace with ColorDrop: The simplest method is to use Color Drop on your existing fill layer. Drag a new color swatch from the Color menu and drop it onto the area you wish to change. This will instantly overwrite the previous color.
- Clipping Masks for Multiple Options: For testing various color schemes simultaneously, start by setting your original fill layer to white. Then, create a new layer directly above it and apply a Clipping Mask to this new layer. Now, drag any color into your sketch on this clipped layer; the color will be restricted to the white shape below, functioning as a stencil. You can repeat this process on additional layers, each with a different color, to explore multiple colorways side-by-side.
Designing with Color: A Deeper Dive
When creating artwork, especially for product design like custom phone cases, the setup and composition are as important as the coloring itself. For instance, using dimensions like 7.5 x 15.5 centimeters at 600 DPI is ideal for printing, ensuring high quality. Remember that your artwork should tell a story, guiding the viewer's eye through a narrative. A consistent flow, where elements lead the eye naturally, is key.
A crucial tip for coloring any design, particularly for product use, is to place each distinct color on its own separate layer. This organizational strategy allows for easy identification and modification of any color throughout the entire design process. If you decide to change the color of all the bees, for example, having each bee's color on its own layer makes this a simple task.
Finally, when exporting your artwork for production, always check the required file format with your manufacturer. For many applications, exporting as a PNG is a safe and versatile choice.