The world of digital photography, while offering incredible creative freedom, can sometimes present unexpected visual challenges. One such phenomenon that photographers frequently encounter, often without realizing its name, is the moiré pattern. This unwanted visual glitch, appearing as a series of faint or pronounced mesh-like lines, can detract from the professionalism of an image. Fortunately, with the right techniques and tools within Adobe Photoshop, these distracting patterns can be effectively identified and removed, restoring the clarity and integrity of your photographs.
Understanding the Moiré Phenomenon
At its core, a moiré pattern is an optical illusion that arises from the interference between two similar repeating patterns. In digital photography, this typically occurs when the fine pattern of an object in your scene interacts with the equally fine, grid-like structure of your camera's sensor. This interference can lead to the creation of false color and false luminosity patterns on the image, manifesting as wavy, often colorful, stripes that were not visible to the naked eye.
This phenomenon is particularly prevalent when photographing subjects with intricate, repeating textures. Common culprits include finely woven fabrics like certain types of shirts, ties, or even upholstery. When these patterns align in a specific way with the camera's sensor grid, the moiré effect is triggered. For instance, photographing a person in a suit with a subtle pinstripe, or a subject wearing a silk garment, can often result in the appearance of moiré. Even seemingly solid objects can exhibit this issue; a camera bag with a textured surface, for example, might unexpectedly display a moiré pattern.
The underlying cause is the sampling process of digital imaging. The camera sensor captures discrete data points (pixels), and when the frequency of the subject's pattern is close to the frequency of the sensor's grid, aliasing occurs. This aliasing is what we perceive as the moiré pattern. It's a form of digital noise, a glitch that arises from the way the digital system "sees" and records the visual information.
Preventive Measures: Avoiding Moiré Before it Happens
While Photoshop offers powerful tools for correction, the best approach is often prevention. If you're aware of the potential for moiré, several photographic techniques can help mitigate its occurrence in the first place.
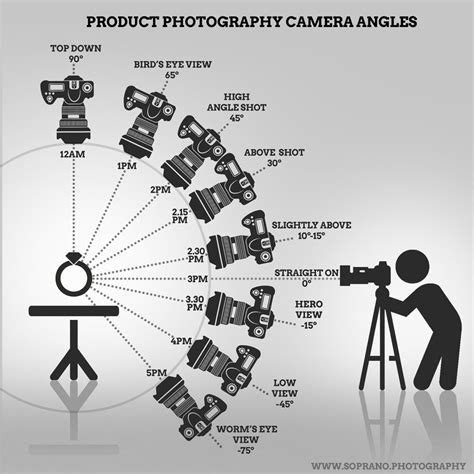
One of the simplest adjustments is to alter your shooting angle. Even a slight shift in perspective can change the way the subject's pattern interacts with the camera sensor, potentially disrupting the conditions that lead to moiré. Experimenting with different viewpoints can often yield a cleaner image without the need for post-processing.
Another effective camera setting is to adjust the aperture. Using a smaller aperture (a higher f-number) increases the depth of field but also affects the lens's resolution and can influence how light rays interact with the sensor. While not a guaranteed solution, a smaller aperture can sometimes reduce the likelihood of moiré appearing.
Similarly, changing the distance from the subject can also play a role. Moving the camera closer or further away alters the scale of the subject's pattern relative to the camera's sensor. This change in scale can break the critical alignment that produces moiré.
Moiré Removal in Photoshop: A Step-by-Step Approach
When prevention isn't possible or effective, Photoshop provides a robust set of tools to tackle moiré patterns. Several methods can be employed, ranging from quick fixes using built-in filters to more advanced techniques that offer greater control.
Method 1: Using the Camera Raw Filter's Moiré Reduction
One of the most direct and often effective methods involves leveraging the Camera Raw Filter, which is integrated into Photoshop. This tool includes a specific slider designed to combat moiré patterns.
Open Your Image: Begin by opening the photograph containing the moiré pattern in Photoshop. Navigate to
File > Openand select your image.Enhance Moiré Visibility (Optional but Recommended): For subtle moiré, it can be beneficial to make it more apparent before attempting removal. To do this, add a Black & White adjustment layer. In the Properties panel, select the "Black & White with Blue Filter (RGB)" preset. This adjustment can help "pop out" any existing moiré, making it easier to identify and target.
Duplicate the Layer: To ensure non-destructive editing, duplicate your background layer. Select the
Backgroundlayer and pressControl-J(Windows) orCommand-J(Mac) to create a copy. Name this new layer "Moiré Removal."Access Camera Raw Filter: With the "Moiré Removal" layer selected, go to
Filter > Camera Raw Filter.Utilize the Adjustment Brush: Within the Camera Raw Filter interface, select the
Adjustment Brushtool (shortcutK). Ensure all brush settings are at their default (usually 0) for new adjustments.Apply Moiré Reduction: Locate the
Moiré Reductionslider. Set this slider to100.Brush Over Moiré Areas: Carefully brush over the areas of your image that exhibit the moiré pattern. The Adjustment Brush will apply the moiré reduction effect specifically to these selected regions.
Confirm and Name: Once you have brushed over all affected areas, click
OKto exit the Camera Raw Filter. You can then rename your layer to something descriptive, like "Moiré Removal," for better organization.
This method is particularly useful for its directness and the dedicated tool it provides. The "Moiré Reduction" slider in Camera Raw is specifically engineered to counteract the interference patterns responsible for moiré.
Method 2: Frequency Separation (Advanced Technique)
For more complex moiré issues or when a higher degree of control is desired, the frequency separation technique offers a sophisticated approach. This method separates the image into high-frequency details (textures, sharp edges) and low-frequency information (color, smooth tones), allowing for targeted edits.
Duplicate Image Layers: Create two duplicates of your original image layer.
- Name the lower layer
Low frequency. - Name the upper layer
High Frequency.
- Name the lower layer
Apply Gaussian Blur to Low Frequency Layer: Select the
Low frequencylayer. Go toFilter > Blur > Gaussian Blur. Adjust the radius until the fine pattern details (including the moiré dots) just disappear. A value around1.6 pxis often a good starting point, but this will vary depending on your image resolution. The goal is to smooth out the texture and color information, leaving only the broader tonal variations.Prepare the High Frequency Layer: Select the
High Frequencylayer.- Go to
Image > Apply Image. - In the
Apply Imagedialog box:- Set the
Sourcelayer toLow Frequency. - Set the
Blendingmode toSubtract. - Set
Scaleto2. - Set
Offsetto128.
- Set the
- Click
OK. - Note: For 16-bit images, step 3 changes slightly. The
Subtractblending mode and the specific values for Scale and Offset are designed to isolate the texture details from the blurred layer.
- Go to
Set Blending Mode for High Frequency Layer: Change the blending mode of the
High Frequencylayer toLinear Light. This will reconstruct the image, but now the moiré pattern is isolated on this layer as high-frequency information.Remove Moiré on Low Frequency Layer: Select the
Low frequencylayer. Use a soft brush tool with a low opacity. Sample colors from the surrounding areas of the moiré pattern using the eyedropper tool. Carefully paint over the moiré areas on this layer. Since you're working on the smoothed-out tonal layer, you're essentially painting out the distracting pattern with corrected color and tone, without affecting the sharper details that are preserved on theHigh Frequencylayer.
This method requires a bit more practice but offers precise control over color and texture, allowing for a very clean removal of moiré.
Method 3: Using the Median Filter and Unsharp Mask (Scanner-Specific)
When dealing with moiré patterns that arise from scanning printed photographs, the presence of a halftone screen is often the culprit. This screen, necessary for printing, creates a grid-like pattern that can interfere with the digital capture. Specialized techniques can address this.
Scan at an Unusual Resolution: Instead of scanning at a standard resolution like 300 ppi, try scanning at an unusual number, for example, 718 ppi. This can help break up the direct alignment between the halftone screen and the scanner's sensor.
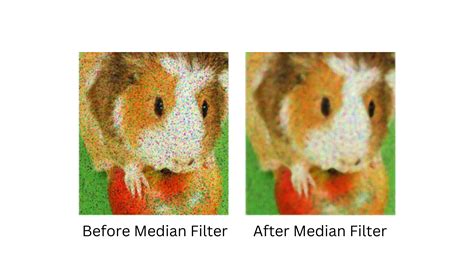
Apply the Median Filter: Go to
Filter > Noise > Median. Use a radius of 2 pixels. The Median filter works by blending adjacent pixels, effectively averaging them out. This process helps to smooth out the variations inherent in the halftone screen, reducing the moiré effect. The image may appear slightly softened or "melted" after this step.Reduce Image Size: After applying the Median filter, reduce the image to your desired resolution, such as 300 ppi for print. This resampling process, combined with the discarding of aberrant pixels, further enhances the smoothness of the image.
Apply Unsharp Mask: To restore sharpness that may have been lost during the blurring and resampling process, apply the
Unsharp Maskfilter (Filter > Sharpen > Unsharp Mask). Suggested settings include anAmountof 50%, aRadiusof 3 pixels, and aThresholdof 5 pixels. It's advisable to experiment with these settings to achieve the best visual result for your specific image.
This method is particularly effective for scanned prints where the moiré is a direct result of the printing process.
Method 4: A Combination of Blurring and Noise (General Purpose)
A more traditional approach involves a combination of blurring to soften the pattern and then adding a touch of noise to blend it further.
Open and Select: Open your image in Photoshop and select the area exhibiting the moiré effect. Consider using a slight feather (a couple of pixels) on your selection to ensure a smooth transition between the edited and unedited areas.
Apply Gaussian Blur: Go to
Filter > Blur > Gaussian Blur. Apply a small radius, typically 2 to 3 pixels. Use thePreviewoption to monitor the effect. The goal is to soften the harsh lines of the moiré without excessively blurring the surrounding details.Apply Median Filter: Immediately after the Gaussian Blur, go to
Filter > Noise > Median. Again, a radius of 2 pixels is often sufficient. While it might seem counterintuitive to add noise after blurring, the Median filter, in this context, can further smooth out the moiré pattern by averaging out pixels, leading to a more refined result than blur alone.Sharpen with Unsharp Mask: To counteract any softness introduced by the previous steps, apply the
Unsharp Maskfilter (Filter > Sharpen > Unsharp Mask). Settings around 60% to 70% forAmountcan be effective.- Pro Tip: For a subtler sharpening effect, consider applying the Unsharp Mask multiple times with a lower
Amountpercentage (e.g., 50% applied three times) rather than a single high-percentage application. This can achieve clearer edges without exaggerating contrast, leading to a more natural look.
- Pro Tip: For a subtler sharpening effect, consider applying the Unsharp Mask multiple times with a lower
How to fix a Moiré Pattern Problem in Photoshop
Recognizing and Addressing Moiré Patterns: A Critical Skill
The first step in effectively combating moiré is to recognize its presence. It often appears as a subtle, repeating mesh or wave-like pattern, most commonly on textured surfaces like clothing. When you zoom into an image and notice these "funky" or "wavy" lines, especially over areas that should be smooth or have a consistent texture, you're likely looking at a moiré pattern.
Understanding that this is a common occurrence in digital photography is crucial. Many photographers encounter it, and knowing how to fix it quickly and easily can save valuable editing time and salvage otherwise excellent images.
Advanced Considerations and Workflows
For professional photographers aiming for flawless results, the appearance of moiré can be particularly disheartening. When the standard Camera Raw adjustment doesn't yield satisfactory results, more intricate workflows might be necessary. Some photographers have developed specialized techniques, often involving the creation of dedicated layers to address color and pattern issues independently.
One such approach involves isolating the area with moiré onto its own layer. This can be achieved by making a selection of the moiré-affected object and then duplicating it onto a new layer (Cmd-J on Mac, Ctrl-J on Windows). This isolated layer can then be further manipulated, perhaps linked to a Hue/Saturation adjustment layer, to fine-tune the color and pattern corrections without impacting the rest of the image.
The development of Photoshop actions can also streamline these advanced workflows. An action can automate the setup of multiple layers and adjustment settings, providing a framework for complex moiré removal based on established techniques, such as those demonstrated in specialized tutorials. These actions can be invaluable for photographers who frequently encounter moiré and want a consistent, efficient method for its removal.
Ultimately, mastering moiré removal in Photoshop involves a combination of understanding the underlying phenomenon, employing appropriate photographic techniques, and utilizing the diverse tools available within the software. Whether through the straightforward application of the Camera Raw filter or the more nuanced frequency separation method, the goal remains the same: to restore the visual integrity of your images and present them in their most polished form.