Are you eager to harness the full potential of the Procreate app on your iPad? You've landed in the right place! This guide will walk you through the steps to create a custom monoline brush in Procreate. Whether you're a seasoned digital artist or just starting out, the monoline brush is a versatile tool that will take your artwork to the next level. Sit tight, we're about to dive deep into the world of Procreate and the magic of monoline brushes.
Getting Started with Procreate
Before we start crafting our monoline brush, let's get comfortable with Procreate. We'll cover everything from downloading and installing the app, understanding its interface, to setting up your canvas. So, let's get started!
Download and Install Procreate
Your journey to creating a monoline brush in Procreate starts with downloading the Procreate app. You can find the app in the Apple App store. Once you've found it, simply hit the download button and wait for it to install on your iPad. Take note, Procreate is not free, but its vast array of features make it a worthwhile investment for any digital artist.
Understanding the Procreate Interface
Now that you've installed Procreate, it's time to familiarize yourself with its interface. At first glance, Procreate's interface might seem intimidating, but don't worry-it's simpler than you think. Here are the key elements you need to know:
- The Gallery is where all your artwork is stored.
- The Actions tab (the wrench icon) houses options for sharing, inserting photos, and canvas information.
- The Adjustments tab (the magic wand icon) is for applying effects like blur, noise, and gradient map.
- The Layers tab (two squares icon) allows you to manage layers in your artwork.
Play around and explore the different tabs and icons on the interface. Before you know it, you'll be navigating Procreate like a pro!
Setting Up Your Canvas
Next, let's set up your canvas. Tap on the '+' icon in the top-right corner of the Gallery to create a new canvas. Procreate offers various preset sizes, but you can also create a custom size by tapping on the 'Custom' option. For our monoline brush creation, a canvas size of 2000 x 2000 pixels should be sufficient. Remember, a larger canvas allows for more detail, but it also uses more of your iPad's processing power.
You're all set now! With Procreate installed and your canvas ready, you're one step closer to creating your very own monoline brush.
Exploring Brushes in Procreate
Before we delve into creating a monoline brush, let's get a handle on the brush library in Procreate. Procreate comes with a wide variety of pre-installed brushes, each with their own unique settings and characteristics. Understanding how to navigate this library and adjust brush settings will be invaluable as we create our monoline brush.
Navigating the Brush Library
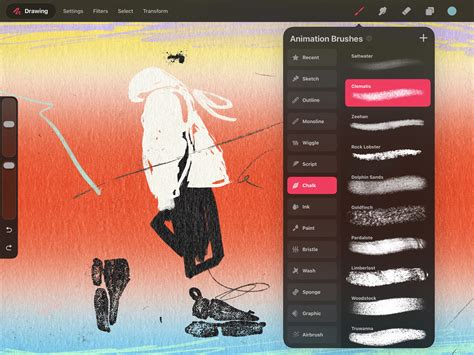
The brush library in Procreate is a treasure trove of artistic tools. It's located on the top-right of the screen, represented by a paintbrush icon. Tap it to open the library. Brushes are organized into sets like 'Inking', 'Painting', and 'Artistic'. Feel free to explore these sets and try out different brushes. The more you experiment, the better you'll understand the wide range of effects you can achieve with Procreate brushes.
Adjusting Brush Settings
One of the great things about Procreate is the ability to customize brushes. When you tap on a brush in the library, you'll see a whole host of settings that you can tweak. Let's look at some of the key ones:
- Spacing: This controls the space between each stamp of the brush. A lower percentage means the stamps are closer together, creating a smoother stroke.
- Streamline: This feature smooths out your strokes. It's especially useful for those of us who have shaky hands!
- Jitter: This will scatter the brush shape as you paint, creating a textured effect.
Feel free to play around with these settings. Understanding how they work will help us fine-tune our monoline brush later.
Now that we've got a handle on Procreate's brushes, let's move on to the main event-creating your very own monoline brush!
Creating Your Own Monoline Brush
Monoline brushes are great for creating consistent, clean lines, making them perfect for lettering, line art, or any design where precision is key. So, how do we create a monoline brush in Procreate? Let's walk through it step by step.
Selecting the Right Brush
First thing's first, we need to choose a base brush to work from. Tap on the '+' icon at the top right of the brush library to create a new brush. Procreate will ask you to choose a brush from the 'Source Library'. For a monoline brush, the 'Inking' category is a good place to start. The 'Studio Pen' is a popular choice because of its clean, sharp lines. Select this as your base brush.
Defining the Brush Shape
Next, we need to define the shape of our brush. In the 'Shape' menu, you can choose how your brush will look. For a monoline brush, we want a simple, well-defined shape. The 'Circle' shape is a good choice. Set the 'Scatter' and 'Rotation' to 0% to keep your lines consistent.
Setting Brush Dynamics
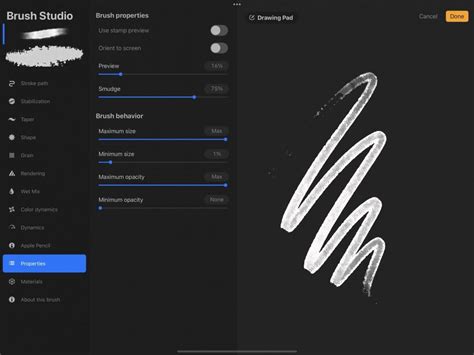
Now, let's tackle the brush dynamics. This is where we can really fine-tune our monoline brush. Go to the 'Stroke Path' menu and set 'Spacing' to the lowest value. This will ensure our brush creates a smooth, continuous line. Then, set the 'Streamline' to 100% to help smooth out your strokes. Finally, in the 'Apple Pencil' menu, set 'Size' and 'Opacity' to 'None'. This will ensure that your brush size and opacity won't change, no matter how hard or soft you press with your Apple Pencil.
And just like that, you've created your very own monoline brush in Procreate! Now that we have our brush, let's put it to work and start practicing.
Practicing with Your Monoline Brush
Now that you've created your monoline brush in Procreate, it's time to try it out. Practice is key to mastering any new tool, and our custom monoline brush is no exception. So, let's get started.
Creating Simple Strokes
Begin with creating simple strokes. This might sound easy, but it's a great way to get a feel for your new brush. Try out a variety of lines - straight, curved, zigzag - to see how your brush performs. Notice how the brush maintains a consistent line weight no matter how you move your Apple Pencil? That's the beauty of a monoline brush!

Drawing Letters and Shapes
Once you're comfortable with simple strokes, move on to more complex shapes and letters. Try writing out the alphabet or drawing a few basic shapes like squares, circles, and triangles. Here, you'll see how the monoline brush shines - the line thickness remains the same, whether you're drawing a straight line in a square or a curve in a circle. The monoline brush in Procreate is a must-have for consistent, clean lines.
Remember, practice makes perfect. The more you use your new monoline brush, the more comfortable you'll become with it. Soon, you'll be creating stunning digital art with ease and precision.
Improving Your Digital Art Skills
Creating a monoline brush in Procreate is just one step in your digital art journey. To truly excel, you'll need to continuously work on and refine your skills. Here are some tips and tricks to help take your digital art to the next level.
Tips for Using Monoline Brush
While the monoline brush is a powerful tool, you'll get the most out of it by understanding its nuances. Here's some advice to help you along:
- Practice line control: The monoline brush in Procreate is great for consistency, but you'll still need to work on controlling your lines. Try varying your stroke speed to see how it affects the line quality.
- Experiment with colors: Monoline brushes aren't just for black and white. Try using different colors to add depth and interest to your designs.
- Use layers: Procreate's layer feature is a lifesaver. Use it to experiment with new ideas without worrying about ruining your original design.
Learning from Others
One of the best ways to improve is to learn from others. Look for artists who use the monoline brush in Procreate and study their work. What techniques do they use? How do they incorporate color and texture? The more you learn, the more tools you'll have in your digital art arsenal.
How to Create a Monoline Brush Pen in Procreate
Practicing Regularly
There's no shortcut to improving your skills - regular practice is key. Try to set aside some time each day to draw with your monoline brush. You'll be amazed at how quickly you improve when you're using it regularly. And remember, the goal is progress, not perfection. So, keep going, even when it feels challenging.
With these tips, your journey towards mastering the monoline brush in Procreate is well underway. So, what are you waiting for? Grab your Apple Pencil and get started!
If you enjoyed learning about creating a monoline brush in Procreate, you'll definitely want to explore the workshop 'Animating with Procreate and Photoshop' by Nyanza. This workshop will teach you how to take your Procreate skills to the next level by incorporating animation techniques, allowing you to create dynamic and engaging digital art.
Before we tweak its thickness, let’s understand the monoline brush. A favorite in the Procreate community, the monoline brush is part of the ‘Calligraphy’ category. It’s known for its uniform weight and pressure, which makes it a go-to for clean lines and crisp lettering. It’s very easy to use and it’s very popular amongst beginners. For a wide selection, explore our Procreate monoline brushes. Open Procreate and tap on the brush library. Navigate to ‘Calligraphy’ and select the monoline brush. On the left side of your canvas, you’ll find the size and opacity sliders. For more precision, tap on the brush icon at the top right to enter the brush settings. After adjusting, do a few strokes on your canvas. It helps to test the thickness in context, like within a letter or part of your drawing. If you find a thickness that’s just perfect, consider saving it. Tap on the brush name in the brush settings, then select “Duplicate.” Rename this new brush variant for future use. And there you go.
Learn how to make a monoline brush in Procreate. A monoline brush is a great brush to learn with because it’s the easiest brush to make. This versatile brush has so many uses and you definitely need one in your brush library. This is part of my series of Procreate brush tutorials. This post contains affiliate links. By purchasing an item through an affiliate link, I earn a small commission at no extra cost to you. I get a lot of questions about why you would want to make your own monoline brush when Procreate already comes with one. The first answer is that this tutorial teaches you how to make a better monoline brush. The default one is fine, but I prefer how this brush behaves. Second, a monoline brush is the best brush to start with when learning to make your own brushes. It’s a very simple brush to make and gets you familiar with some of the settings in the brush studio. The last reason to make your own brush is that it’s fun. I’m the kind of person who just loves making things and figuring stuff out. If you’re reading this, you’re probably like that too. A monoline brush is a smooth liner brush where the weight does not vary. It’s very similar to a pen or gel pen when compared to real art supplies. Monoline brushes are perfect for so many things! Lettering. Even if your handwriting is bad, anything lettered with a monoline brush looks amazing. It’s really pretty for cursive writing too. Details. A monoline brush is perfect for adding lettering. Use it like you would use a white gel pen to add interest in lettering or illustrations. Make a circle. Use it as a stamp and create a perfect circle. (Make a bigger circle by changing the spacing in stroke settings, and then change the max size in properties.) Outline. Use a monoline brush to create outlines for illustrations. Fill in shapes. Sometimes I like to use the monogram brush to fill in shapes to add color. Make sticker outlines. This brush makes the best outlines for making stickers in Procreate. Eraser. The monogram brush makes the BEST eraser, especially if you change the opacity in the Apple pencils settings like I suggest. This brush is perfect for erasing tiny spots or giant spots. I prefer it because it creates a smooth line with no opacity changes when erasing. The easiest way to change a brush size is to use the size slider on the side of the screen. If you want to change the size range of a brush, you can change it in the brush studio. Under properties, change the min and max brush size. Lowering the max brush size will result in a smaller brush when you use it. You might also like this tutorial for making a square monoline brush. Start a new brush. The default shape and grain are perfect for a monoline brush. In the stroke settings, set spacing to 0 and streamline to max. This creates a really smooth brush. If you want your brush to draw more naturally, you can set streaming lower. Skip down to the Apple pencil settings and change opacity to 0. Finally, name your brush. You might be interested in printable lettering worksheets to use with your iPad. New brushes are added all the time! These downloads are for personal use only. Here’s how to import brushes in Procreate.