Adobe Photoshop's Artboard feature has revolutionized how designers approach multi-canvas projects within a single document. This powerful tool allows for the creation and management of multiple individual canvases, often referred to as "artboards," each acting as a distinct workspace. This comprehensive guide will delve into the intricacies of Photoshop artboards, exploring their properties, behaviors, and best practices for optimizing your design workflow.
Understanding the Essence of Artboards
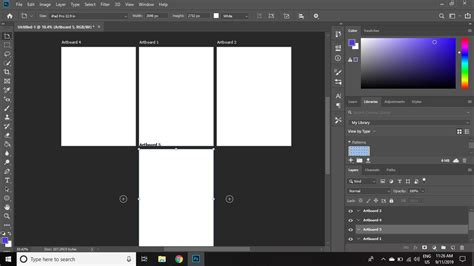
At their core, artboards in Photoshop are akin to specialized container groups or individual canvases residing within the same document source. This fundamental concept distinguishes them from the traditional single canvas of earlier Photoshop versions. An artboard serves as a blank canvas upon which designers can meticulously add images, objects, text, and a myriad of other design elements. Crucially, each artboard can independently house multiple layers and layer groups, providing a structured environment for complex designs.
The primary purpose of utilizing artboards in Photoshop is to empower designers to create and manage designs tailored for a variety of devices, screen sizes, and orientations, all consolidated within a single Photoshop document source. This consolidation streamlines the design process, enabling efficient iteration and comparison of designs across different platforms.
Initiating Your Artboard Journey
To embark on your artboard design journey, the process begins with creating a new document. Navigate to File > New from the menu bar. In the subsequent "New Document" dialog box, you will find a "Document Type" pop-up menu. Select "Artboard" from this menu to initiate the creation of your first artboard.
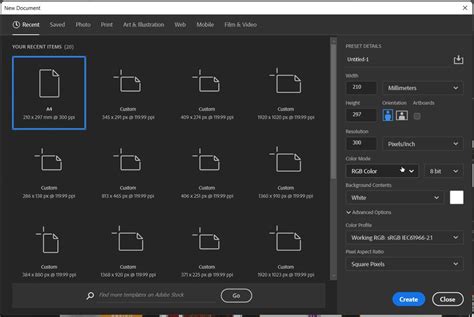
From this juncture, you gain access to a vast library of over 35 Artboard Size presets, meticulously curated to cater to specific devices and common screen dimensions. These presets offer a significant head start, allowing you to quickly set up canvases that accurately reflect target display environments. Alternatively, you can define custom dimensions to precisely match unique project requirements.
Creating and Customizing Artboards
The creation of artboards is further facilitated by the dedicated Artboard Tool, typically accessed by pressing the 'V' key on your keyboard. When the Artboard Tool is active, you can click and drag on the canvas to define the dimensions of a new artboard. This offers a more direct and intuitive method for sketching out your initial artboard layouts.
Once an artboard is created, its properties can be extensively customized. You can select an artboard by clicking on its name in the Layers panel or directly on the artboard itself using the Artboard Tool. The Properties panel then becomes your central hub for adjustments. Here, you can modify the artboard's dimensions, assign a custom name, and even select a background color to visually differentiate it from other artboards within the document. This color-coding can be particularly useful for organizing complex projects with numerous artboards.
Navigating and Managing Your Artboard Workspace
The true power of artboards lies in their ability to facilitate the management of multiple design canvases within a single document. Photoshop provides several intuitive mechanisms for organizing, moving, and manipulating these artboards and their contents.
The Layers Panel: Your Artboard Command Center
The Layers panel serves as the primary control center for managing your artboards. Each artboard you create is represented as a specialized type of Layer Group in this panel. This structural similarity to groups means that any elements you place on a specific artboard are automatically organized within its corresponding group. This inherent organization dramatically simplifies the process of identifying and isolating content belonging to each individual canvas.
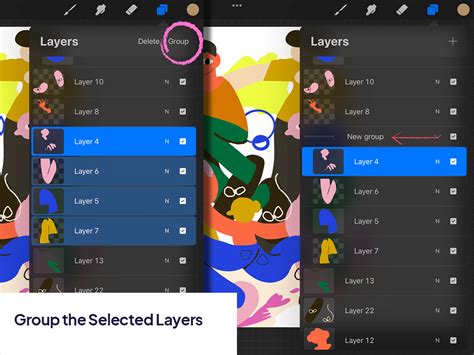
Organizing Layers within Artboards
Within each artboard's group, you can further organize your layers using standard layer management techniques. This includes creating sub-groups, applying layer styles, and adjusting blending modes. For instance, if you are designing a webpage, you might create separate layer groups for headers, navigation, content areas, and footers within the artboard dedicated to that page.
Duplicating and Rearranging Artboards
Photoshop makes duplicating and rearranging artboards remarkably straightforward. To duplicate an existing artboard, first select the artboard you wish to replicate, either by clicking its name in the Layers panel or by using the Artboard Tool. Then, you can either use the "Duplicate Artboard" option available in the Artboard Options bar (when the Artboard Tool is active) or, more commonly, select the artboard in the Layers panel and click the duplicate artboard icon at the bottom of the panel.
Rearranging artboards is equally simple. With the Artboard Tool selected, you can click and hold on an artboard and drag it to a new position within your document canvas. This allows for dynamic restructuring of your workspace as your design evolves.
Deleting and Ungrouping Artboards
To remove an artboard, simply select it in the Layers panel and press the Delete key or right-click and choose "Delete Artboard." If you wish to dissolve an artboard back into its constituent layers, effectively removing the artboard structure, select the artboard and navigate to Layer > Ungroup Artboards. This action will convert the artboard into a standard layer group, with its contents becoming regular layers within that group.
Artboard Behaviors: Streamlining Workflow
Artboard behaviors define a set of actions that govern how artboards and their contents are organized, moved, and managed within Photoshop. Understanding and leveraging these behaviors can significantly enhance your design efficiency.
- Drag and Drop Between Artboards: When you drag elements between artboards in Photoshop, they intelligently align with the ruler's starting point of the target artboard. This ensures predictable placement and reduces the need for manual alignment adjustments.
- Duplicating Layers to Specific Artboards: To move a layer or a group of layers to another artboard, you can right-click on the layer(s) in the Layers panel, select "Duplicate Layer," and then choose the target artboard from the "Document" dropdown menu.
- Guides and Artboards: Guides, when dragged from the rulers onto an artboard, move in unison with that artboard. This means that if you duplicate or rearrange an artboard, its associated guides will follow, maintaining their relative positions.
- Displaying Artboard Names: You can toggle the visibility of artboard names by navigating to
View > Show > Artboard Names. This is useful for quickly identifying individual artboards, especially in complex layouts. - Filtering Layers by Artboard: To focus your view on the contents of a specific artboard, you can use the filtering option in the Layers panel. Select "Filter layers by type" and then choose "Artboard." This will temporarily hide all layers not associated with the currently selected artboard.
- Preventing Auto-Nesting: In some scenarios, you might want to prevent layers from automatically nesting into or out of artboards or frames. This behavior can be controlled by selecting the "Prevent auto-nesting into and out of Artboards and Frames" option within the Layers panel.
- Locking Artboard Position: To ensure an artboard remains in its designated position on the canvas, you can select the artboard and choose
Layer > Lock Position. This prevents accidental movement during your design process.
Designing for Multiple Devices and Resolutions
One of the most compelling use cases for Photoshop artboards is the ability to create design previews for various devices and screen resolutions within a single document. This eliminates the need to create separate documents for each device, significantly streamlining the responsive design workflow.

Imagine you want to visualize how a webpage would appear on a 27-inch iMac, a 15-inch MacBook Pro, and an iPhone. With artboards, you can create three distinct artboards, each pre-sized to match the resolution of these devices. You can then design your webpage layout on each artboard, ensuring a pixel-perfect representation across different screen sizes.
Previewing Designs at Different Resolutions
The File > New dialog box, when selecting the "Artboard" document type, offers the ability to choose from a wide array of preset resolutions. This is particularly useful when you need to preview your design at specific screen dimensions, such as the 27â³ iMac resolution mentioned earlier.
Leveraging Smart Objects for Scalable Designs
When working with designs that will be adapted across multiple artboards, the use of Smart Objects is paramount. Smart Objects allow you to scale and resize your design elements without any loss of image quality or information. To convert a layer into a Smart Object, right-click on the layer in the Layers panel and select "Convert to Smart Object."
To place these Smart Objects onto your artboards, you can simply duplicate your design layers. Once you have arranged the Smart Objects to your satisfaction on one artboard, you can then repeat this process on other artboards, ensuring consistency and maintainability. By duplicating the current artboard, you can efficiently create new canvases sized for devices like the 15â³ MacBook PRO and an iPhone, and then populate them with your scaled Smart Objects.
Optimizing for Export and Web Use
The ability to export your artboards in various formats and resolutions is crucial for delivering your designs to clients or for web implementation. Photoshop provides robust export options to cater to diverse needs.
Exporting Artboards in Multiple Formats
You can export your artboards in common file formats such as PDF, PNG, and JPEG. The "Export As" dialog box, accessible via File > Export > Export As..., offers extensive control over export settings. Here, you can define dimensions, resolution, scaling options, and even color profiles for each artboard.
When exporting for various devices, it's highly recommended to create a table to manage the different export settings efficiently. This ensures that you are generating the correct file sizes and resolutions for each target platform.
Optimizing for Web Pages
For optimizing your artboards specifically for web pages, Photoshop offers the "Save for Web (Legacy)" option. This feature provides advanced controls for fine-tuning your exports while preserving the visual quality essential for online use. Within this dialog, you can select optimized file formats like PNG-24 or JPEG and meticulously adjust quality, compression, and other critical settings to achieve the best balance between file size and visual fidelity.
Including Overlapping Areas in Exports
In certain scenarios, you might need to include areas that extend beyond the visible boundaries of an artboard in your exports. The export settings allow for the customization of such options, ensuring that all necessary design elements are captured.
Enhancing Performance with Advanced GPU Drawing
For designers working with complex documents containing numerous artboards and high-resolution assets, performance can become a concern. Photoshop's Advanced GPU Drawing Mode can significantly improve rendering speed and overall responsiveness.
To activate this feature, navigate to Photoshop > Preferences (or Edit > Preferences on Windows). Select "Performance" from the sidebar. Under the "Graphics Processor Settings" section, ensure that "Use Graphics Processor" is enabled. Then, choose "Advanced" from the "Drawing Mode" dropdown menu. It's important to note that some older graphics processing units (GPUs) may not fully support this advanced feature.
Integrating Vector Assets from Illustrator
Photoshop artboards can seamlessly integrate vector assets created in Adobe Illustrator. To do this, simply copy the desired vector object from Illustrator and paste it into a Photoshop artboard. When prompted with the paste options, select "Smart Object." This ensures that the vector artwork is embedded as a Smart Object in Photoshop, allowing for non-destructive scaling and editing while retaining its vector scalability.
Conclusion: A Paradigm Shift in Design Workflow
Artboards in Photoshop represent a significant advancement in the software's capabilities, fundamentally altering how designers approach multi-canvas projects. By providing the ability to work with multiple individual canvases within a single document, artboards offer unparalleled organization, efficiency, and flexibility. Whether you are designing for a myriad of devices, creating different versions of a campaign, or simply organizing complex layouts, mastering Photoshop artboards is essential for any modern digital designer. Their intuitive management through the Layers panel, coupled with powerful behaviors and export options, transforms the design process from a series of disconnected tasks into a cohesive and streamlined workflow.