Photoshop provides a robust suite of Shape tools designed to facilitate the creation and manipulation of various geometric forms. Among these, the Ellipse tool stands out as a versatile instrument for drawing curved shapes, commonly recognized as ovals. While the term "oval" often conjures an image of a freehand, potentially imperfect curve, Photoshop empowers users to achieve precise results, particularly when a perfect circle is the desired outcome. Understanding the nuances of this tool unlocks a world of possibilities for designers and artists.
The Fundamentals of the Ellipse Tool
The Ellipse tool, accessible within Photoshop's extensive toolkit, allows for the creation of shapes that fall under the broader category of ellipses. A key feature is its ability to generate shapes that are filled with color. This is achieved by operating in either Vector Shape mode or Pixel-based Shape mode. The distinction between these modes is crucial for maintaining the integrity of your artwork.
Vector shapes, once created, retain their sharpness and clarity regardless of how many times they are resized. This makes them ideal for designs that might be scaled up or down for different applications. In contrast, pixel-based shapes, while offering a different workflow, can suffer from a loss of quality and exhibit pixelation when subjected to significant resizing. Therefore, for designs requiring scalability without compromise, the Vector Shape mode is the preferred choice.

Beyond these core modes, Photoshop offers a third, highly advantageous option when working with multiple ellipses. This feature dictates how newly created shapes interact with existing ones. Users can opt to have each shape reside on its own distinct layer, providing maximum flexibility for independent editing. Alternatively, ellipses can share a layer, and their interaction can be defined by specific parameters.
Shape Interaction Modes
The interaction modes for shapes in Photoshop are akin to the logic used in selection interactions, offering powerful control over how overlapping elements behave. These modes allow for sophisticated composite shapes to be built within a single layer.
- Appear only where the two intersect: This mode effectively subtracts portions of both overlapping shapes, leaving only the area where they physically meet. This is useful for creating intricate cut-out effects or defining precise intersection points.
- Create negative space in the intersecting area: This option functions as the inverse of the previous one. The overlapping region is removed entirely, creating a void or negative space where the shapes would otherwise merge. This is invaluable for generating holes, windows, or other elements that require transparency within a combined form.
These interaction modes, when employed with the Ellipse tool, can lead to complex and dynamic graphical elements that would be far more challenging to achieve with simple shape drawing.
Crafting Precise Circles and Ellipses
While the Ellipse tool is designed for ovals, creating a perfect circle requires a specific technique. Attempting to draw a circle freehand often results in an imperfect oval, a common pitfall for many users. Photoshop, however, simplifies this process significantly.
To draw a perfect circle using the Ellipse tool:
- Select the Ellipse Tool: Locate the Ellipse Tool within the Photoshop toolbar. It's often grouped with other shape tools like the Rectangle Tool. You might need to click and hold on the Rectangle Tool icon to reveal the fly-out menu and then select the Ellipse Tool.
- Choose the "Path" Mode: Crucially, before drawing, navigate to the options bar at the top of the Photoshop window. Look for the "Shape" option. If it's set to "Shape" (which creates a new shape layer) or "Pixels" (which directly modifies pixels and is destructive editing), you'll want to change it. Click and hold on this option and select "Path". This mode is essential for creating vector paths that can be easily manipulated, converted to selections, or used for precise outlining without directly altering pixel data. Drawing in "Pixels" mode is considered destructive editing because it directly changes the pixels of the selected layer, making it difficult to undo or adjust later without quality loss.
- Hold the Shift Key: With the Ellipse Tool selected and set to "Path" mode, click and drag on your canvas. While dragging, press and hold down the Shift key. This constraint will force the ellipse into a perfect circle. Releasing the mouse button first, followed by the Shift key, will ensure the circle is accurately formed.
- Adjusting Size and Position: As you drag with the Shift key held down, you'll see a preview of the path. You can reposition the center of the circle while still holding down the mouse button and Shift key by pressing and holding the Spacebar. Release the Spacebar to continue drawing.

Understanding Tool Presets
Photoshop allows users to save custom settings for any tool as a "Tool Preset." This feature is incredibly useful for the Ellipse Tool, as it enables you to save specific configurations, such as a particular stroke color, width, or fill type, for quick recall. If you find yourself frequently using a specific set of ellipse settings, creating a Tool Preset can significantly streamline your workflow. To reset any tool, including the Ellipse Tool, back to its default settings, you can right-click on the Tool Presets button in the options bar and select "Reset Tool."
Advanced Ellipse Tool Features
The Ellipse Tool offers several more options that enhance its functionality and allow for greater creative control. These options are typically found in the options bar when the Ellipse Tool is active.
Fill Type and Color
Clicking on the fill color swatch in the options bar opens the Fill Type and Color panel. This panel allows you to define the color and type of fill for your shape. Options usually include solid colors, gradients, and patterns, providing a wide range of aesthetic possibilities for your ellipses.
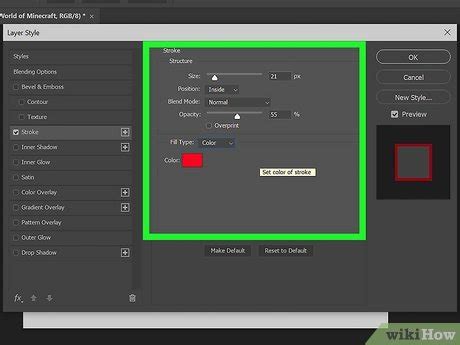
Stroke Options
A "Stroke" in Photoshop refers to the outline of a shape. The Ellipse Tool provides extensive control over the stroke properties:
- Stroke Width: You can adjust the thickness of the stroke in several ways. A dropdown menu offers predefined sizes, and a slider allows for fine-tuning. Alternatively, you can use the "Scrubby Slider" feature. To use the Scrubby Slider for stroke width, hover your cursor over the word "Stroke" in the options bar. The cursor will transform into a hand with arrows. Clicking and dragging to the left will decrease the stroke width, while dragging to the right will increase it.
- Stroke Color: The color swatch next to the stroke width controls the color of the outline.
- Caps: This option determines the appearance of the beginning and end points of a stroke, particularly relevant for open paths. You can choose from different cap styles, such as butt caps, round caps, or projecting caps.
- More Options: Beyond the primary stroke settings, further customization is often available under a "More Options" or similar designation, allowing for more intricate control over stroke behavior.
Shape Interaction and Layer Management
As mentioned earlier, when working with multiple shapes, you have control over how they interact and are organized:
- New Shape Layer: Each ellipse is created on its own independent layer. This is the default behavior when the "Shape" mode is selected and offers the most flexibility for editing each ellipse individually.
- Combine Shapes: This option allows multiple shapes to exist on the same layer and interact according to the chosen mode (e.g., intersect, subtract).
- Bring Shape Forward / Send Shape Backward: These commands are available when shapes are on the same layer and allow you to control their stacking order, determining which shape appears in front of another.
Constraining Aspect Ratios and Sizes
When drawing ellipses or circles, the "Unconstrained" option is the default, allowing for freeform drawing. However, you can also choose:
- Square: This option, when applied to the Ellipse Tool, will force the shape to be a perfect circle.
- Fixed Size: This allows you to input specific width and height dimensions for your ellipse, ensuring exact measurements.
- Proportional: When drawing, this maintains the aspect ratio of the initial drag, ensuring that if you start dragging to create a circle, it will remain a circle, or if you start to create a wide oval, it will maintain that width-to-height ratio.
The "Scrubby Slider" is a powerful interface element that can be found in various Photoshop contexts, including stroke width adjustment. It allows for intuitive, on-canvas adjustments by simply clicking and dragging. For corner radius adjustments on rectangles (and by extension, rounded rectangles), this slider provides a visual and immediate way to control the roundness.
Paths vs. Shapes vs. Pixels
Understanding the different modes for the Ellipse Tool (and other shape tools) is fundamental to effective Photoshop use.
- Shape Mode: This is the default and most common mode for creating vector-based shapes. When you select "Shape" in the options bar, Photoshop creates a "Shape Layer." These layers contain vector data, meaning the shape is defined by mathematical equations rather than pixels. This makes them infinitely scalable without loss of quality and allows for easy editing of fill, stroke, and path points.
- Path Mode: When you select "Path" in the options bar, the Ellipse Tool draws a vector path rather than a shape layer. A path is essentially a non-printing outline that can be used for various purposes. You can convert a path into a selection, which can then be used to mask layers or fill areas with color. Paths are also crucial for creating precise outlines for illustrations or for use with the Pen Tool. As demonstrated in the introductory movie, starting with a basic ellipse path around a feature like a face is a common technique for detailed work. To turn off the visual display of a path, you would click below it in the Paths panel.
- Pixels Mode: This mode allows you to draw directly onto the pixels of the currently selected layer. While it might seem straightforward, it's considered destructive editing. Any marks made in Pixels mode are permanent changes to the pixel data. This means you cannot easily resize, recolor, or reshape the element later without degrading its quality or having to redraw it. It's generally recommended to use Shape or Path modes for most design work unless you specifically need to manipulate pixel data directly, perhaps for certain types of digital painting or photo manipulation where destructive editing is intended.
How to Combine Shapes in Photoshop
Practical Applications and Workflow Tips
The Ellipse Tool, with its array of options, finds application in a wide range of design scenarios. From creating perfect circular buttons for web design to generating oval elements for logos and illustrations, its utility is broad.
When working on a project that requires multiple ellipses, consider your workflow:
- Layer Organization: For maximum flexibility, create each ellipse on its own shape layer. This allows you to move, resize, and edit each ellipse independently without affecting others.
- Combining Shapes: If your design requires complex composite shapes where ellipses intersect or subtract from each other, utilize the shape interaction modes while keeping them on a single layer. This can lead to more efficient file structures for certain types of graphics.
- Path Conversion: If you need to create a selection based on an ellipse (e.g., for a circular mask), draw the ellipse in Path mode. Then, you can load the path as a selection by Control-clicking (Windows) or Command-clicking (Mac) on the path thumbnail in the Paths panel, or by right-clicking on the path and choosing "Make Selection." This selection can then be applied to a Layer Mask for non-destructive image editing.
The ability to create Tool Presets for the Ellipse Tool can be a significant time-saver, especially if you work with specific brand guidelines that dictate precise dimensions, colors, or stroke styles for circular or oval elements. By saving these as presets, you ensure consistency and speed up repetitive tasks.
Remember that it's not always necessary to set all options before creating a shape. Many attributes, such as fill, stroke, and even the path itself, can be modified after the ellipse has been drawn. This non-destructive editing capability is a cornerstone of efficient Photoshop workflows. By understanding and utilizing the full potential of the Ellipse Tool, users can elevate their design capabilities and achieve professional-quality results with greater ease and precision.