In the realm of digital design and content creation, the ability to isolate subjects from their backgrounds is a fundamental skill. This becomes particularly crucial when working with product photography, logos, or any visual asset intended for diverse applications across digital platforms. Creating a transparent background in Photoshop allows for seamless integration of images into new designs, offering unparalleled flexibility and creative freedom. Whether you're aiming to repurpose product photos for various marketing materials or to ensure your logo displays perfectly on any webpage, understanding how to achieve transparency is key.
The Power of Transparency in Digital Assets
Transparent backgrounds transform static images into versatile design elements. When a background is removed, the subject of the photo can be placed onto an infinite array of new designs and destinations without being confined by its original setting. This is invaluable for product photography, where a clean, transparent cutout allows a product to be showcased against different colored backgrounds or within various marketing layouts. Similarly, logos with transparent backgrounds can be easily incorporated into websites, social media posts, presentations, and print materials, maintaining a professional and consistent brand identity. The ability to "take the background out of a picture faster than ever" opens up a world of creative possibilities, enabling designers and marketers to maximize the utility of their visual assets.
Leveraging Photoshop's Built-in Tools for Transparency
Photoshop offers a robust suite of tools designed to facilitate background removal and the creation of transparent areas. For images with solid, uniform backgrounds, such as a white or black backdrop, Photoshop provides several efficient methods.
The "Remove Background" Feature: A One-Click Solution
For users of newer Photoshop versions, the "Remove Background" feature presents a remarkably swift approach. This AI-powered tool, often accessible via the Contextual Task Bar (which can be enabled through Window > Contextual Task Bar), intelligently identifies the subject of your image and automatically generates a mask to conceal the background.
To utilize this feature:
- Open your image in Photoshop.
- Ensure the Contextual Task Bar is visible.
- Click the "Remove Background" button.
Photoshop will then process the image, aiming to isolate your subject. While this tool is highly effective for many common scenarios, it's important to understand that the background isn't truly deleted; rather, it's masked. This means you retain the ability to refine the selection if needed.

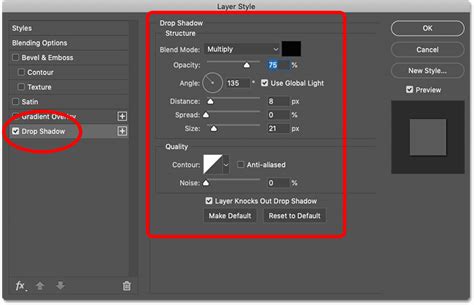
Blending Sliders: Precision for Solid Backgrounds
Blending sliders, found within the Layer Style dialog box under the "Blend If" section, offer a powerful and nuanced method for removing solid white or black backgrounds. These sliders allow you to control the transparency of a layer based on the brightness values of its pixels.
How to use Blending Sliders:
- Open your image and ensure it's on an editable layer (double-click the "Background" layer to convert it to "Layer 0").
- Right-click on the layer and select "Blending Options" to open the Layer Style dialog box.
- Locate the "Blend If" section. You'll see two sets of sliders: "This Layer" and "Underlying Layer."
- The left slider in each pair controls the shadows (blacks), and the right slider controls the highlights (whites).
- To remove a white background, you'll primarily adjust the "This Layer" sliders. Drag the right-hand (highlight) slider from "This Layer" towards the left. As you drag, white areas of the image will begin to disappear, revealing the checkerboard pattern that signifies transparency.
- For a smoother transition and to avoid harsh edges, you can split a slider. Hold down the
Altkey (orOptionkey on Mac) while dragging one half of the slider. This creates a gradient effect, allowing for more refined control. - If you need to remove a black background, you would adjust the left-hand (shadow) slider of "This Layer" towards the right.
While blending sliders are most effective for solid color backgrounds, they can offer some degree of success with other colors, though results may require further refinement.
Magic Eraser and Background Eraser Tools: Direct Removal
For simpler images, the Magic Eraser and Background Eraser tools can provide quick solutions.
- Magic Eraser Tool: This tool works similarly to the Magic Wand selection tool. Clicking on a color with the Magic Eraser will delete all contiguous pixels of that same color. You can adjust the "Tolerance" setting to control how wide a range of similar colors is affected. It's effective for solid, uniform backgrounds.
- Background Eraser Tool: This tool allows you to "paint" away the background. It samples the color under your cursor and then erases pixels of that color as you drag. The crosshair in the center of the cursor determines the color being sampled. You can set a "Tolerance" level to prevent the tool from affecting colors too dissimilar to the sampled background.
When using these tools, it's often advisable to first convert your background layer to an editable layer and potentially duplicate it as a backup.
Quick Selection and Color Range: Targeted Isolation
When the background isn't perfectly uniform, or when you need more precise control over your selection, the Quick Selection tool and the Color Range command are excellent choices.
- Quick Selection Tool: This tool allows you to "paint" a selection. As you drag over your subject, Photoshop intelligently tries to identify and select edges and areas of similar tone and color. You can then invert this selection to target the background for deletion or masking.
- Select > Color Range…: This command lets you select pixels based on their color. Using the eyedropper tool, you can click on the white background to select it. Adjusting the "Fuzziness" slider controls how sensitive the selection is to variations in color. Once the background is selected, you can press
Deleteto remove it.
Refining Your Mask for Perfect Edges
Even with advanced tools, automated background removal might not always be perfect. Stray pixels or missing parts of your subject can occur. This is where refining the mask becomes crucial.
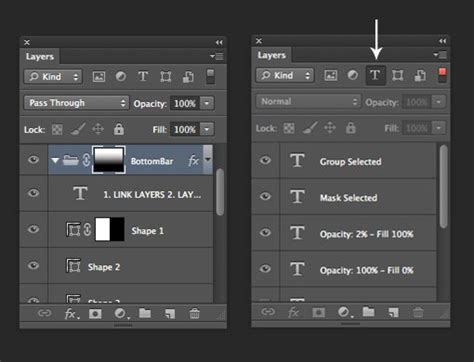
- Select the Mask: In the Layers panel, click on the mask thumbnail (the black and white icon next to your image thumbnail). A small black outline will appear around the mask icon, indicating it's active.
- Use Painting Tools: With the mask selected, you can use the Brush tool (
B) to paint. Painting with white on the mask reveals parts of the image that might have been accidentally masked out, while painting with black conceals areas that were incorrectly included. The Eraser tool can also be used for similar purposes. - "Add to Mask" and "Subtract from Mask": These options, often found in the Contextual Task Bar when a mask is active, function similarly to the Brush and Eraser tools for mask refinement.
- Refine Edge/Select and Mask: For more intricate edges, especially with hair or fur, Photoshop's "Select and Mask" workspace (accessible from the Options bar when a selection tool is active, or
Select > Select and Mask) offers advanced controls for smoothing, feathering, and shifting edge selection.
Saving Your Transparent Image: The Right Format is Key
Once your background is transparent, saving the image in an appropriate file format is paramount to preserving that transparency.
PNG: The Standard for Transparency
The Portable Network Graphics (PNG) format is the industry standard for images requiring transparency. There are two main types:
- PNG-24: This format supports full alpha transparency, meaning pixels can be anywhere from 0% to 100% opaque. This is ideal for complex images with smooth gradients and soft edges, as it avoids the "halo" effect sometimes seen with older formats.
- PNG-8: This format supports only 1-bit transparency, meaning a pixel is either fully transparent or fully opaque. It also supports fewer colors than PNG-24. While it results in smaller file sizes, it's generally not recommended for images with smooth transparency needs.
To save as PNG-24 in Photoshop:
- Go to
File > Export > Export As…(or use the shortcutShift+Alt+Ctrl+Won Windows,Shift+Option+Command+Won Mac). - In the dialog box, ensure the "Format" is set to "PNG."
- Crucially, make sure the "Transparency" checkbox is ticked.
- Avoid selecting "Smaller File (8-bit)" if you want full alpha transparency.
- Adjust "Image Size" as needed, keeping in mind that larger dimensions result in larger file sizes. Aim for optimized file sizes for web use (e.g., around 200 KB or smaller for web images).
- Click "Export."
If you're using an older version of Photoshop without "Export As…," you can use File > Save for Web (Legacy) and select PNG-24 from the presets.
Vector Logos and Transparency
If your logo is a vector file (e.g., .AI, .EPS, .PDF), it inherently supports scalability and transparency. However, for web use, you'll need to convert it to a raster format like PNG-24.
- Open the vector file in Photoshop or Adobe Illustrator.
- When opening in Photoshop, ensure the dialog box settings are correct (e.g., set "Crop To" to "Bounding Box" and "Mode" to "RGB Color").
- If the original file (like a JPG logo) has a background, you'll need to remove it using the methods described earlier (e.g., Color Range or Quick Selection).
- Save the final transparent logo as a PNG-24.
Beyond Background Removal: Enhancing with Adobe Express
For those seeking an all-in-one solution for quick edits and design creation, Adobe Express offers a streamlined experience. Its "Remove Background" tool is incredibly user-friendly, allowing for instant transparency creation. Beyond background removal, Adobe Express provides a vast library of templates, quick action tools, photo editing capabilities, and design assets like fonts, icons, and GIFs.

You can easily:
- Add shape crops to frame your newly transparent image.
- Apply filters for stylistic effects.
- Add GIFs and animation for dynamic designs.
- Blur backgrounds using the dedicated blur tool.
Adobe Express boasts a free plan, making its powerful features accessible to everyone. This platform empowers users to transform their transparent images into stunning flyers, social posts, album covers, profile photos, and an unlimited array of other creative designs.
Addressing Common Questions and Challenges
Can I use Adobe Express for free?
Yes, Adobe Express offers a free plan that includes numerous tools and templates to help you create standout designs.
How do I make a white background transparent in Photoshop if it's not perfectly white?
For non-uniform white backgrounds, tools like the Quick Selection tool, Color Range, or refining the mask generated by the "Remove Background" feature are more effective than the Magic Eraser. Blending sliders can also offer more control.
Can I use blending sliders to remove other color backgrounds?
While most effective for white and black, blending sliders can remove other solid colors to some extent. However, for complex or varied colored backgrounds, dedicated selection tools or masking techniques are usually required.
What if blending sliders don't completely remove the background?
If blending sliders leave residual background elements, you can further refine the mask using painting tools or other Photoshop selection and cleanup tools like the Clone Stamp or Healing Brush.
Can I use blending sliders for batch background removal?
Photoshop's blending sliders do not support batch processing directly. For automated background removal across multiple images, you would typically use Photoshop's Actions feature to record and replay a series of steps, or explore third-party batch processing software.
How do I save a PNG with a transparent background in Photoshop?
Use File > Export > Export As… (or Save for Web (Legacy)) and select PNG-24, ensuring the "Transparency" option is checked.
What's the difference between PNG-8 and PNG-24?
PNG-24 supports full alpha transparency and a wider color spectrum, ideal for smooth edges and gradients. PNG-8 has limited transparency (binary) and fewer colors, resulting in smaller file sizes but potentially jagged edges and halos.
Can I use Photoshop scripts for batch transparency?
Yes, you can create custom scripts in Photoshop to automate tasks like background removal across a batch of images. These scripts can be run via File > Scripts > Browse….
What are alternatives to blending sliders for background removal?
Photoshop offers numerous alternatives, including the Magic Wand, Quick Selection, Lasso, Pen tool, Background Eraser, and the Select and Mask workspace. Each tool is suited for different types of images and background complexities.
By mastering these techniques, you can unlock the full potential of your images, ensuring they integrate seamlessly into any design project and communicate your message with clarity and impact.
tags: #how #to #make #white #background #transparent