Photoshop's Symmetry Painting feature offers a powerful and intuitive way to create complex, mirrored, and radially repeating designs with remarkable ease. Introduced as a technology preview in Photoshop CC 2018 and now a staple feature, this tool allows artists to paint brush strokes that are automatically mirrored and repeated across defined axes or paths. Whether you're designing intricate mandalas, repeating patterns, or even reflected text, understanding and utilizing Symmetry Painting can significantly enhance your creative workflow and unlock new artistic possibilities.
Activating and Understanding Symmetry Painting
To begin using Symmetry Painting, you first need to ensure the feature is enabled. In earlier versions of Photoshop CC 2018, this involved navigating to Edit > Preferences > Technology Previews and checking the box labeled "Enable Paint Symmetry." For more recent versions, this step may be unnecessary as the feature is likely enabled by default. Once enabled, the primary control for Symmetry Painting appears as a butterfly icon within the Options bar, typically located below the currently active tool's settings. Clicking this icon reveals a dropdown menu presenting various symmetry options.
When you select a symmetry option, Photoshop introduces a default symmetry axis onto your digital canvas. This axis acts as a mirror or a central point for repetition. You can then reposition this axis by clicking and dragging it, and confirm its placement by clicking the checkmark button. Once the symmetry axis is set, any stroke you make with the Brush, Pencil, or Eraser tools will be mirrored or repeated according to the chosen symmetry mode.
Exploring Different Symmetry Modes
Photoshop offers a variety of symmetry modes, each providing a unique way to generate repeating patterns:
Vertical Symmetry: This is the most basic mode, mirroring your brush strokes across a single vertical axis. As you paint on one side of the axis, the stroke is duplicated on the other, creating a perfect reflection. This is particularly useful for creating symmetrical elements or designs.
Horizontal Symmetry: Similar to vertical symmetry, this mode mirrors your strokes across a horizontal axis.
Dual Axis Symmetry: This mode combines both horizontal and vertical symmetry, mirroring your strokes across both axes simultaneously. This results in four identical reflections of each stroke, creating a cross-like pattern.
Wavy Symmetry: This is where Symmetry Painting begins to showcase its more advanced capabilities. The Wavy mode uses a curved path as its symmetry boundary. When you paint on one side of this curved path, your strokes are mirrored and mapped onto the other side, following the curvature of the path. This can lead to fascinating distortions and unique visual effects that are difficult to achieve with standard copy-paste transformations. The mapping of the stroke is determined by finding the minimum perpendicular distance from the painted point through the path, which can result in non-intuitive shapes when the curves are extreme or the brush stroke is far from the path.

The Power of Custom Paths and Hidden Modes
What truly sets Photoshop's Symmetry Painting apart is the ability to define your own custom symmetry paths. You are not limited to the default axes provided by the software. By right-clicking within the Paths panel and selecting "Make Symmetry Path," you can designate any existing path as your symmetry boundary. This opens up a world of possibilities for complex and organic symmetry. You can then transform this custom path using the Free Transform controls (Cmd/Ctrl-T) to scale, rotate, or distort it as needed, further refining your symmetry setup.
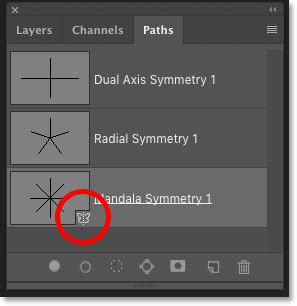
Beyond the readily available options, Photoshop also hides two advanced symmetry modes: Radial and Mandala. These modes are accessed through a clever workaround involving the "New Dual Axis" option.
Radial Symmetry: When selected, Radial Symmetry repeats your brush strokes evenly distributed and rotated around a central point, much like the numbers on a clock face. This is ideal for creating circular patterns, starbursts, or floral designs.
Mandala Symmetry: This mode builds upon Radial Symmetry by incorporating an additional reflection that is also rotated. This results in more complex and intricate circular patterns, perfect for creating detailed mandalas or kaleidoscopic effects.
To enable these hidden modes, you first select "New Dual Axis" from the symmetry dropdown. Then, open the Paths panel (Window > Paths), locate the newly created path, and double-click its name. By renaming the path to "Radial Symmetry [number]" or "Mandala Symmetry [number]," where the number can range from 1 to 12, you dictate the number of repetitions. For instance, "Mandala Symmetry 8" will create a mandala pattern with eight repeating elements. This renaming can be done at any time, and the changes will be applied the next time you paint.
Photoshop: SYMMETRY Tool - Create Awesome MANDALAS in CC 2018 and later.
Advanced Techniques: Multiple Paths and Editable Text
The versatility of Symmetry Painting extends to creating multiple simultaneous symmetry results. This is achieved by duplicating and transforming the symmetry paths themselves. Start with a simple path, like a Vertical symmetry path. Once committed, use the Path Selection tool to select the path again. Then, use the transform shortcut (Command-Option-T on Mac, Ctrl-Alt-T on Windows) to duplicate and transform the path. Repeatedly pressing the transform again shortcut (Shift-Option-Command-T on Mac, Shift-Ctrl-Alt-T on Windows) creates multiple copies of the transformed path. Painting with these multiple active paths results in a composite effect, where each duplicated path generates its own symmetry. This technique is particularly effective when used with very small brush sizes (around 4 pixels or less) and can lead to incredibly detailed and complex compositions.
Furthermore, Symmetry Painting offers an elegant solution for creating reflected text. By converting your text layer and its background into a Smart Object (Layer > Smart Objects > Convert to Smart Object, or Filter > Convert for Smart Filters), you can then apply symmetry transformations. Positioning this Smart Object to one half of your canvas and then duplicating and flipping it to the other side allows for perfectly mirrored text that remains fully editable. This is a significant advantage over rasterizing text and manually transforming it, as it preserves the text's editability.
Considerations and Limitations
While Symmetry Painting is a powerful tool, it's essential to be aware of its nuances and limitations:
- Brush Tip Integrity: Symmetry Painting mirrors and repeats the position of each brush mark, not necessarily the scaled or distorted brush tip itself. This means the brush tip retains its size regardless of the symmetry mode or path curvature, which can limit its use for perspective effects without additional transform controls.
- Path Complexity: Highly complex or extremely curved paths can lead to unpredictable distortions and may strain your system's processing power, especially when combined with multiple duplicated paths and large brushes. Simpler paths generally yield more intuitive and manageable results.
- Tool Restrictions: Symmetry Painting is primarily designed for the Brush, Pencil, and Eraser tools. It does not directly support features like smudging, gradients, selections, or live brushes such as mixer or erodible tips. However, you can still erase using symmetry.
- Persistence: The symmetry setting for a given document is persistent until you close the document. You will need to re-enable it when you reopen the file if you wish to continue painting symmetrically.
- Saving Paths: You can create and save custom symmetry paths, allowing you to reuse them in the same document or share them with others. To activate a saved path, select it with the Brush tool active and choose "Selected Path" from the Symmetry Painting dropdown.
By understanding these aspects, you can effectively leverage Symmetry Painting to create a wide array of stunning visual content, from richly illustrated photo borders and standalone designs to intricate patterns for fabric or 3D textures. The ability to define custom paths and utilize hidden modes like Radial and Mandala, combined with techniques for duplicating paths, offers an almost limitless canvas for artistic exploration.