In the realm of digital design and layout, the ability to precisely control text formatting is paramount. Adobe InDesign, a leading professional-grade tool, offers a sophisticated system for managing styles, moving beyond the drudgery of manual, character-by-character formatting. While paragraph and character styles are foundational, InDesign provides even greater power through nested styles. This tutorial delves into the intricacies of nested styles, exploring their application, variations, and how they can dramatically enhance your workflow and design output. We will uncover how to automatically apply character formatting to specific parts of a paragraph, creating dynamic and sophisticated text treatments with unprecedented ease.
The Power of Styles in Layout Design
Before diving into nested styles, it's crucial to appreciate the fundamental importance of styles in layout. Without them, designers would be relegated to formatting text laboriously, paragraph by paragraph, character by character. This would be akin to returning to hand typesetting or even more arduous manual labor. However, with the advent of modern electronic layout software, the immense power of these tools has delivered design capabilities that were once only dreamt of. Every professional-grade tool, and even many home-user applications, provide paragraph and character-level styling. This enables instant styling of body text, captions, kicker paragraphs, and a myriad of other text elements. Nested styles represent a further evolution, allowing designers to think about removing yet another layer of drudgery: applying a paragraph style and automatically having character styles applied to designated parts of that paragraph.

Understanding Nested Styles: Character Styles Within Paragraph Styles
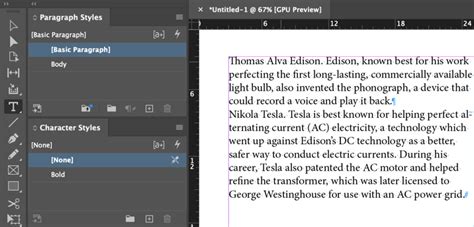
At its core, a nested style is a character style that is contained within a paragraph style. This means that as you apply a broader paragraph style to a block of text, specific character-level formatting defined by a nested style is automatically applied to designated portions of that text. This is accessed and enabled within the "Drop Caps and Nested Styles" pane of the Paragraph Style Options dialog. To access this pane, you would typically double-click on an existing paragraph style to bring up its dialog, or simply create a new paragraph style from the flyout menu on the Paragraph Styles palette. The lower half of this pane is where the Nested Styles list resides.
The key to nesting styles lies in using text to delimit where these character styles should be applied. For instance, a style might be applied until the first period glyph, exclamation mark, or question mark is encountered within the text. Within this pane, you can choose to apply the style either "Through" or "Up To" the designated delimiter character. All of this is configured directly within the Paragraph Style itself, allowing for a seamless integration of character-level enhancements into your overall paragraph formatting.
Creating Your First Nested Style
To begin creating nested styles, you first need to establish your desired character styles. These are the specific formatting attributes (like font, size, color, or emphasis) that you want to apply to a particular segment of text. Once your character styles are ready, you can then create or modify a paragraph style to incorporate them.
- Open Paragraph Style Options: Double-click an existing paragraph style or create a new one.
- Navigate to Drop Caps and Nested Styles: In the Paragraph Style Options dialog box, select "Drop Caps and Nested Styles" from the left-hand menu.
- Add a New Nested Style: Click the "New Nested Style" button.
- Define the Rule: This is where the magic happens. You'll see fields for "Apply Style" and "To Text."
- Apply Style: Choose the character style you have previously created from the dropdown menu.
- To Text: This field requires a rule that tells InDesign when to apply the selected character style. This rule can be based on a specific character, a number of characters, or even a GREP expression for more advanced scenarios.
Common Use Cases for Nested Styles
Nested styles are incredibly versatile and can be employed in numerous design scenarios:
- Highlighting Keywords: Automatically apply a distinct character style to specific keywords or phrases throughout your document.
- Formatting Run-in Headings: Apply a style to introductory phrases that lead into a heading, ensuring they stand out. For example, a style could be applied to text up to the first colon (:).
- Adding End Ornaments: As demonstrated in the introductory example, a nested style can be used to append a decorative character, like a solid square, at the very end of an article to signify its completion. This is often added at the end of a paragraph.
- Styling First Uppercase Letters: A common requirement is to style the first uppercase letter of every sentence differently. While this can be complex, nested styles offer a powerful way to achieve this. For example, if you have sentences like "Joe goes to school. Lara works at home. George sleeps a lot," you might want to apply a specific style to the initial "J," "L," and "G" to make them stand out without affecting the rest of the word.
Advanced Nested Styling Techniques
The power of nested styles extends beyond simple applications. InDesign provides granular control over how these styles are applied and sequenced.
Using Delimiters
The "To Text" field in the "New Nested Style" section is crucial. It defines the boundaries for applying the character style.
- Character-Based Delimiters: You can specify a character (or characters) that, when encountered, will stop the application of the nested style. For example, if you want to style text up to the first period, you would enter "." in the "To Text" field and choose "Up To." If your run-in headings end with a hyphen, colon, or question mark, you can type
-:?to have the style stop at any of those characters. - Number of Characters/Words/Sentences: You can also specify that a style should be applied for a certain number of characters, words, or sentences. This offers a more quantitative approach to defining the scope of your nested style.
- GREP Styles: For highly specific and complex pattern-based text selection, GREP styles are invaluable. Instead of relying on simple characters, you can use GREP expressions to find and style patterns like all phone numbers, email addresses, or specific grammatical constructs within your text. For example, to style the first uppercase letter of a paragraph, you could use the GREP expression
\<\u. This tells InDesign to apply the chosen character style to the first uppercase letter (\u) that appears at the beginning of a word (\<).
Sequencing and Repeating Styles
When you need to apply multiple nested styles within a single paragraph style, the order in which they appear in the list is critical. The order determines the sequence in which the formatting is applied.
- Order of Application: InDesign processes nested styles from top to bottom. The formatting of the first style concludes, and then the next style in the sequence takes effect.
- Repeating Sequences: You can create repeating sequences of nested styles. This is particularly useful for alternating formatting, such as making every other word or sentence a different color. You can set up multiple nested styles, and InDesign will repeat this sequence throughout the paragraph.
- Skipping Styles: In some scenarios, you might want to skip the first style or styles in a sequence. This can be achieved by setting the "skip" option for a particular style.
- Looping Styles: Nested styles can be set up to loop, meaning the sequence of styles will repeat indefinitely. This is ideal for creating rhythmic visual patterns within your text. You can control whether the entire sequence loops or if certain styles are excluded from the loop.
Multiple Nested Styles In InDesign
Nested Line Styles: Styling Entire Lines
While nested styles apply character formatting to specific text within a paragraph, nested line styles allow you to apply character styles to entire lines of text within a paragraph. This feature was added to InDesign in response to user requests for more granular control over line-based formatting.
How Nested Line Styles Differ
Nested line styles function similarly to nested styles but offer a different scope of application.
- Line-Based Application: A nested line style can apply a character style to a complete line of text within a paragraph.
- Limited Criteria: When defining a nested line style, you can primarily change two criteria: the character style to be applied and how many lines it should affect. The terms "for" and "lines" are fixed and cannot be modified.
- Combining with Nested Styles: Nested line styles and nested styles can be defined within the same paragraph style. This allows for a powerful combination, where, for example, a nested line style might apply a specific color to a line, while a nested style simultaneously applies italics to a word within that line.
Creating a Nested Line Style
- Open Paragraph Style Options: Access the Paragraph Style Options dialog.
- Navigate to Drop Caps and Nested Styles: Go to the "Drop Caps and Nested Styles" tab.
- Add a New Line Style: Click the "New Line Style" button.
- Configure Settings: Similar to nested styles, you select a character style and specify the number of lines.
While the options for nested line styles are more constrained than regular nested styles, the principle of "less is more" often applies in design. These tools, when used judiciously, can create sophisticated and visually engaging text layouts.
GREP Styles: The Power of Pattern Matching
For ultimate flexibility and power in applying character styles, GREP styles are indispensable. GREP (Global Regular Expression Print) is a pattern-matching technique that allows you to define complex rules for finding and styling text.
When to Use GREP Styles
GREP styles are ideal when:
- You need to apply styles based on patterns rather than fixed characters or word counts.
- You want to automate the styling of recurring elements like phone numbers, dates, or specific grammatical structures.
- You need to apply formatting to the first uppercase letter of a paragraph or sentence, as mentioned earlier with the
\<\uexample.
Implementing GREP Styles
- Open Paragraph Style Options: Access the Paragraph Style Options dialog.
- Select GREP Style: Choose "GREP Style" from the left-hand menu.
- Create a New GREP Style: Click the "New GREP Style" button.
- Define the Rule:
- Apply Style: Select the character style you want to apply.
- To Text: Enter your GREP expression. For example, to style all instances of "InDesign" with a specific character style, you might use a GREP expression like
InDesign. For more complex scenarios, like styling all digits, you would use\d+.

David Blatner provides numerous real-world examples of GREP styles in action, showcasing their practical applications for tasks such as styling all phone numbers in a text or ensuring consistent formatting for specific terms.
Beyond Basic Formatting: Advanced Type Preferences
While nested styles and GREP styles provide powerful mechanisms for text formatting, InDesign also offers lower-level controls for specific typographic nuances. For instance, if you need to control the relationship between capital and lowercase letters when using small caps, you can navigate to Edit > Preferences > Advanced Type and adjust the "Small Cap %" value. This allows for fine-tuning the appearance of small caps to ensure they integrate harmoniously with the surrounding text.
Conclusion: Elevating Your InDesign Workflow
Nested styles, nested line styles, and GREP styles are not merely advanced features; they are essential tools for any InDesign user serious about efficiency and sophisticated design. By mastering these techniques, you can move beyond manual formatting and unlock a level of automation and precision that significantly elevates your workflow. Whether you're adding end ornaments, styling specific phrases, or creating complex typographic hierarchies, these InDesign capabilities empower you to achieve professional results with greater speed and accuracy. The ability to define character styles within paragraph styles, apply formatting to entire lines, and leverage the power of pattern matching with GREP styles allows for dynamic, adaptable, and visually compelling layouts that would be arduous, if not impossible, to achieve manually.