This guide delves into the process of creating custom handmade vine brushes within Procreate, offering a pathway to infuse your digital designs with a distinctive, personal touch. Whether your aim is to adorn festive ornaments, construct intricate borders, or develop sellable brush sets, this tutorial will meticulously guide you through each stage. We'll cover everything from the initial sketching of your foundational shapes to the nuanced adjustments of brush settings. Furthermore, we will explore how to effectively utilize your newly created brushes within a composition, demonstrating their potential for both commercial endeavors and personal creative expression.
HOW TO CREATE BRUSHES IN PROCREATE
For those who prefer a visual learning experience, a supplementary video tutorial is available as part of the iPad Art Break Series on YouTube. However, for a detailed, step-by-step textual guide, please continue reading below.
Establishing Your Digital Canvas
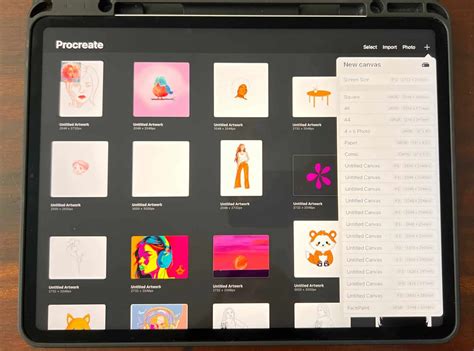
The genesis of any custom brush in Procreate begins with the careful preparation of your digital workspace. It is recommended to initiate this process by setting up a square canvas. A canvas dimension of 3000 x 3000 pixels is often ideal, providing ample resolution for detailed work and brush creation.
For optimal results when defining the shape of your brush, it is crucial to utilize pure black. This ensures that Procreate accurately interprets the areas that will form the solid components of your brush. Begin by sketching your desired design. You can employ a brush such as the Rough Inking Brush from the FREE Everything Bagel Brush Set, or any other drawing tool that you find comfortable and effective. The objective at this stage is to create simple, repeating shapes. These foundational elements could take the form of leaves, stars, or indeed, vine-like tendrils, which will ultimately serve as the building blocks for your custom brush. The simplicity of these shapes is key, as they will be repeated to form the brush stroke.
Preserving Your Brush Shape
Once you have successfully sketched the foundational shape for your brush, the next critical step is to save it in a format that Procreate can readily import. Navigate to the Actions menu within Procreate. From there, select the "Share" option. You will then need to save your sketch as a JPEG file. This exported image will serve as the source material for constructing your custom brush. The JPEG format is widely compatible and preserves the black and white values of your sketch, which are essential for brush definition.
Constructing Your Custom Brush
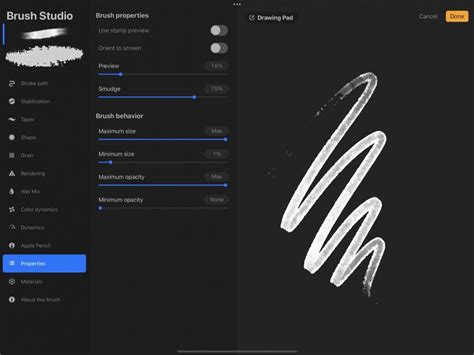
With your brush shape saved, you can now proceed to the creation of the brush itself. Access the Brush Library in Procreate. To initiate the process of creating a new brush, tap the "+" icon. This action will open the brush studio, where you can begin to define your brush's characteristics.
Within the brush studio, locate the "Shape" section. Tap on "Edit" to access the shape source settings. Following this, tap "Import Photo." You will then be prompted to select the JPEG file of your saved sketch. Once your shape is imported, it is imperative to adjust the source settings. Perform a two-finger tap on the imported shape. This action will invert the black and white areas. This inversion is fundamental because it dictates to Procreate which parts of the imported image will be rendered as solid (opaque) and which will be transparent. Essentially, you are telling Procreate where the ink or paint of your brush should appear.
Refining Brush Dynamics: Fine-Tuning Settings
The imported shape is merely the foundation; the true character of your brush is sculpted through the meticulous adjustment of its settings. Procreate offers a robust suite of parameters to fine-tune your brush's behavior, allowing for a vast array of expressive possibilities.
Stroke Path: Controlling Repetition and Flow
The "Stroke Path" section is where you govern how your brush shape is repeated along a stroke. The primary setting here is "Spacing." Adjusting the spacing controls the distance between each instance of your brush shape. A lower spacing value will result in a denser, more continuous line, while a higher spacing will create more distinct, separated instances of your shape. This is particularly vital for vine brushes, as it allows you to control whether the vines appear tightly interwoven or more spread out.
Shape Rotation: Adding Organic Variation
The "Shape Rotation" setting is instrumental in imparting a sense of organic flow and natural variation to your brush strokes. Enabling rotation allows your brush shapes to orient themselves in relation to your stroke. This can create a beautiful effect where the shapes subtly turn and twist as you draw, mimicking the natural growth patterns of vines. You can also set rotation to "Random" or "Pen Tilt" for even more dynamic and unpredictable results, adding a playful or highly organic feel to your artwork.
Apple Pencil Dynamics: Tailoring Responsiveness
For users employing an Apple Pencil, the "Apple Pencil" settings offer powerful control over how your brush responds to pressure and tilt. You can set "Opacity" dynamics so that the brush becomes more or less transparent depending on how hard you press. Similarly, "Size" dynamics can be adjusted to alter the thickness of the brush stroke based on pressure. These settings are crucial for achieving a natural, hand-drawn feel and can be tailored to your personal drawing style. Experimentation is key here to find the sweet spot that feels intuitive and expressive for you.
Duplication for Variation
A highly efficient workflow tip is to duplicate your brush. Once you have a base brush that you are happy with, you can duplicate it within the Brush Library. This allows you to create variations without the need to start the entire creation process from scratch. You can then tweak specific settings on the duplicated brush, such as spacing or rotation, to achieve subtle or significant differences, building a cohesive set of related brushes quickly.
Cultivating a Cohesive Brush Set
The power of custom brushes often lies in their ability to work together harmoniously. To this end, it is highly beneficial to experiment with creating brushes based on different themes or styles, all while maintaining a degree of visual consistency. Consider developing sets of brushes inspired by natural elements like leaves or snowflakes, or perhaps exploring more stylized aesthetics such as Art Nouveau-inspired patterns.
For each new brush concept, save the unique shape as described previously. Then, meticulously adjust its settings within the brush studio. The goal is to make these brushes feel like they belong to the same family. This might involve using similar foundational shapes, applying consistent stroke path behaviors, or ensuring that the Apple Pencil dynamics offer a comparable level of responsiveness. A well-curated set of brushes can significantly enhance your workflow and the aesthetic coherence of your artwork.
Showcasing Your Creations: Brush Composition
The ultimate test and demonstration of your custom brushes come when you integrate them into a larger composition. This practical application not only helps you to further refine the nuances of your brush settings but also serves to create compelling visuals that can effectively showcase the potential of your brush set, especially if you intend to sell them.
A practical example would be to create simple geometric shapes that represent ornaments. You can then utilize your newly crafted vine brushes to intricately decorate these ornament shapes. This process allows you to see how the brushes interact with different forms and how they contribute to the overall aesthetic. The resulting artwork can be a powerful marketing tool, illustrating the artistic possibilities that your unique brushes unlock. Furthermore, it provides a satisfying creative outlet to see your digital tools come to life in a tangible piece of art.
Expanding Your Creative Horizons
The journey of brush creation in Procreate is an ongoing exploration. For those who wish to delve deeper into the art of digital brush design, consider exploring the creation of unique texture brushes. These brushes can add another layer of depth and tactile quality to your artwork, complementing your vine brushes and expanding the expressive vocabulary available to you within Procreate. The principles learned in creating vine brushesâsketching, importing, and fine-tuning settingsâare directly transferable to the creation of a wide variety of brush types. The possibilities for unique digital art tools are virtually limitless, driven by your imagination and willingness to experiment.