Inkscape's snap to grid feature is an invaluable tool for designers seeking precision in their work. It acts like a magnet, attracting your cursor and objects to specific points, lines, or corners within your design canvas. This tutorial delves into the intricacies of enabling and utilizing snap to grid, exploring its various functionalities and addressing common user experiences to ensure accurate object placement and alignment.
Understanding the Core Concept of Grid Snapping
At its heart, "snap to grid" implies that objects should align with a defined grid structure. Ideally, this means that the position and size of every shape drawn should be dictated by which grid points its key points (like corners or nodes) lie on. In essence, everything drawn should be "on the grid." However, it's important to note that Inkscape's implementation of "snap to grid" doesn't always strictly adhere to this ideal, leading to nuances in its behavior.
The "Magnet" Analogy
To visualize snap to grid, consider it a powerful magnet. As your cursor or an object's key points approach a grid point, they are automatically drawn and "stuck" to that point. This automatic alignment eliminates the guesswork involved in manual placement, ensuring that objects are positioned with pixel-perfect accuracy on your artboard. This feature is particularly useful when working on projects that require meticulous alignment, such as creating scalable vector graphics, designing logos, or laying out intricate illustrations.
Enabling and Configuring Snap to Grid in Inkscape
To harness the power of snap to grid, you first need to enable it and configure its settings. The process involves navigating through Inkscape's menus and toolbars.
Accessing Snap Controls
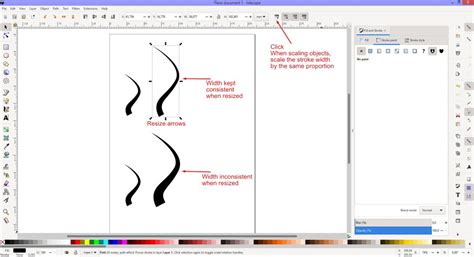
The primary icon for enabling snapping functionality resembles a triangle pointing left, typically found in the upper-right corner of the Inkscape interface. Clicking this icon reveals a menu with various snapping options. For the latest versions of Inkscape, it's crucial to be aware that menu options may differ slightly from older iterations. Ensuring you have the most recent version installed will provide access to the most up-to-date features and functionalities.
The Snap Controls Bar
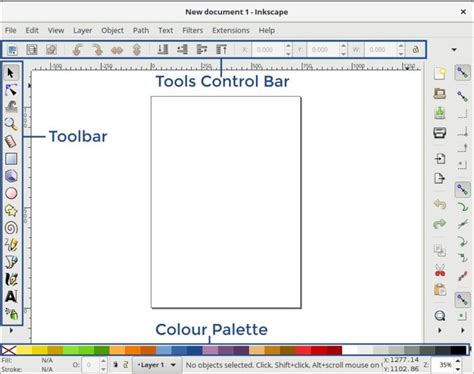
If you don't see the Snap Controls Bar, you can enable it by navigating to View > Show/Hide > Snap Controls Bar. This toolbar provides quick access to various snapping toggles, including the essential "Snap to Grid" option. For starters, try making the same settings as shown in the accompanying image. Depending on your specific design needs, these settings could significantly impact whether snap to grid is functioning as expected.
Global Snapping Preferences
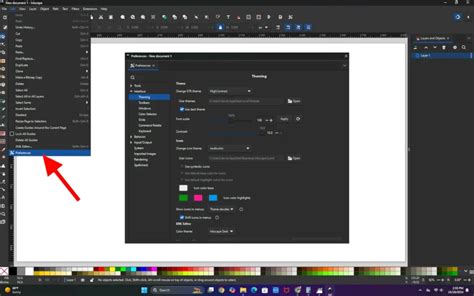
For more in-depth control, you can access Inkscape's preferences. Navigate to Edit > Preferences > Behavior > Snapping. This section allows you to fine-tune how snapping behaves globally within Inkscape.
Document Properties: Grids and Snapping
The configuration of grids and snapping is also managed within the Document Properties. To access this dialog, go to File > Document Properties... and select the "Grid" tab. Here, you can create new grids or modify existing ones.
Creating and Managing Grids
Within the Grid tab of Document Properties, you can define the appearance and behavior of your grids. You'll notice options to create a new grid by pressing "New" if necessary. This dialog allows you to set up custom grid structures tailored to your project's requirements. The grid is typically made of horizontal and vertical lines, forming a series of blocks or cells. The current settings might define a block size, for instance, 1x1 pixel. However, it's important to understand that grid blocks don't necessarily have to be square; you can customize their dimensions.
You can also change the color of minor or major grid lines. A major grid usually has a set number of minor grid lines within each column and row. You can adjust this "minor grid number" to control the density of your grid.
"Always Snap" Setting
Within the Document Properties, specifically in the "Snap" tab, you will find the "Snap to Grids" section. For initial setup and testing, selecting "Always Snap" in this section is recommended. This ensures that snapping is consistently active for grid elements.
Nuances in Snap to Grid Behavior
While the concept of snap to grid is straightforward, Inkscape exhibits different behaviors that users should be aware of. These variations can sometimes lead to confusion if not understood.
Scenario 1: Correct Grid Intersection Snapping
The ideal scenario occurs when each corner or key point of an object snaps precisely to the nearest grid intersection. This happens when the user's pointer is within a defined "tolerance" - a maximum distance from the grid point they intend to snap to. In this case, the object's corners align perfectly with the grid points, resulting in a truly "on the grid" placement.
Scenario 2: Snapping to Grid Lines, Not Intersections
A common variation is when one or both points of an object snap to locations that lie along a grid line but are not actual grid intersection points. In this situation, the grid no longer functions as a strict coordinate system but rather as a series of guides placed at regular horizontal and vertical intervals. Inkscape will indicate that it's snapping to a "grid line," which it treats as a distinct concept from a "grid intersection." This behavior can be useful for aligning objects along specific axes without necessarily locking them to a corner.
Scenario 3: Differentiating Grid Line and Grid Intersection Snapping
If the ability to snap to "grid lines" at points that are not "grid intersections" is desired, it's beneficial to have these options separated in the advanced snapping menu. This allows users to enable or disable snapping to grid lines and snapping to grid intersections independently, providing greater control over the snapping behavior.
Practical Application: Snapping Paths and Nodes
A common challenge users face is getting paths, especially those created with tools like the Bezier tool or shapes composed of paths, to snap correctly to the grid.
The Font Creation Challenge
Consider a user creating a font for a logo by assembling letters from smaller shapes, such as outset and inset rounded corners. These shapes are paths. When attempting to align these paths on the grid, they might not snap as expected, leading to the question: "Are paths not treated the same for grid snapping as objects?"
Workaround: Using the Node Tool for Path Snapping
While the direct snapping of paths to grid intersections might not always be intuitive, a reliable workaround involves using the Node tool.
- Select the path with the Node tool.
- Select all nodes within the path by drawing a bounding box around them.
- Identify the specific node you want to snap to a grid point.
- Click and drag that node towards the desired grid intersection. The node will snap to the grid, and consequently, the entire shape will be positioned accurately.
This method ensures that even complex paths can be precisely aligned with the grid by manipulating their constituent nodes.
How To Smooth An Already Drawn Path In Inkscape
Advanced Snapping Configurations
Inkscape offers a robust set of snapping options that go beyond simple grid alignment.
Snapping to Other Elements
Inkscape allows objects to snap to various other elements on your canvas, not just the grid. This includes:
- Other shapes: Objects can snap to the boundaries or corners of existing shapes.
- Lines: Snapping to vector lines provides alignment along linear elements.
- Vector points (nodes): This is crucial for precise manipulation of paths and curves.
- Guidelines: User-created guidelines offer flexible alignment aids.
The "Tolerance" Setting
The "tolerance" setting is a critical parameter that determines how close your cursor or object needs to be to a snap point (like a grid intersection or node) for snapping to occur. A smaller tolerance requires more precise mouse positioning, while a larger tolerance makes snapping more forgiving. Adjusting this setting can significantly influence the responsiveness of the snap feature.
"Snap to Visible Grid Lines Only"
If you have multiple grids enabled or wish to have grids visible for reference without always snapping to them, the "Snap to visible grid lines only" option is invaluable. When this option is disabled, you can choose to work with specific grids independently. By making a grid invisible, you can effectively disable snapping to that particular grid while keeping other snapping features active. This allows for a highly customized and controlled design environment.
Conclusion: Enhancing Accuracy with Snap to Grid
Inkscape's snap to grid feature is a powerful ally for designers, enabling the creation of precise and well-aligned artwork. By understanding how to enable, configure, and leverage its various behaviors, including snapping to grid intersections and grid lines, users can significantly improve their workflow and the accuracy of their designs. Whether you're piecing together intricate illustrations, designing precise vector graphics, or even crafting custom fonts, mastering Inkscape's snap to grid functionality will undoubtedly elevate your command of the software and the quality of your artistic output. Remember to explore the preferences and document properties to tailor the snapping behavior to your specific project needs, ensuring a seamless and efficient design process.