The digital age has gifted us with a unique form of communication: the meme. These bite-sized pieces of cultural commentary, often humorous and highly shareable, have become an integral part of online discourse. While many meme creators rely on readily available tools, mastering Adobe Photoshop offers a pathway to unparalleled creative control and meme perfection. This comprehensive guide will walk you through the process of transforming ordinary images into viral-worthy content, with a particular focus on the unique landscape of tech industry memes. Whether you're a seasoned Photoshop user or a complete novice, these steps will equip you to become a meme-making machine.
Ideation: The Genesis of a Meme
Before a single pixel is placed, the most crucial step is conceptualization. For those targeting the tech industry, this means tapping into its unique culture, trends, and shared experiences. Brainstorming meme ideas can revolve around a commentary on industry trends, a humorous take on your startup's product, or a lighthearted depiction of common tech issues. Think about the inside jokes, the recurring frustrations, and the aspirational dreams that resonate within the tech community. What are the latest buzzwords, the most common development challenges, or the daily routines of tech professionals?
Inspiration can be found everywhere, from recent news headlines to ongoing pop culture phenomena. Observing what other meme creators are posting online can also spark ideas. Many successful memes combine one to two lines of amusing text with a recognizable image, or they might take the form of an animated GIF or a short video. The essence of creating a shareable meme lies in its wittiness and relatability. Consider what you want your meme to communicate and which format will best convey your point or joke. Crucially, ensure you have a good grasp of your audience’s interests, problems, and the types of media or memes they consume.
Preparing Your Digital Canvas
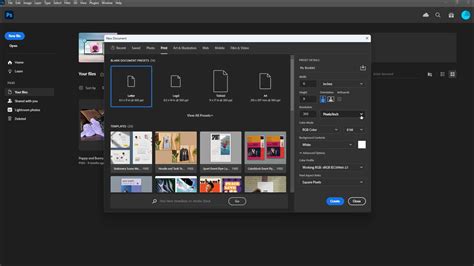
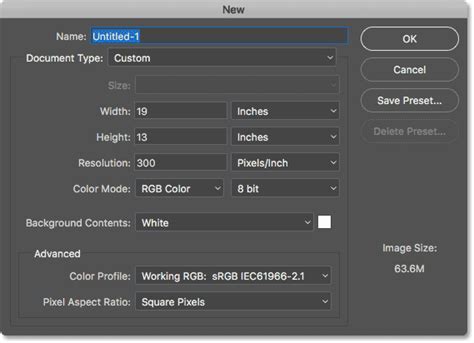
The first practical step in Photoshop is setting up your canvas. For a universally compatible image that works well on most social platforms, begin by creating a new file with dimensions of 1080 pixels by 1080 pixels. This creates a perfect square. For web images, a resolution of 72 Pixels/Inch is standard and sufficient. Some tutorials suggest starting with a 600x600 pixel canvas, which is also suitable for web use and particularly for platforms like Instagram. If you plan to create a range of meme templates, consider using Artboards. Ensure they are ticked in the "New Document" window before you begin. This allows for easier comparison and management of multiple design variations within a single Photoshop file.
Importing and Manipulating Your Base Image
Once your canvas is ready, it's time to bring in your chosen image. Navigate to "File -> Open" and select your background image. For seamless integration, it's often best to duplicate the layer. In the Layers panel, right-click the image layer and select "Duplicate Layer." Choose your meme canvas as the destination and click "OK." This preserves your original image and allows for non-destructive editing.
To adjust the size and position of your imported image on the canvas, use the "Free Transform" tool, accessible via "Edit -> Free Transform" or the keyboard shortcut Ctrl/Cmd+T. Drag the edges and corners of the bounding box to resize. Holding the Shift key while transforming will maintain the image's original proportions, preventing distortion. Press Enter when you're satisfied with the placement and scale.
If you need to crop unwanted areas of the image, select one of the marquee tools (Rectangular Marquee Tool or Elliptical Marquee Tool) to define the area you wish to keep or remove. You can then either delete the selected area or create a layer mask and fill the selection with black to conceal it. If your imported image is a Smart Object, you can easily move, resize, or even replace it later by double-clicking the layer thumbnail.
Crafting the Meme's Visual Foundation: Backgrounds and Elements
A distinct background is essential for framing your meme and making your content stand out. While design instincts might lean towards colors that complement the image, memes often benefit from unconventional choices. Garish, clashing colors can draw the eye and aren't subjected to the same intense scrutiny as other design work.
To create a background, you can start by creating a new layer using the shortcut Cmd+Shift+N. Drag this new layer to the bottom of your layer stack. You can then fill this layer with a solid color using the Paint Bucket tool or a gradient using the Gradient tool.
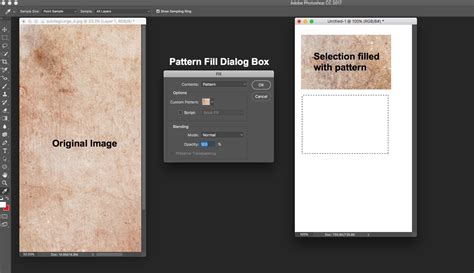
Alternatively, you can utilize patterns. Go to "Edit -> Fill" and select "Pattern" from the dropdown menu. Photoshop offers a selection of default patterns, but you can expand your choices by adding custom pattern packages. Click the gear icon in the top-right corner of the pattern selection window to access more options. You can even combine patterns with solid colors by applying a "Color Overlay" layer style to the pattern layer.
Beyond the background, consider incorporating tech-related symbols or icons. The "Custom Shape Tool" (U) is ideal for this. You can select from a variety of pre-set shapes or import your own custom shapes. For instance, adding a subtle circuit board pattern or a stylized code bracket could enhance the tech theme. Importing other images, like screenshots of code, company logos, or even abstract tech graphics, can be done using the same "File -> Open" and "Duplicate Layer" method described earlier.
The Heart of the Meme: Adding Text
Text is the cornerstone of most memes, and its presentation is critical for impact. The text needs to be unapologetically large and brash, prioritizing clarity and immediate comprehension over intricate styling. Use the "Horizontal Type Tool" (T) to add your meme caption. Click on your canvas where you want your text to appear and begin typing.
To modify the font style, color, or size, highlight the text and utilize the options bar at the top of the screen. For a classic meme aesthetic, the "Impact" font is a popular choice, typically rendered in white with a black stroke.
To add a stroke, right-click your text layer in the Layers panel, select "Blending Options," check the "Stroke" option, set the color to black, and adjust the size to your preference. A stroke helps the text stand out, especially against busy backgrounds. Some designers also find that adding a "Drop Shadow" can further enhance text legibility, even if it's considered a more dated effect. To add a drop shadow, double-click the text layer to open the Layer Style window and apply it. Experiment with the distance and angle to create a hard, defined shadow.
When typing your message, aim for a clear hierarchy. A larger, main statement followed by a smaller, supporting message can be effective. Choose a thick, blocky typeface that commands attention, such as Impact or Tungsten. The goal is to sacrifice subtle style for maximum impact.
Photoshop Text effect Compilation: 18 Simple Text Effects for Beginners
Refining and Exporting Your Masterpiece
With your image, background, and text in place, it's time for the final touches. Review your meme for any excess areas, awkward alignments, or areas where the text might be difficult to read. Use the eraser tool carefully on any stray elements, paying attention to opacity and flow settings to ensure a natural look. If you're working with multiple design variations, now is the time to duplicate your Artboard (by clicking on the Artboard layer and then the plus signs on the canvas, or by holding Alt and dragging an existing Artboard) and experiment with different backgrounds, colors, or text placements.
When you are completely satisfied with your creation, it's essential to save your work in a way that preserves your layers for future editing. Go to "File -> Save As" and save your Photoshop document in the .PSD format. This ensures you can return to your meme later and make any necessary modifications.
For sharing on social media, you'll need to export your meme in a web-optimized format. Navigate to "File -> Export -> Export As." Here, you can choose between JPEG for photographic images or PNG for graphics with transparency. Adjust the quality settings as needed to balance file size and image fidelity.
The Final Frontier: Sharing and Performance
Once exported, your meme is ready for its digital debut. Share your creation on your startup's social media channels. To increase its visibility, consider using relevant industry-specific hashtags. For example, if your meme is about cloud computing, hashtags like #cloudcomputing, #techmemes, or #startuplife could be effective.
The journey doesn't end with posting. Monitor the engagement your meme receives - track likes, shares, comments, and any other relevant metrics. Understanding what resonates with your audience provides valuable feedback for future meme creations. A successful meme is a combination of a good idea, good timing, and effective execution. While virality can't be guaranteed, staying attuned to social trends and consistently producing engaging content increases your chances of riding the wave of internet culture. Before you post, it's also a good practice to share your meme with a few friends for a quick review to gauge their reaction and catch any last-minute tweaks.
The ability to create compelling memes in Photoshop empowers you to inject humor, personality, and relatable commentary into your online presence, making it a powerful tool for engagement and brand building in the fast-paced tech world.