Realistic shadows around objects are the unsung heroes of professional and believable product photography. They provide depth, dimension, and a sense of tangible presence that can elevate a simple image into a compelling visual. However, achieving these crucial elements in-camera can often be a challenge, requiring specific studio setups, precise lighting, and the right environmental conditions. Fortunately, with a combination of patience, skill, and a nuanced understanding of how light and shadow interact, you can effectively add natural-looking drop shadows in Photoshop to your product photos, transforming them into polished, professional visuals. This comprehensive guide will walk you through the intricate process, moving from fundamental principles to advanced techniques, ensuring your digital creations possess an authentic, lifelike quality.
Understanding the Fundamentals of Light and Shadow
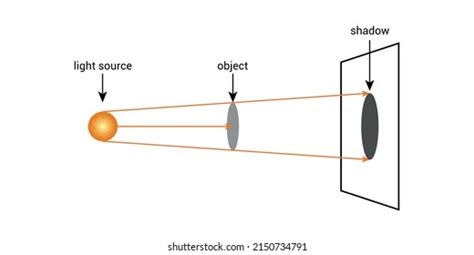
Before diving into the technical application within Photoshop, it is essential to grasp the underlying principles that govern shadow formation. Objects inherently possess two primary types of shadows: cast shadows and form shadows. Cast shadows are the projections of an object onto surfaces like floors or other objects, appearing around the object. Form shadows, on the other hand, are the gradations of light and dark that occur within the object itself, defining its three-dimensional shape. Both types are intricately determined by the direction, distance, and number of light sources illuminating the scene. By observing the form shadows on an object, one can gain valuable insights into how a realistic cast shadow would manifest. A key characteristic of cast shadows is that they become progressively lighter and more diffused as they recede from the object casting them.
The Nuance Between Drop Shadows and Cast Shadows in Photoshop
While Photoshop offers a convenient "Drop Shadow" layer style, it's crucial to understand that this is merely a starting point and rarely an accurate representation of real-world shadows. A standard drop shadow applied directly from the layer style menu often results in a shadow that is roughly the same size and dimension as the object itself. This uniformity is rarely encountered in natural environments. To achieve a truly natural and believable shadow, the process must extend beyond this basic effect, transforming the generic drop shadow into a dynamic, three-dimensional cast shadow. This tutorial will guide you through a sophisticated workflow that meticulously reconstructs the characteristics of natural shadows using a combination of Photoshop's powerful tools, including the Drop Shadow Layer Style, transform tools, the gradient tool, blur filters, layer masks, and alpha channels.
Step-by-Step Guide to Creating Realistic Shadows
The following detailed steps will guide you through the process of creating a natural-looking shadow for your product photos in Photoshop.
1. Isolate Your Object from the Background
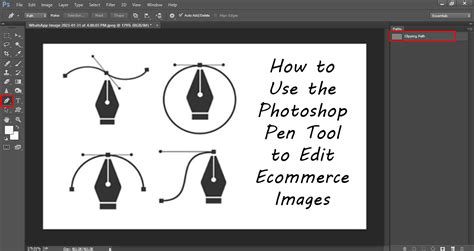
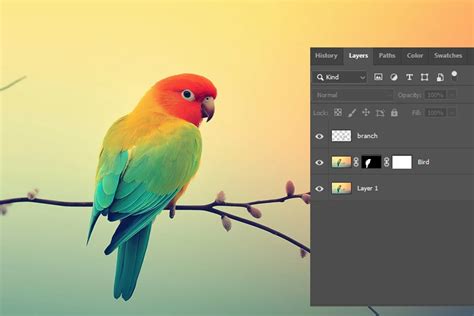
The first critical step is to meticulously isolate your product from its original background. Open the photograph you intend to modify in Photoshop. Navigate to Window > Layers to ensure your Layers panel is visible. Select the object within your photo using your preferred selection tool (e.g., Quick Selection Tool, Pen Tool for precision). Once the object is selected, copy your selection (Ctrl+C or Cmd+C) and paste it into a new layer (Ctrl+V or Cmd+V). This action creates a duplicate of your object on a separate layer, allowing you to work on the shadow creation without altering the original image. It is highly recommended to rename this new layer to something descriptive, such as "Isolated Product," to maintain clarity within your Layers panel as you progress. To ensure you are only working with your isolated object, click on the eye icon next to your original Background layer, making it invisible. This will present your object against a transparent background, facilitating easier manipulation.
2. Create a New Background Layer
With your object now isolated on its own layer, it's time to establish a new background. In your Layers panel, select the now-invisible Background layer. Go to Layer > New Fill Layer > Solid Color…. A dialog box will appear, prompting you to name this new layer. A suitable name would be "Solid White" or "Background Color." Click "OK." This action will open the Color Picker window. To create a clean white background, move your cursor to the upper-left corner of the color field, or alternatively, input "ffffff" into the hexadecimal color value field at the bottom of the dialog box, and click "OK." You should now see your entire image covered by this solid white fill. To ensure your isolated object appears on top of this new background, simply drag the "Solid White" fill layer in the Layers panel so that it is positioned below your "Isolated Product" layer.
3. Determine Your Cast Shadow Color
Shadows are not simply black voids; they possess subtle colorations influenced by the ambient light and the object itself. To achieve a realistic shadow, you need to sample a color that reflects these nuances. Examine your isolated object and locate areas where form shadows are present. Use the Eyedropper Tool (I) to click on one of these darker, shadowed areas within your object. The sampled color will appear as your foreground color in the Toolbar. Double-click on this foreground color swatch to open the Color Picker. Within this dialog, adjust the sampled color to be slightly darker and less saturated. This is typically achieved by moving the selection point downwards and slightly to the left within the color field. Click "OK" once you have a suitable shadow color.
4. Apply a Basic Drop Shadow
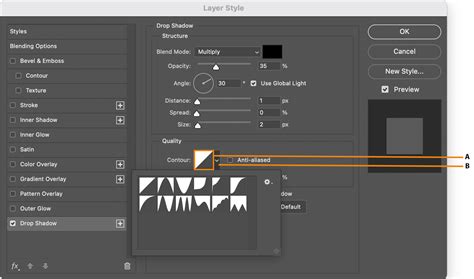
With your "Isolated Product" layer still selected, click on the fx button at the bottom of your Layers panel and choose "Drop Shadow." The Drop Shadow dialog box will appear. Set the shadow color to the foreground color you just sampled and adjusted. At this stage, you don't need to meticulously fine-tune the opacity, distance, spread, and size. These parameters will be further refined later. For now, use the values displayed in the accompanying screenshot as a starting point. Once you have a basic shadow that is roughly in the correct position, click "OK."

5. Convert Drop Shadow to a Layer
To gain greater control over the shadow and manipulate it independently of the object, you need to separate it from the layer style. Go to Layer > Layer Style > Create Layer. A warning dialog box may appear, informing you that this action will convert the layer style into a layer. Click "OK" to proceed. Your drop shadow is now a distinct layer, allowing for advanced transformations and adjustments.
6. Distort the Drop Shadow for Realism
Now begins the process of transforming the static drop shadow into a dynamic cast shadow. In your Layers panel, ensure the newly created drop shadow layer is selected. Navigate to Edit > Transform > Distort. This tool allows you to manipulate the shadow by dragging its corner anchor points. This is where artistic judgment and an understanding of light become paramount. Consider the direction of the form shadows on your object to determine the natural direction in which the cast shadow should fall. Also, think about the vanishing point of your image to guide how far and in what direction you should distort the shadow to simulate it falling onto a surface. Pull the shadow downwards and outwards, shaping it to appear as if it's cast onto the background plane.
7. Create an Alpha Channel for Gradient Control
Real-world shadows exhibit a natural progression: they are darkest and sharpest closest to the object and gradually become lighter and more diffused as they move away. An alpha channel is an excellent tool for precisely controlling these variations. Open your Channels panel by going to Window > Channels. From the Channels panel menu (the small icon with horizontal lines in the top-right corner of the panel), select "New Channel." In the "New Channel" dialog box, you can accept the default name "Alpha 1." Crucially, ensure that the "Color Indicates" radio button is set to "Selected Areas." Click "OK."
8. Apply a Gradient to the Alpha Channel
With your new Alpha 1 channel selected in the Channels panel (just as you would select a layer in the Layers panel), and ensuring that the visibility of all channels (RGB or CMYK) is toggled on (via the eye icon), select the Gradient Tool (G) from the Toolbar. In the Options Bar at the top of your Photoshop window, set the gradient to transition from black to white, and ensure the gradient type is set to "Linear." Also, confirm that your foreground color is set to black and your background color is set to white. Position your cursor at the furthest extent of your distorted shadow (or even beyond it) and draw the gradient towards the part of the shadow that is closest to your isolated object. This action will create a visible red gradient overlay on your image, indicating how the alpha channel will influence the shadow's transparency.
How to Make most REALISTIC SHADOWS in Photoshop, 3 simple steps
9. Blur the Selection Based on the Alpha Channel
The gradient created in the alpha channel is now ready to inform a blur effect, making the shadow lighter and softer in its furthest reaches. Toggle off the visibility of the red gradient overlay in the Channels panel by clicking the eye icon next to Alpha 1. Then, click on the top channel in your Channels panel (typically RGB or CMYK, depending on your image's color mode) to re-select your color channels and deselect the alpha channel. Return to your Layers panel and ensure your drop shadow layer is still selected. Go to Filter > Blur > Lens Blur. In the Lens Blur dialog box, make sure the "Preview" box is checked. Under the "Depth Map" section, select "Alpha 1" from the "Source" dropdown menu. Keep the "Blur Focal Distance" at 0, and check the box next to "Invert." Adjust the "Radius" slider to a high value (e.g., 72 or more, depending on the desired effect). Leave all other values at their defaults and click "OK." This filter will apply a blur that is dictated by the gradient in your alpha channel, making the shadow progressively softer and more transparent as it moves away from the object.
10. Create a Layer Mask for Precise Control
To refine the shadow's appearance and ensure it behaves as a true cast shadow, a layer mask is essential. Go to Select > Load Selection. In the "Load Selection" dialog, choose "Alpha 1" from the "Channel" dropdown menu and ensure the radio button next to "New Selection" is checked. Click "OK." You will now see a selection active, outlining the areas corresponding to the darker parts of the gradient you created in your alpha channel. Next, invert this selection by going to Select > Inverse (or using the keyboard shortcut Shift+Ctrl+I on Windows or Shift+Cmd+I on Mac). With the selection active, return to your Layers panel and click on the "Add layer mask" icon at the bottom of the panel. This action will apply a layer mask to your drop shadow layer. The shadow will now appear to "fade" into the background as it recedes from the object, mimicking natural light behavior. Observe that the thumbnail for the layer mask on your drop shadow layer will closely resemble the thumbnail of your Alpha 1 channel. If you desire a subtler shadow overall, you can reduce the opacity of the entire Drop Shadow layer.
11. Refine and Clean Up Shadows
The final stage involves critically assessing the shadow's placement and appearance in relation to the light source. Ensure that no portions of the shadow are appearing on the "wrong" side of your product or object. For instance, if the primary light source is positioned to the left, the cast shadow should predominantly fall to the right. Use the Eraser Tool (E) with a soft brush to carefully remove any shadow elements that appear unnatural or inconsistent with the established lighting direction. This meticulous cleanup ensures the shadow integrates seamlessly with the overall image.
When to Employ Natural Shadows in E-commerce and Beyond
The application of natural-looking shadows is a powerful technique with numerous benefits, particularly in e-commerce. When showcasing products against a clean white background, the addition of a realistic shadow helps the product "pop," creating a more engaging and professional presentation. This technique is especially effective for items like furniture, where a natural drop shadow can add significant dimension and depth without requiring complex in-studio lighting setups. Brands like The Mood Store and Famous Footwear effectively utilize natural shadows in their product imagery to enhance visual appeal and maintain a consistent, professional aesthetic across their platforms.
While creating these natural shadows in Photoshop is an art form that significantly enhances product photography, it can be a time-consuming and detailed process. For businesses with a high volume of product images or limited in-house resources, outsourcing this task to professional photo editing services can be a strategic decision, freeing up valuable time to focus on core business operations and growth.
Frequently Asked Questions about Shadows in Photoshop
How do I add a shadow to an image in Photoshop?
The process involves isolating your object, creating a new background, determining a realistic shadow color, applying a basic drop shadow, converting it to a layer, distorting it, using an alpha channel and gradient for falloff, blurring it based on the alpha channel, and finally applying a layer mask for refinement.
What is the easiest way to add a shadow in Photoshop?
The simplest method is to apply the "Drop Shadow" layer effect directly to the layer containing your isolated object. However, this typically results in a less realistic shadow and is best suited for quick mockups or when realism is not a primary concern.
How do you add a subtle shadow in Photoshop?
For a subtle shadow, create a small, feathered ellipse of color beneath your object using the Ellipse Tool. Set this ellipse to be wider than it is tall, feather the selection significantly, fill it with 50% gray, and then reduce the layer's opacity. This method works well for simple shapes that need to appear as if they are "floating" with a soft shadow.
What is a drop shadow in Photoshop?
A drop shadow is a layer effect in Photoshop that simulates a shadow cast by an object. It can be applied through Layer > Layer Style > Drop Shadow.... While easy to apply, it often requires further manipulation to achieve a natural appearance, especially for product photography where casting shadows on walls or ground planes in architectural visualizations differs significantly from product shots. Creating truly realistic shadows, rather than just applying a basic effect, involves a deeper understanding of light and form.
In architectural visualization (ArchViz), creating shadows also presents unique challenges. Shadows cast by cut-out objects like people, trees, or cars, or atmospheric shadows, require different approaches than those cast by buildings themselves. Often, 90% of elements in an ArchViz scene are added in Photoshop, necessitating the creation of convincing shadows for these imported assets. When working with cut-out PNGs, duplicating the layer, selecting near the feet, and then using the Gradient Tool with a black-to-white mode can begin the process. Blurring these shadows, first with a small Gaussian Blur (2-3 pixels) for general softness and then with a much larger value (30-40 pixels) on selected areas, is key to achieving realism. If a ground plane was not rendered, or if shadows need to be cast on walls, techniques like using the Polygonal Lasso Tool to select areas and then applying a "Brightness/Contrast" adjustment to reduce brightness offer non-destructive methods. For blurry tree shadows on a foreground, the process involves transforming a rendered tree shape, applying a Color Overlay, and then using Gaussian Blur. Adjusting the brightness and contrast of the main object layer can further enhance the overall effect.
When creating digital assets like trees in Photoshop, finding perfect cut-out PNGs that match the lighting can be time-consuming. A starting point can be using Filter > Render > Tree and then scaling and repositioning it. To add a shadow, duplicating the tree layer, sending it backward, transforming its shape, applying a Color Overlay, and then using Gaussian Blur can create a convincing shadow effect. Subsequently, adjusting the original tree's brightness and contrast can help integrate it better into the scene.
The process of creating a drop shadow for an object, like a turtle in a sample PSD file, can be initiated by placing the object on its own layer. Then, applying the Drop Shadow layer style allows for adjustments to distance, light angle, and opacity. If the image is part of a larger composition, such as placing a turtle underwater in the water.psd document, the shadow needs to be adjusted to match the new environment, which might involve modifying the Drop Shadow effect's settings to reflect the underwater lighting conditions. The ability to edit PSD files means these shadow adjustments can be revisited and refined at any time.