Turning a vibrant, colorful photograph into a compelling black and white image is an art form that transcends simple desaturation. While it's easy to remove color from an image in any editing software, achieving a truly impactful black and white photograph requires a nuanced understanding of tonal balance, contrast, and mood. This tutorial delves into a powerful and flexible technique using Photoshop's Black & White Adjustment Layer, offering a deep dive into its capabilities for both beginners and seasoned professionals.
The Art of Black and White Photography

Static selections and vibrant colors enrich our lives, but in the realm of photography, color can sometimes be a distraction. When the goal is to draw attention to the fundamental elements of an image - lines, shapes, and textures - converting to black and white is a highly effective strategy. This process allows the viewer to focus on the composition and the interplay of light and shadow, unhindered by the subjective interpretations that color can evoke. Expressing character and mood in black and white is a whole different ball game compared to working with color, which can readily convey emotion. The challenge lies in creating depth and impact through tonality alone.
Why Shoot in RAW for Black and White?
Even when you are shooting with the intention of creating a black and white image, it is crucial to always remember to shoot in RAW format. This is because RAW files capture the maximum amount of image data, allowing you to fully control the metadata and make precise adjustments in post-processing. This flexibility is paramount when aiming for a specific tonal range and contrast in your monochrome conversions.
Introducing the Black & White Adjustment Layer
The appropriately named Black & White Adjustment Layer is the premier tool within Photoshop for converting color images to black and white. Its primary function is to instantly remove color, but its true power lies in its ability to allow for fine-tuned adjustments to the tonal values of an image, directly influenced by the original colors present.
Applying the Black & White Adjustment Layer
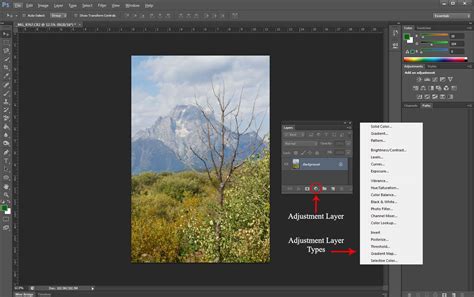
There are several straightforward ways to apply this essential adjustment layer:
- Using the Adjustments Panel: Ensure you have both the Layers panel and the Adjustments panel open. You can typically find these under the "Window" menu if they are not already visible. Click on the "Add New Adjustment Layer" icon at the bottom of the Layers panel (it looks like a half-filled circle) and select "Black & White" from the dropdown menu. Alternatively, within the Adjustments panel itself, click on the third icon in the second row, which is the Black & White icon.
- Via the Layer Menu: Navigate to the "Layer" menu at the top of the Photoshop interface. From there, choose "New Adjustment Layer" and then select "Black & White."
This process adds a new Black & White adjustment layer to your Layers panel. The Properties dialogue for this layer should also open automatically. If it doesn't, you can open it by selecting "Properties" from the "Window" menu.
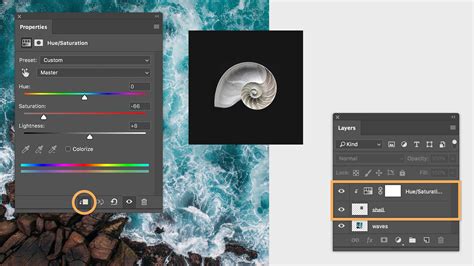
Understanding the Properties Panel
Once the Black & White adjustment layer is applied, the Properties panel becomes your control center. This panel offers six sliders, each corresponding to a color range (Red, Yellow, Green, Cyan, Blue, Magenta). These sliders allow you to adjust the brightness of the corresponding colors in the original image as they are converted to grayscale.
For instance, if you want the reds and yellows of skin tones to appear brighter in your black and white conversion, you can simply slide the Red and Yellow sliders to the right. Conversely, dragging these sliders to the left will darken those tones. The same principle applies to other color ranges. In a landscape, you might use the sliders to darken a blue sky or lighten green foliage. Dragging the Blues and Cyans sliders to the left can effectively darken the sky, while adjusting the Yellows slider can influence the brightness of elements like roof tiles or dry grass.
A helpful starting point for balancing the tones is the "Auto" button found within the Black & White properties panel. While it provides a good baseline, manual adjustments are often necessary for achieving a truly artistic result.
Photoshop Black and White Image with a Simple Adjustment Layer
Beyond Simple Conversion: Enhancing Mood and Drama
Now that your image is in black and white, the real creative work can begin. The goal is to go beyond a simple desaturation and to bring out the drama and mood inherent in the scene. This involves carefully controlling contrast and tonality.
The Critical Role of Contrast
Contrast is arguably the most important element to consider in black and white photography. Striking the right balance between having enough contrast to create visual interest and avoiding too much contrast, which can lead to a loss of detail and blown-out highlights or crushed blacks, is key.
The Importance of Grey Tones
Don't neglect the grey tones. These subtle variations in lightness and darkness are what breathe life into a monochromatic image. A full spectrum of grays, from near-white to near-black, provides depth, dimension, and a sense of realism. Without a good range of grays, an image can appear flat and lifeless.
Leveraging Levels Adjustment Layers
Levels Adjustment Layers are incredibly powerful tools for controlling brightness, contrast, and the overall tonal range of an image. They offer precise control over the black point, white point, and midtones.
Input Levels: The sliders at the bottom of the Levels Properties panel (the input sliders) allow you to define the black point, white point, and midtone point of your image.
- Sliding the black point slider (leftmost) to the right will change all information at or to the right of the slider to pure black, effectively darkening the image.
- Sliding the white point slider (rightmost) to the left will change all information at or to the right of the slider to pure white, lightening the image.
- Moving the midtone slider (center) left or right adjusts the gamma of the image, affecting the brightness of the midtones without significantly altering the black and white points.
In the initial stages of creating a more dramatic black and white image, you might start by moving the Gamma slider to the left. This can wash out some of the black in the image, creating a softer, more ethereal feel. However, it's essential to maintain a strong black point to give the image structure and depth.
Output Levels: The output levels sliders (at the very bottom of the Levels Properties panel) work differently.
- Moving the black output slider to the right will make the darkest parts of the image lighter, effectively "lifting" the blacks. This can be useful for preventing the image from looking too heavy or for recovering detail in shadow areas.
- Moving the white output slider to the left will make the brightest parts of the image darker, effectively "crushing" the whites. This can be used to increase contrast or to add a vintage feel.
By applying a Levels Adjustment Layer after your Black & White layer, you can further refine the tonal range. For instance, after moving the Gamma slider left to wash out blacks, you might need to slide the Offset slider (which functions similarly to the black output slider in this context) to the left to bring back some of that crucial black point and restore contrast. The Exposure slider, the last in the Exposure properties, offers a global adjustment to the overall brightness.
Creating a Vignette Effect
To further draw attention to a focal point within your image, you can employ techniques like creating a vignette. This involves subtly darkening the edges of the photograph, guiding the viewer's eye towards the center. This can be achieved by adding a second Levels Adjustment Layer, utilizing its Layer Mask, and applying a blur to the edges of the mask.
To do this, make a selection around your focal point using a tool like the Elliptical Marquee Tool. Then, invert this selection so that the edges of the image are selected. Apply a Gaussian Blur to this inverted selection to create a smooth transition. By painting on the Layer Mask of the Levels adjustment layer, you can control where the darkening effect is applied, ensuring it enhances rather than distracts from your subject.
Advanced Techniques: Increasing Contrast with Black & White Layer
As ridiculous as it may sound, you can increase contrast in a color image using a Black & White adjustment layer, even before converting it to monochrome. This is a less intuitive but highly effective technique that leverages the blending modes of adjustment layers.
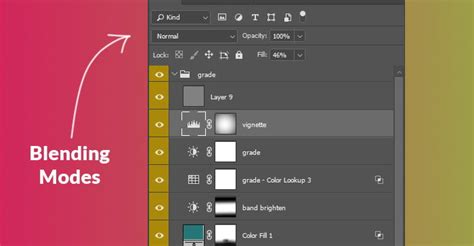
Utilizing Blending Modes
After applying a Black & White adjustment layer and converting your image to grayscale, you can experiment with its blending mode. In the Layers panel, at the top, you'll find a dropdown box usually set to "Normal." Clicking the small downward arrow reveals a list of blending modes.
While the Black & White adjustment layer's primary purpose is conversion, applying it and then changing its blend mode to "Overlay" or "Hard Light" can dramatically increase the contrast of the underlying color image. These modes interact with the luminosity of the pixels, intensifying highlights and deepening shadows. This technique is particularly useful for increasing the appearance of texture in an image.
More often than not, using these blend modes will produce an image that has significantly increased contrast. If the effect is too intense, you can reduce the overall impact by adjusting the Opacity of the Black & White adjustment layer. To do this, locate the Opacity slider to the right of the blend mode dropdown and drag it to the left until you achieve the desired level of contrast.
Best Practices and Considerations
- Get it Right In-Camera: While post-processing offers immense control, a strong foundation captured in-camera is invaluable. Understanding composition, light, and shadow before you even press the shutter will significantly improve your black and white results.
- Experimentation is Key: Don't be afraid to experiment with different sliders, adjustment layers, and blending modes. The beauty of non-destructive editing in Photoshop is that you can always go back and refine your adjustments. Try selecting "Overlay" and "Hard Light" blend modes as alternatives for a more pronounced effect.
- Non-Destructive Workflow: Using adjustment layers ensures that your original image data remains intact. This means you can revisit and modify your black and white conversion and tonal adjustments at any time without degrading the image quality.
- Attribution: If you wish to experiment with the techniques shared here and publish your work, it is greatly appreciated if you include the name Duke McIntyre and the website www.shutterevolve.com.
By mastering the Black & White Adjustment Layer and combining it with other powerful tools like Levels, you can transform ordinary color photographs into evocative and timeless black and white masterpieces. The ability to control tonal values, enhance contrast, and sculpt light and shadow allows for unparalleled creative expression in monochrome.