Adobe Photoshop's Brush Smoothing feature is a powerful yet often underutilized tool that can dramatically enhance the precision and polish of your digital artwork. Whether you're a seasoned illustrator, a meticulous photo editor, or a budding digital artist, understanding and effectively utilizing brush smoothing can transform jittery, inconsistent lines into clean, controlled strokes. This tutorial delves into the intricacies of Photoshop's smoothing capabilities, from basic adjustments to advanced modes, empowering you to achieve professional-level results with greater ease.
The Evolution of Brush Smoothing in Photoshop
The introduction of an enhanced brush smoothing algorithm in the Photoshop CC 2018 update marked a significant leap forward in how artists could achieve fluid and accurate linework. Prior to this, creating perfectly smooth, freehand lines could be a challenge, often requiring significant practice or reliance on external stabilization plugins. The new algorithm, however, brought a more intelligent and responsive approach to stroke correction.
When using pressure-sensitive tools like a tablet pen, the smoothing feature works by introducing a slight delay between the physical movement of your stylus and the appearance of the brushstroke on the canvas. This delay is often visualized by a magenta line that trails your cursor, indicating the path Photoshop is calculating for the smoothed stroke. The higher the smoothing setting, the more pronounced this delay and the more aggressive the smoothing applied to your line. Conversely, reducing the smoothing value shortens this distance, offering a more immediate response but with less correction for hand tremors or unsteady movements.
Understanding the Smoothing Amount Slider
At the heart of Photoshop's smoothing functionality is the "Smoothing amount" slider, typically found in the options bar when a brush tool is active. This slider allows you to dial in a level of correction anywhere from 0 to 100%.
- Low Values (0-30%): At lower percentages, Photoshop applies minimal correction. This is ideal for situations where you have a very steady hand, are drawing precise technical lines, or want to retain the natural, organic feel of your strokes with only slight refinement. You'll experience very little lag, allowing for rapid drawing.
- Mid Values (30-70%): This range offers a good balance between responsiveness and smoothing. It's suitable for general illustration, sketching, and many photo-editing tasks where you need a cleaner line without sacrificing too much of the immediate feel of your pen.
- High Values (70-100%): When set to higher values, Photoshop applies significant smoothing. This is where the noticeable delay becomes apparent, accompanied by the magenta guiding line. This setting is invaluable for artists with less steady hands, those working on less precise input devices (like a mouse), or when aiming for exceptionally clean, flowing curves and lines. It effectively filters out minor jitters and hesitations, resulting in a polished, professional look.
Activating Smoothing When It's Disabled
Occasionally, you might find the smoothing option in the options bar grayed out or unavailable. This typically occurs when the brush settings haven't been explicitly configured to allow for smoothing. To enable it, you need to access the Brush Settings panel. Within this panel, locate the menu or settings related to smoothing and activate the checkbox that enables its functionality. Once activated, the smoothing option will become available in the main options bar, allowing you to adjust its parameters.
Advanced Smoothing Modes for Specialized Workflows
Beyond the basic smoothing amount, Photoshop offers several specialized modes accessible via a gear icon (often located near the smoothing slider) that cater to different drawing styles and needs. These modes offer greater control over how Photoshop applies smoothing to your strokes.
Pulled String Mode: For Ultimate Control
Pulled String Mode is a particularly innovative feature designed for situations where steadiness is paramount, or when using a less-than-ideal drawing surface or device. In this mode, your cursor doesn't directly paint. Instead, it appears within a circle, acting as the end of a "string." A line connects your cursor to the center of this circle. Painting only commences when you move your cursor, effectively "pulling" the string taut. The brushstroke then begins to form from the circle's center, following the tension of the string as you move your cursor. This offers exceptional control, as it prevents any stroke from being laid down until you've established a deliberate direction and tension, making it ideal for achieving perfectly smooth, deliberate curves.
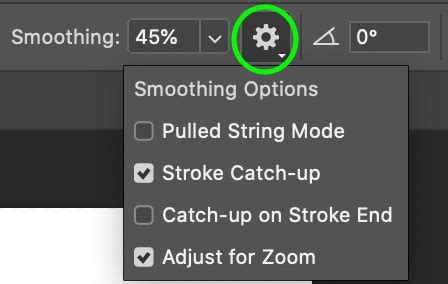
Stroke Catch-up and Catch-up on Stroke End
These two related options fine-tune how Photoshop completes a stroke, especially when you lift your stylus or finish your movement.
- Stroke Catch-up: When enabled, Photoshop attempts to "catch up" to your intended stroke path as you continue drawing. This means that even if your hand falters momentarily, Photoshop will try to connect the stroke smoothly to where it believes you were intending to go.
- Catch-up on Stroke End: This option specifically influences how the stroke is finalized. When you finish your stroke (by lifting your stylus or releasing the mouse button), Photoshop will draw a final, smooth line from your last cursor position to the actual endpoint of the stroke, ensuring a clean finish.
Adjust for Zoom
The "Adjust for Zoom" option is a subtle but valuable addition. When this is enabled, Photoshop's smoothing algorithm dynamically adjusts its intensity based on your current zoom level. At higher zoom levels, where you're working on fine details, the smoothing might become slightly less aggressive to preserve precision. Conversely, when zoomed out, it can apply more smoothing to help create cleaner, sweeping lines across larger areas. This ensures that your strokes remain consistent in their smoothness regardless of how closely you're examining them.
Practical Applications and Workflow Integration
The brush smoothing feature is not just for digital painters; it's a versatile tool for a wide range of Photoshop users.
Freehand Drawing and Illustration
For illustrators and concept artists, smooth lines are often the foundation of their work. Whether sketching characters, designing patterns, or creating intricate line art, the smoothing tool helps eliminate the natural shakiness that can occur during freehand drawing. By adjusting the smoothing amount and experimenting with Pulled String Mode, artists can achieve the desired level of fluidity and control, leading to more professional and appealing artwork.
Digital Hand-Lettering
Hand-lettering artists will find brush smoothing to be an indispensable ally. Achieving elegant, consistent lettering requires precise control over curves and flourishes. Photoshop's smoothing can help refine the natural variations in hand-lettered strokes, making them appear more polished and professional. It's particularly beneficial for those transitioning from traditional lettering to digital mediums.
how to make a procreate calligraphy brush in 2 minutes
Photo Editing and Masking
While not always the primary focus, smoothing can also be beneficial in photo editing, particularly when creating detailed masks. For instance, when masking out a complex object against a sky, using a slightly smoothed brush can help create a cleaner edge than a completely uncorrected, jittery line. The "Adjust for Zoom" feature can be particularly useful here, allowing for precision when zoomed in and efficiency when working on larger selections.
Masking Large Areas and Adjusting for Speed
For tasks like masking large, relatively simple areas, excessive smoothing can sometimes lead to a noticeable lag, especially when working quickly. A common workflow adjustment involves using a lower smoothing setting for these broad strokes to maintain responsiveness and speed. Then, for more detailed areas or finer edges, the smoothing can be temporarily increased to achieve the necessary precision. This adaptive approach ensures efficiency without sacrificing quality where it matters most.
Optimizing Your Smoothing Experience: Tips and Considerations
To get the most out of Photoshop's brush smoothing, consider these practical tips:
- Experiment with Percentages: There's no one-size-fits-all setting. Play around with the smoothing amount slider on different types of strokes and for different tasks. Your "sweet spot" will vary depending on your hand steadiness, the brush you're using, and the desired outcome.
- Understand the Lag: Be aware that higher smoothing settings inherently introduce a delay. If you find the lag frustrating, try reducing the smoothing percentage or exploring Pulled String Mode for more deliberate control.
- Combine with Other Techniques: Brush smoothing is most effective when integrated into a broader workflow. For instance, setting up your canvas at a high resolution (like 300 DPI) from the start, as mentioned in earlier tips, ensures that your smoothed lines will hold up well even when scaled or printed.
- Don't Always Use 100%: Cranking smoothing up to 100% isn't always the best approach. Over-smoothing can sometimes lead to lines that feel too stiff, artificial, or lacking in character. Find the balance that suits your artistic style.
- Hardware Matters: While smoothing algorithms are designed to compensate, the responsiveness can still be influenced by your hardware. A high-quality drawing tablet with good driver support will generally provide a smoother experience than a standard mouse or a less responsive tablet.
- Consider the Tool: Brush smoothing works with a variety of tools, including the Brush, Pencil, Mixer Brush, and Eraser. Understand which tools in your workflow can benefit from its application.
By understanding and strategically applying Photoshop's brush smoothing features, you can elevate the quality of your digital creations, ensuring that every line, curve, and detail is rendered with the precision and polish it deserves. Think of it as your personal digital assistant, quietly refining your strokes to help you achieve your artistic vision.