Opacity, a fundamental concept in Adobe Photoshop, plays a crucial role in controlling the visibility and interaction of layers and design elements. Understanding and manipulating opacity allows users to achieve a vast array of visual effects, from subtle enhancements to dramatic transformations. This guide delves into the intricacies of opacity in Photoshop, exploring its various applications, adjustment methods, and advanced techniques.
The Essence of Opacity: Defining Transparency
At its core, opacity in Photoshop refers to the level of transparency or opaqueness of an image or layer. This setting dictates how much of the underlying layers or image will be visible when multiple elements are combined. Opacity operates on a scale from 0% to 100%. At 0%, an element is fully transparent, meaning it is completely invisible and allows everything beneath it to show through. Conversely, at 100% opacity, an element is completely opaque, entirely obscuring any layers or content located behind it. The visual distinction between opaque and transparent areas is clearly represented in Photoshop, with transparent areas typically displayed as a checkerboard pattern.
Navigating Opacity Controls in the Layers Panel
The primary location for adjusting layer opacity is the Layers Panel, a central hub for managing all elements within a Photoshop document. Each layer, including the background layer and any adjustment layers, is listed here, along with its current opacity percentage. To modify the opacity of a specific layer, the process is straightforward: first, ensure the desired layer is selected by clicking on it in the Layers Panel. Then, locate the "Opacity" slider, usually found at the top of the panel. This slider allows for precise adjustments, enabling users to dial in the exact level of transparency required for their design.
However, there are instances where direct opacity adjustment may not be possible. This often occurs with locked layers, most commonly the background layer of an image. A padlock icon to the right of the layer name indicates that a layer is locked or partially locked, preventing certain modifications, including direct opacity changes. In such scenarios, unlocking the layer is necessary before opacity can be altered.
Opacity vs. Fill Opacity: A Crucial Distinction
While often used interchangeably, "Opacity" and "Fill Opacity" are distinct settings in Photoshop, each affecting layer transparency differently. Opacity controls the transparency of the entire layer, encompassing its content, applied layer styles (such as drop shadows, strokes, or bevels), and any effects. In contrast, Fill Opacity affects only the actual content of the layer itself, excluding any layer styles or effects applied to it.
This distinction is particularly useful when you want to adjust the transparency of a layer's content without altering the visibility of its associated styles. For example, you might want to fade out the text on a layer while keeping its drop shadow fully visible. By manipulating Fill Opacity, this precise control becomes achievable. To change these values, you can access them alongside the main Opacity slider in the Layers Panel.
Opacity Beyond Layers: Tools and Effects
The concept of opacity is not confined solely to layers; it extends to various tools and effects within Photoshop, offering further control over the creative process.
Brush Opacity: Gradual and Subtle Effects
When working with painting tools like the Brush tool, adjusting brush opacity is essential for creating subtle and gradual effects. Brush opacity dictates the degree of transparency of each brush stroke applied to the canvas. A lower brush opacity allows for softer, more blended strokes, where subsequent strokes build up in intensity, revealing more of the underlying layers. Conversely, a higher brush opacity results in more solid, opaque marks.
For quick access to brush opacity, Photoshop offers convenient keyboard shortcuts. While the Brush tool is active, pressing a number key from 1 to 0 on your keyboard will instantly adjust the brush opacity in 10% increments. For instance, pressing "5" sets the opacity to 50%, while pressing "0" sets it to 100%. This real-time adjustment capability streamlines the painting process, enabling artists to achieve nuanced textures and gradients with ease.
OPACITY vs FLOW brush settings in Photoshop
Layer Styles and Effects Opacity
Layer styles, such as drop shadows, outer glows, strokes, and gradient overlays, are powerful non-destructive effects that can significantly enhance the appearance of layers. Each of these layer styles often comes with its own opacity setting, allowing for granular control over their intensity and visibility. For example, when applying a drop shadow, you can adjust its opacity to make it appear more subtle or more pronounced against the background. Similarly, the opacity of a stroke or gradient overlay determines how strongly it is applied to the layer's content.
Working with blending options within layer styles provides even more refined control. These specific settings allow you to fine-tune how layers and their effects interact with one another, offering a sophisticated level of customization for achieving unique visual outcomes.
Advanced Opacity Techniques for Enhanced Control
Mastering opacity in Photoshop extends to employing advanced techniques that unlock even greater creative potential.
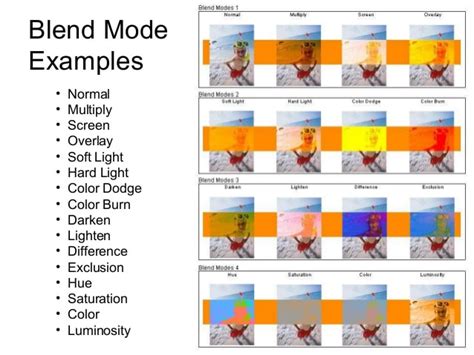
Blend Modes: The Art of Layer Interaction
Blend modes are a cornerstone of advanced image manipulation in Photoshop. They dictate how the pixels of a layer interact with the pixels of the layers beneath it, resulting in a wide spectrum of visual effects. The "Normal" blend mode, for instance, applies the active layer's opacity directly without any special blending calculations. In contrast, modes like "Screen" lighten the image by combining colors, while "Multiply" darkens it.
When hovering over different blend modes in the Layers Panel, Photoshop provides real-time visual feedback, instantly updating the image to demonstrate how each mode affects the selected layer. This instant preview eliminates guesswork and makes it significantly easier to select the most appropriate blend mode for a desired effect. It's important to note that blend modes operate differently for various image color modes; for example, certain blend modes are unavailable for Lab images.
Clipping Masks and Layer Masks with Opacity
Clipping masks and layer masks are indispensable tools for non-destructive editing and precise control over layer visibility. A clipping mask, for example, can be used to limit the application of a layer's effects or content to the shape of the layer directly beneath it. By combining clipping masks with opacity adjustments, you can precisely control how much of the clipped content is visible.
Layer masks, on the other hand, allow you to selectively reveal or conceal parts of a layer without permanently erasing any pixels. By painting with black, white, or shades of gray on a layer mask, you can control the opacity of different areas of the layer. Black conceals the layer, white reveals it, and shades of gray create varying levels of transparency. This offers a highly flexible way to integrate elements seamlessly and create complex compositions.
Adjustment Layers for Non-Destructive Opacity Control
Adjustment layers provide a non-destructive method for applying image adjustments, such as color balance, exposure, or hue/saturation, while retaining the ability to modify their opacity independently. This means you can apply an adjustment to an entire group of layers or a specific layer, and then fine-tune its intensity without altering the original image data. This flexibility is crucial for iterative design processes and for maintaining the editability of your work.
Opacity in Specific Contexts
The application of opacity extends across various creative disciplines and workflows within Photoshop.
Photography and Image Editing
In photography, opacity is vital for refining the final image. It directly influences the transparency of elements, allowing photographers to adjust the visibility of layers for effects like subtle fading or enhancing specific details. When working with applications like Lightroom or Photoshop, understanding how opacity affects transparency is key to achieving desired outcomes.
A common technique in photography involves using a solid white layer and adjusting its opacity. By reducing the opacity of a white layer placed above an image, you can create a soft, faded, or "vintage" look, subtly desaturating and lightening the underlying content. Similarly, adjusting the opacity of type layers allows for text to be more or less visible against a background.
Working with Locked Layers and Backgrounds
As mentioned earlier, the background layer in Photoshop is often locked by default, preventing direct opacity adjustments. If you need to manipulate the opacity of the background, you can typically unlock it by clicking the padlock icon in the Layers Panel. Alternatively, you can duplicate the background layer and work with the copy, or convert it into a regular layer.
Group Opacity and Blend Modes
When layers are grouped together, the group itself can have an opacity setting and a blend mode applied. This affects how the entire group of layers interacts with the layers below it. When you choose a different blending mode for a group, you are essentially changing the order in which the image components are combined. All layers within the group are composited together first, and then that composite is blended with the layers beneath the group according to the group's blend mode.
Practical Application and Shortcuts
To effectively utilize opacity in your Photoshop workflow, remember these practical tips and shortcuts:
- Keyboard Shortcuts for Layer Opacity: Select a layer and press number keys 1-0 (e.g., pressing '5' sets opacity to 50%, '0' to 100%).
- Real-time Blend Mode Previews: Hover over blend mode options in the Layers Panel to see instant visual feedback.
- Understanding Transparency Shapes Layers: This option restricts layer effects and knockouts to the opaque areas of a layer, offering precise control over where effects are applied.
- Blending Options for Granular Control: Dive into the Blending Options within layer styles for detailed adjustments of effect opacity.
- Saving Your Work: Regularly save your Photoshop documents as PSD files to preserve all layers, masks, and opacity settings, ensuring easy accessibility and future edits.
By thoroughly understanding and applying the principles of opacity, users can elevate their designs, achieve nuanced visual effects, and produce highly polished and impactful work in Adobe Photoshop.