Layers are arguably one of the most complex, yet fundamental, aspects of Adobe Photoshop. They are the bedrock upon which sophisticated image manipulation and design are built, offering unparalleled flexibility and control. For those new to Photoshop, the concept of layers can initially seem daunting, but understanding and utilizing them effectively unlocks the full potential of the software. This comprehensive guide aims to demystify Photoshop layers, providing an in-depth exploration of their creation, manipulation, and advanced applications, empowering users from beginners to seasoned professionals.
What Exactly Are Photoshop Layers?
At its core, a layer in Photoshop functions like a transparent sheet of plastic stacked on top of others. Each sheet can contain an image, text, or a specific effect. Where a layer is empty, you can see through to the layers beneath it, allowing for the seamless compositing of multiple elements. This is fundamentally different from traditional image editing software where changes are often applied directly to the entire image, making it difficult to revert specific edits without affecting the whole.

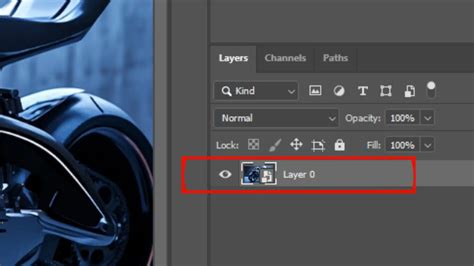
The Layers Palette, typically found in the bottom right of the Photoshop workspace, is your central hub for managing these transparent sheets. When you drag and drop an image into Photoshop or use the text tool, Photoshop automatically creates a new layer for that content. You can also manually add new layers by clicking the "Add New Layer" icon, usually located at the bottom of the Layers Palette. The order of these layers is crucial; you can rearrange them by simply selecting and dragging them up or down within the palette, dictating which elements appear on top of others.
The Foundational Layer Operations
Before diving into advanced techniques, it's essential to grasp the basic operations of layer management. These form the building blocks for more complex workflows.
Moving, Resizing, and Renaming Layers
Once layers are created, you'll frequently need to adjust their position and dimensions. The Move Tool (keyboard shortcut 'V') is used to reposition layers within your canvas. For scaling, rotating, or skewing, the Free Transform tool (Edit > Free Transform, or keyboard shortcut 'Ctrl+T' on Windows / 'Cmd+T' on Mac) is indispensable. When scaling, it's vital to hold down the Shift key to maintain the layer's original proportions and avoid distortion. Pressing 'Enter' or 'Return' confirms the transformation. Renaming layers, by double-clicking their current name in the Layers Palette, is a crucial organizational habit, especially when working with numerous layers.
Reorganizing, Grouping, and Hiding Layers
As your project grows, keeping your layers organized becomes paramount. You can manually drag layers to reorder them. For managing numerous layers, Layer Groups are invaluable. You can select multiple layers and group them by pressing 'Ctrl+G' (Windows) or 'Cmd+G' (Mac), or by clicking the "Create a New Group" icon. This functions like a folder, allowing you to collapse or expand sections of your project, significantly decluttering the Layers Palette.
To temporarily remove a layer from view without deleting it, you can simply click the eye icon next to the layer in the Layers Palette. Clicking the eye again will make the layer visible. This is incredibly useful for comparing different versions of your work or isolating specific elements.
Deleting Layers
When a layer is no longer needed, it can be deleted. You can select a layer and click the trashcan icon at the bottom of the Layers Palette, or simply drag the layer into the trashcan. Photoshop will typically prompt for confirmation, which you can disable for frequently deleted layers by checking "Don't show again."
Layer Styles: Enhancing Your Designs
Layer Styles, often referred to as Layer Effects, offer a powerful way to add sophisticated visual enhancements to your layers non-destructively. These effects can be applied to text, images, or shapes, adding depth, dimension, and flair without directly altering the original pixel data of the layer.
To access Layer Styles, you can double-click the blank space next to the layer name in the Layers Palette, or right-click on the layer and select "Blending Options." Common Layer Styles include:
- Bevel and Emboss: Creates the illusion of depth and dimension by simulating raised or indented edges.
- Drop Shadow: Adds a shadow behind the layer, creating separation from the background and enhancing depth.
- Outer Glow/Inner Glow: Applies a colored glow around the edges of the layer.
- Color Overlay/Gradient Overlay/Pattern Overlay: Fills the layer with a solid color, gradient, or pattern.
- Stroke: Adds an outline around the layer.
Layer styles in Adobe Photoshop Ep16/33 [Adobe Photoshop for Beginners]
The beauty of Layer Styles is their non-destructive nature. As long as your document is saved in Photoshop's native .psd format, these effects remain editable. They appear as sub-items under the layer in the Layers Palette, and each effect can be individually toggled on or off using its own eye icon, or the entire layer's visibility can be controlled by its main eye icon.
Smart Objects: The Power of Non-Destructive Editing
Smart Objects are a special type of layer that preserves the original image data of your placed or imported content. When you convert a layer into a Smart Object (Layer > Smart Objects > Convert to Smart Object), or when you drag an image directly from Adobe Bridge into Photoshop, it becomes a Smart Object.
The primary advantage of Smart Objects is that any transformations applied to them (scaling, rotating, skewing) are non-destructive. This means you can scale a Smart Object down multiple times and then scale it back up to its original size without any loss of quality, unlike regular raster layers which degrade with each transformation.
Furthermore, Smart Objects allow you to embed or link other Photoshop documents, Illustrator files, or even raw image files. Edits made to the original source file can be updated within the Smart Object layer, ensuring consistency across your projects. You can also apply filters as Smart Filters, which are non-destructive and can be edited or removed at any time.
Layer Masks: Precision Control Over Visibility
Layer Masks are an incredibly powerful tool for selectively hiding or revealing parts of a layer without permanently erasing pixels. They are black and white images that are linked to a layer. Painting with black on a layer mask hides the corresponding part of the layer, while painting with white reveals it. Shades of gray create semi-transparency.
To add a Layer Mask, select the layer you wish to mask and click the "Add Layer Mask" icon at the bottom of the Layers Palette. You can then use various tools, most commonly the Brush Tool, to paint on the mask.
- Opacity: Controls the transparency of the paint applied. 100% opacity results in a solid color (fully opaque or transparent), while lower opacities create semi-transparent effects.
- Flow: Controls the rate at which paint is applied. A low flow allows for subtle building up of color or transparency.
The ability to "rub away" parts of a layer using a mask is a non-destructive process. If you make a mistake, you can simply switch your brush color to white and paint back over the masked area to reveal it again. This offers immense flexibility for compositing images, blending elements, and making precise adjustments.
Adjustment Layers: Non-Destructive Image Corrections
Adjustment Layers are a cornerstone of non-destructive editing in Photoshop. Instead of applying color or tonal corrections directly to an image layer, you create a separate Adjustment Layer that sits above the layers you want to affect. This Adjustment Layer then overlays its effect onto all the layers beneath it.
Layer styles in Adobe Photoshop Ep16/33 [Adobe Photoshop for Beginners]
The most common way to add an Adjustment Layer is by clicking the "Create new fill or adjustment layer" icon at the bottom of the Layers Palette and selecting the desired adjustment. Popular Adjustment Layers include:
- Brightness/Contrast: For basic tonal adjustments.
- Levels: Offers precise control over shadows, midtones, and highlights.
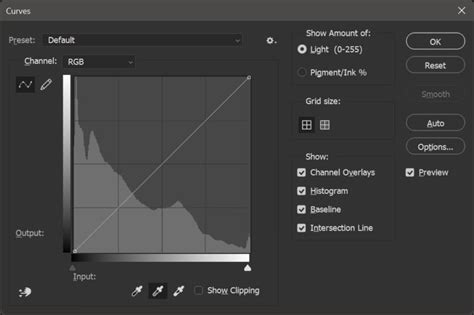
- Curves: A highly versatile tool for fine-tuning tonal range and color balance. You can adjust the overall RGB curve or target individual color channels (Red, Green, Blue) to correct color casts or create specific color effects. The top right of the curve controls highlights, and the bottom left controls shadows.
- Hue/Saturation: For altering the color, saturation, and lightness of an image.
- Black & White: Converts the underlying layers to grayscale.
Like layer masks, Adjustment Layers also come with their own built-in mask, allowing you to control which areas of the image the adjustment affects. Painting with black on the adjustment layer's mask will hide the adjustment in that area, while white will reveal it.
A powerful technique with Adjustment Layers is clipping them to a specific layer. By holding down the Alt/Option key and hovering your mouse between the Adjustment Layer and the layer directly below it, you'll see a cursor with a downward-pointing arrow. Clicking will "clip" the adjustment layer, meaning its effect will only apply to the single layer directly beneath it, rather than all layers below. This provides granular control over where your adjustments are applied.
Advanced Layer Concepts and Techniques
Beyond the fundamental operations, Photoshop offers a rich array of advanced layer functionalities that significantly enhance creative possibilities.
Blending Modes
Blending modes dictate how a layer's pixels interact with the pixels of the layers beneath it. Found in a dropdown menu at the top of the Layers Palette, there are numerous blending modes, each offering unique ways to combine and interact with underlying colors and luminosity. For example:
- Multiply: Darkens the image by multiplying color values.
- Screen: Lightens the image by inverting and multiplying.
- Overlay: Multiplies or screens colors depending on the base layer's luminosity, increasing contrast.
- Soft Light/Hard Light: Similar to Overlay, but with a gentler or harsher effect.
Experimenting with different blending modes is crucial for achieving sophisticated compositing effects, creating textures, and generating unique visual styles.
Layer Comps
For projects requiring multiple variations of a design (e.g., different color schemes, text placements, or image arrangements), Layer Comps are a lifesaver. This feature, found under Window > Layer Comps, allows you to save snapshots of your layer visibility, position, and appearance states. You can then quickly toggle between these different compositions without manually showing or hiding layers each time.
Layer Styles and Smart Filters in Detail
The non-destructive nature of Layer Styles and Smart Filters is a significant advantage. Unlike applying filters directly to a raster layer, which permanently alters pixels, Smart Filters are applied to Smart Objects and can be re-edited, reordered, or deleted at any time. This allows for iterative refinement of effects without fear of damaging the original image data.
For instance, applying a Gaussian Blur filter to a Smart Object as a Smart Filter means you can later go back and change the blur radius or even replace it with a different filter altogether. Similarly, a Drop Shadow applied as a Layer Style can have its color, distance, or opacity adjusted long after it was initially applied.
Vector Shapes and Type Layers
Beyond raster images, Photoshop also supports vector-based content through Shape Layers and Type Layers.
- Shape Layers: When you use Photoshop's shape tools (Rectangle, Ellipse, Polygon, etc.), they are created as Shape Layers. These are vector objects, meaning they are resolution-independent and can be scaled infinitely without losing quality. You can edit their paths, fill colors, and strokes as easily as any other layer.
- Type Layers: Text created with the Type Tool is placed on Type Layers. These are also vector-based, allowing for crisp text at any size. You can edit the font, size, color, and other typographic properties of Type Layers at any time.
The ability to combine raster elements with vector shapes and text within the same Photoshop document, all managed through layers, is what makes Photoshop such a versatile design tool.
Video and 3D Layers
In newer versions of Photoshop, the layer system has expanded to include support for Video Layers and 3D Layers. This allows Photoshop to function not only as a powerful image editor but also as a basic video editor and a platform for working with 3D models and preparing them for 3D printing. These specialized layers have their own unique properties and workflows within the Layers Palette.
Best Practices for Layer Management
To maximize efficiency and maintain sanity when working with complex Photoshop documents, adhering to best practices is crucial:
- Name Your Layers: Always rename layers descriptively. Instead of "Layer 1," "Layer 2," use names like "Background Image," "Product Shot," "Headline Text," or "Shadow Effect."
- Group Related Layers: Use Layer Groups to organize elements logically. Group all layers related to a specific object, section, or effect.
- Use Smart Objects: Convert layers that will undergo transformations or filter applications into Smart Objects to ensure non-destructive editing.
- Leverage Adjustment Layers: Always use Adjustment Layers for color and tonal corrections instead of applying them directly to image layers.
- Maintain a Clean Layers Palette: Regularly delete unused layers and consolidate where possible.
- Consider Layer Comps: If your project involves multiple variations, use Layer Comps to manage them efficiently.
- Color-Code Layers: Photoshop allows you to assign colors to layers, which can help visually identify different types of content or elements at a glance.
By embracing these principles and thoroughly understanding the capabilities of Photoshop's layer system, users can transform their image editing and design workflows, achieving professional-quality results with greater ease and flexibility.