DaVinci Resolve, a powerhouse in the realm of video editing, offers a versatile toolkit that extends beyond mere video manipulation. Among its many capabilities lies a feature that allows users to extract a single frame from a video clip and save it as a standalone image. This function effectively serves as a "screenshot" within DaVinci Resolve, providing a valuable asset for various creative and practical applications. Whether you're in the process of crafting compelling thumbnails, preserving pivotal moments, or meticulously referencing specific scenes, the ability to export a single frame is indispensable. This guide will meticulously navigate you through the established procedures for capturing and exporting these stills, ensuring you can confidently leverage DaVinci Resolve's screenshot functionality and optimize its single-frame export capabilities.
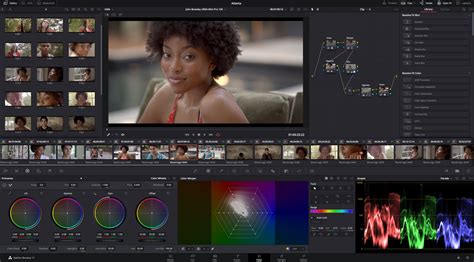
Navigating the Color Workspace for Still Capture
The Color workspace in DaVinci Resolve, primarily engineered for sophisticated color grading and correction, also houses the essential tools for extracting still frames. If you've been pondering "how to export a frame in DaVinci Resolve" or how to obtain a "DaVinci Resolve screenshot," this is the designated area. Within the workspace's toolbar, you will find and need to select the "Color" tab to proceed. This workspace is crucial because it provides access to the Gallery, where captured stills are stored and managed. Without entering the Color workspace, the native "Grab Still" function is inaccessible.
Pinpointing the Precise Frame for Extraction
Before you can successfully export a single frame or capture a DaVinci Resolve screenshot, the paramount step involves accurately locating and selecting the exact frame you intend to preserve. This stage is critical for anyone aiming to understand "how to export a frame from DaVinci Resolve" or to acquire a specific still from their project.
To achieve this, you will utilize the 'Player Head,' a marker that traverses the timeline. By meticulously scrubbing through your video with this marker, you can advance frame by frame, if necessary, to pinpoint the precise moment you wish to capture. Alternatively, you can employ the 'Play,' 'Fast-forward,' and 'Rewind' options to navigate towards your desired screenshot. For those working within the 'Cut' tab, the play controls are conveniently situated just above the timeline. Repeatedly pressing 'Play' can exponentially increase the speed at which the playhead moves, allowing for faster navigation through longer clips.

The Art of Capturing a Still Frame
Once you have successfully isolated the frame you wish to capture, the subsequent action is to perform the capture itself. This step is fundamental, whether your objective is to export a single frame, take a DaVinci Resolve screenshot, or simply to acquire a still image. The captured snapshot will be automatically saved within DaVinci Resolve's media pool, a highly convenient feature for those seeking clarity on "how to export a frame from DaVinci Resolve."
To initiate the capture, ensure that the desired frame is currently displayed in the preview window and that you have selected the 'Color' tab. With the frame paused, you will then 'right-click' on the video preview window. This action will reveal a context-sensitive menu. From this menu, select the "Grab Still" option. This command directly captures the current frame being displayed and places it into the Gallery.

Exporting Your Captured Still as a Standalone Image
After successfully grabbing a still or taking a DaVinci Resolve screenshot, the imperative next step is to make this captured image accessible for use outside of the DaVinci Resolve software. This stage is particularly beneficial for individuals inquiring about "how to export a frame from DaVinci Resolve" as a distinct image file.
Once the still has been captured and resides in the Gallery bin within the Color workspace, you can proceed with its export. Navigate to the Gallery bin, where your captured still will be visible. Right-click (or Ctrl + click on a Mac) on the thumbnail of the still image you wish to export. This will present another drop-down menu. From this menu, select the "Export" option.
A dialog box will then appear, prompting you to specify a save location on your computer and to assign a name to your image file. This step further guides you through the process of "how to export a frame in DaVinci Resolve." Browse to your preferred save location, enter a descriptive name for your image, and critically, select the desired image format from the 'Format' drop-down menu.
It is crucial to ensure you are exporting in an image format that is compatible with your intended applications. DaVinci Resolve often defaults to formats like DPX (Digital Picture Exchange), which, while excellent for professional workflows, may not be readily usable in standard image editing software or for web use. For broader compatibility, consider exporting as JPEG (for smaller file sizes and general use) or TIFF (for higher quality and print applications). After selecting your desired format, click "Export" to save your high-resolution still image.
How to Export a Still from DaVinci Resolve
Alternative: The Quick Screenshot Hack for Expedited Workflow
For situations where absolute maximum resolution is not a critical requirement, and you simply need to capture a quick still for immediate use, such as a thumbnail or for a rapid review with collaborators, a more expedient method exists. This "hack" bypasses some of the more involved steps of the native "Grab Still" function.
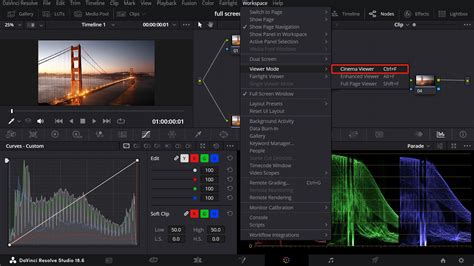
Begin by locating the precise frame you wish to capture by dragging your timeline marker to the correct position. Next, maximize the preview window by making it full-screen. This can typically be achieved using the shortcut Ctrl + F on Windows or Cmd + F on macOS. Once the preview is full-screen, you can then utilize your operating system's built-in screenshot tools to capture the image.
On macOS, the shortcuts are Shift + Cmd + 3 for a full-screen screenshot or Shift + Cmd + 4 to select a specific area of the screen. For Windows users, the Print Screen key captures the entire screen, while the Windows key + Shift + S combination activates a snipping tool that allows you to select a custom area. Depending on your system settings, you may be prompted to choose a save location, or the screenshot may be saved to a default folder.
While this method is significantly faster and requires less clicking within DaVinci Resolve, it's important to note that the resulting image quality will be dependent on your display resolution and the capture method. This is perfectly adequate for many web-based uses or quick previews, but for professional print materials or when extensive manipulation is planned, the native "Grab Still" function will yield superior results.
Understanding Image Formats for Still Exports
A common point of inquiry among video editors who may not frequently work with still images revolves around selecting the optimal format for their exported stills. The "best" format is inherently dependent on the intended application of the image. Here's a breakdown of frequently encountered image export formats and their typical use cases:
JPEG (Joint Photographic Experts Group)
This is arguably the most ubiquitous image format globally, boasting extensive compatibility across virtually all devices and software. Its primary advantage lies in its compressed nature, resulting in smaller file sizes, which is beneficial for conserving storage space and accelerating upload times. However, JPEG is a "lossy" format. This means that each time an image is saved, copied, or resized, some image data is discarded, leading to a degradation of quality over time. It's ideal for web graphics, social media posts, and general-purpose image sharing where file size is a concern.
PNG (Portable Network Graphics)
PNG is a "lossless" image format, meaning it does not discard image information during compression. This preserves image quality even after multiple saves or edits. PNGs are particularly well-suited for digital applications where transparency is required, such as logos or graphics that need to be overlaid on different backgrounds. While they maintain excellent quality, they are generally not as high-resolution as some other lossless formats and can result in larger file sizes than JPEGs.
TIFF (Tagged Image File Format)
TIFF is a high-resolution, lossless image format that meticulously retains all image data, regardless of how many times it is copied or manipulated. This makes it an excellent choice for professional printing, archival purposes, and situations where preserving the absolute highest image quality is paramount. However, the significant advantage of data integrity comes at the cost of very large file sizes, which can be cumbersome for web use or when storage is limited.
Advanced Screenshotting and Screen Recording Tools
While DaVinci Resolve offers robust native methods for capturing stills, for users requiring more advanced functionalities such as on-screen annotation, editing capabilities, or the ability to record the entire screen with audio and webcam, third-party software can be a valuable supplement. Tools like iTop Screen Recorder, for instance, are primarily designed as screen recorders but also incorporate versatile screenshot utilities. These tools often feature intuitive interfaces, flexible screenshot options (including full screen, active window, or custom area selection), and annotation features that allow users to mark up their screenshots directly.
For those seeking to capture not just a static frame but an entire video session within DaVinci Resolve, or to document a workflow for tutorial purposes, these screen recording solutions offer comprehensive features. They often allow for high-quality recording of any screen area, unlimited recording duration, and even the ability to polish recordings with built-in video editors for trimming, merging, and adding effects.
How to Export a Still from DaVinci Resolve
Leveraging Keyboard Shortcuts for Efficiency
DaVinci Resolve offers extensive customization options, including the ability to assign custom keyboard shortcuts to various commands. This can significantly streamline workflows, especially for frequently performed actions like capturing a still. By navigating to the keyboard customization settings within DaVinci Resolve, users can search for the "Grab Still" command and assign a new shortcut combination, such as Alt + 3. Once this shortcut is assigned, activating it will directly execute the "Grab Still" function, eliminating the need to navigate through menus and right-click actions. This is particularly useful for users who frequently need to capture stills from different points in their timeline.
Final Considerations for Image Capture in DaVinci Resolve
The capability to export still images from video clips within DaVinci Resolve is a powerful asset for any video editor or content creator. It enables the creation of a wide array of supplementary digital and print materials derived from a single video project, effectively transforming a video editor into a versatile marketing machine for social media. Moreover, it serves as an invaluable tool for sharing preview images with collaborators for review and approval.
For teams looking to enhance remote collaboration and streamline their DaVinci Resolve workflows from a distance, platforms like Evercast offer integrated solutions. Evercast facilitates the streaming of DaVinci Resolve edit sessions in high definition, complete with simultaneous video conferencing, note exchange, and real-time adjustments, all consolidated within a single platform. This fosters a more connected and efficient collaborative environment, even when team members are geographically dispersed.
The process of exporting a frame as an image in DaVinci Resolve, whether described as "how to export a frame in DaVinci Resolve," "taking a DaVinci Resolve screenshot," or simply "grabbing a still," is a well-defined procedure. Understanding these steps ensures that you can reliably capture the perfect moment from your video content. Whether your objective is to export a single frame for reference, for sharing, or for broader content creation, this feature is undeniably valuable.