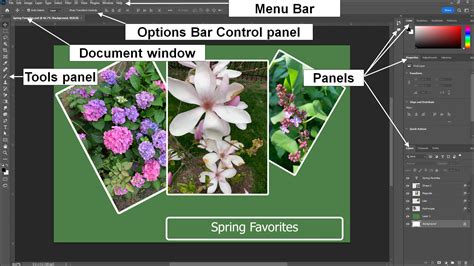
Photoshop's canvas is the fundamental workspace for all your creative endeavors. While often aligning with the dimensions of your imported image, there are numerous scenarios where modifying this editable area becomes crucial. Whether you need to add space for stylistic elements like reflections, create room for text overlays, prepare an image for specific social media formats, or simply ensure a uniform background for scanned images, understanding how to change canvas size is an indispensable skill for any Photoshop user. This tutorial delves into various methods for adjusting your canvas, from simple dialogue box entries to the versatile Crop tool, ensuring you can adapt your workspace to any project requirement.
Understanding Image Size vs. Canvas Size
Before diving into the practical steps, it's essential to differentiate between "Image Size" and "Canvas Size" in Photoshop. Image Size refers to the dimensions and resolution of the actual pixel data that constitutes your image or artwork. Canvas Size, on the other hand, defines the total editable area or workspace within which your image resides. The canvas can be larger or smaller than the image itself. If the canvas is larger, a border or empty space will be visible around your image. Conversely, if the canvas is smaller than the image, parts of the image will be cropped or hidden. Changing the canvas size does not alter the image content's dimensions or resolution; it only adjusts the surrounding workspace.
Method 1: The Canvas Size Dialog Box
The most direct way to alter your canvas dimensions is by using the dedicated "Canvas Size" dialog box. This method offers precise control over new dimensions, units of measurement, and how the canvas expands or contracts.
Step 1: Accessing the Canvas Size Dialog
To open the Canvas Size dialog box, navigate to the top menu bar and select Image > Canvas Size. Alternatively, you can use the keyboard shortcut Alt + Ctrl + C (Windows) or Option + Cmd + C (Mac).
New Dialogue box, Canvas size, Colour Modes and Resolution, - Photoshop Project Tutorial 06.1
Step 2: Defining New Dimensions and Units
Once the dialog box is open, you'll see fields for "Width" and "Height." You can input your desired new dimensions here. Crucially, Photoshop allows you to select from various units of measurement, such as pixels, inches, centimeters, millimeters, points, picas, and percentages, using the dropdown menus next to the Width and Height fields. A helpful feature is that if you change the unit of measurement for one dimension, Photoshop will automatically match the units for the other dimensions.
Step 3: Utilizing the "Relative" Option
The "Canvas Size" dialog also offers a "Relative" option. When this checkbox is ticked, the values you enter for width and height will be added to or subtracted from the current canvas size, rather than setting an absolute new size. For instance, if you want to add 1 inch to each side of your image, you would enter 2 inches for the width value and 2 inches for the height value. Photoshop will then add 1 inch to each side of the width and height respectively, effectively expanding the canvas by 2 inches in both directions. This is particularly useful when you need to add a consistent border or a specific amount of space around your existing artwork.
Step 4: Understanding the Anchor Point
The "Anchor" section within the Canvas Size dialog is a powerful tool for controlling where the new canvas space is added or from where it is cropped. It's represented by a 3x3 grid of squares, with the center square representing the current image. By default, the anchor is set to the center, meaning any added canvas space will be distributed equally on all sides. However, you can click on any of the other eight squares to dictate the direction of expansion or contraction. For example, clicking the top-center square will cause the canvas to expand upwards, while clicking the bottom-right square will cause it to expand downwards and to the right. If you are decreasing the canvas size, the anchor point determines which parts of the image are kept.
Step 5: Selecting the Canvas Extension Color
When you increase the canvas size, Photoshop needs to fill the newly added areas with a color. You can choose this "Canvas extension color" from a dropdown menu at the bottom of the dialog box. The default is usually "Background color" or "White." If your image is a "Background" layer (not a regular layer), the new canvas areas will be filled with the chosen color. To have transparent areas instead, it's recommended to convert the "Background" layer to a regular layer before adjusting the canvas size. This is done by double-clicking the "Background" layer in the Layers panel and clicking "OK" in the new layer dialog.
Method 2: The Crop Tool for Canvas Adjustments
The Crop tool, primarily used for removing unwanted portions of an image, can also be expertly employed to add or subtract canvas space. This method offers a more visual and intuitive approach, especially when precise measurements are less critical than a general expansion or reduction.
Step 1: Activating the Crop Tool
Select the Crop tool from the toolbar on the left side of the Photoshop workspace, or simply press the C key.
Step 2: Extending the Canvas with the Crop Tool
When the Crop tool is active, a bounding box with handles will appear around your image. To add canvas space, simply click and drag any of the corner or edge handles outwards, beyond the current boundaries of your image. As you drag, you'll see the canvas area expand. You can drag from any side or corner to add space in specific directions. Once you've achieved the desired canvas size, press Enter (or Return on Mac) to commit the changes.
Step 3: Cropping the Canvas with the Crop Tool
Conversely, to decrease the canvas size, you would drag the handles inwards, towards the center of the image. This will visually define the new boundaries of your canvas, effectively cropping the image to the new dimensions.
Step 4: Utilizing Crop Tool Settings
The options bar at the top of the screen provides additional controls when the Crop tool is active. You can set specific ratios or dimensions for your crop, which can be useful if you have a target canvas size in mind. Options like "Ratio," "Resolution," and "Clear" allow you to define how the crop tool behaves. The "Grids and Rulers" option can be toggled on to provide visual guides within the crop area. The "Delete Cropped Pixels" option, when ticked, will permanently remove the parts of the image that fall outside the new crop boundaries. If this is not selected, the cropped areas are retained and can be recovered by expanding the canvas again.
Method 3: The Trim Command
The Trim command offers a specialized way to adjust canvas size based on specific pixel criteria, particularly useful for removing unwanted transparent areas or consistently colored borders.
Step 1: Accessing the Trim Command
Navigate to Image > Trim.
Step 2: Defining Trim Criteria
A dialog box will appear, allowing you to specify how the canvas should be trimmed. You can choose to trim based on "Transparent Pixels," the "Top Left Pixel Color," or the "Bottom Right Pixel Color."
Step 3: Specifying Trim Away Options
Under the "Trim Away" section, you can select which edges of the document you want to trim. For example, if you have unwanted transparency at the top, left, and right edges, you would check those boxes. This command is effective for cleaning up edges or ensuring an image fills its canvas precisely based on its content.
Advanced Techniques and Considerations
Converting Background to a Layer
As mentioned, if your image is set as a "Background" layer, adding canvas will fill the new space with the background color. To achieve transparent canvas extensions, right-click on the "Background" layer in the Layers panel and select "Layer from Background." You can then name your new layer and click "OK." With this done, any expansion of the canvas will result in transparent areas.
Resizing vs. Changing Canvas Size
It's crucial to remember that changing the canvas size is distinct from resizing the image itself. The "Image Size" command (Image > Image Size) alters the dimensions and resolution of the actual image pixels. The "Canvas Size" command, conversely, only modifies the overall workspace. If you want to resize an image and change its aspect ratio simultaneously, the Crop tool is generally the preferred method over the Image Size command.
Technology Preview: Preserve Details 2.0 Upscale
Photoshop continually evolves, and newer versions may include advanced algorithms for resizing. The "Preserve Details 2.0 Upscale" technology preview, for instance, is designed to intelligently detect and maintain important details and textures when resizing images, minimizing over-sharpening or excessive smoothing. To enable this, you would typically find it under Preferences > Technology Preview.
Generative Expand
For more advanced scenarios, especially when adding significant amounts of new canvas, Photoshop's Generative Fill and Generative Expand features (powered by Adobe Sensei AI) offer sophisticated ways to intelligently fill new areas with content that blends seamlessly with the existing image. While not strictly a canvas size adjustment tool, it's a powerful companion when expanding canvases for creative purposes.
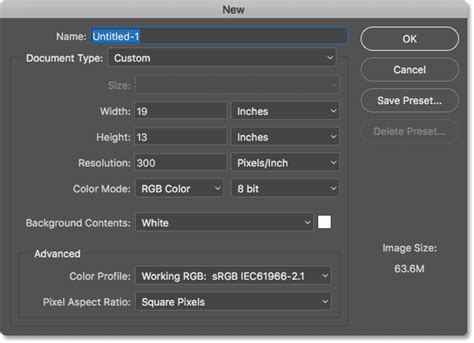
Creating New Documents with Specific Canvas Sizes
You can also define your canvas size from the outset when creating a new document. Go to File > New (or Ctrl+N/Cmd+N). In the "New Document" dialog, you can specify the exact Width, Height, and Units of measurement, as well as Resolution, Color Mode, and Background Contents (including Transparent). This is ideal when you know your required canvas dimensions before you even import an image.
By mastering these various methods for adjusting canvas size in Photoshop, you gain the flexibility to prepare your images for any output, from print to web, and to incorporate them seamlessly into complex designs. Whether you need a small adjustment or a significant expansion, Photoshop provides the tools to ensure your workspace perfectly complements your creative vision.