The digital art and game development landscape is constantly evolving, and with it, the tools and workflows used to create stunning visual assets. At the forefront of this evolution is Adobe Substance 3D, a suite of powerful applications that have revolutionized texturing and material creation. Among its key components, Substance Painter and Substance Designer stand out, enabling artists to craft highly detailed and dynamic materials. A crucial aspect of leveraging these tools effectively lies in understanding and utilizing the vast ecosystem of community-created assets. This tutorial delves into the world of Substance Painter community assets, explaining their nature, benefits, and how to integrate them into your workflow, with a particular focus on the underlying principles that make them so powerful.
Understanding Substance Materials: Beyond Static Textures
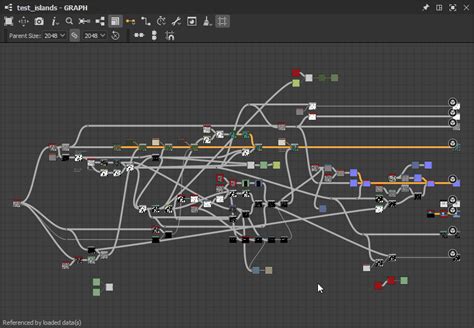
At its core, a Substance material is not a static, “dead” texture. Instead, it is a parametric material. This fundamental difference means that the author of a Substance material has the ability to expose parameters, granting control to the end-user. Imagine the possibilities: you can change the amount of dust settling on an object, or effortlessly alter the color of a soccer team's jersey. Your talent and imagination are truly the only limits to what you can achieve with these dynamic assets.
These materials can be crafted in two primary ways. They can be 100% procedural, meticulously built within Substance 3D Designer. Alternatively, they can be created from real-world sources, utilizing scans or photographs. Even when starting with scans or pictures, a layer of procedural detail can be added on top, or multiple scans can be merged to forge an entirely new material.
The true power of Substance materials is amplified by their publishability. Once created, they can be seamlessly used in any external application that supports the Substance Engine, such as Unity or Unreal Engine 4 (UE4). This integration means you don't just receive the generated textures; all the exposed parameters remain accessible and modifiable. This affords you the incredible flexibility to make changes to your material right up until the last minute, without the daunting task of redoing the texture from scratch.
The Efficiency of Proceduralism: Lightweight and Adaptable
When you create a Substance material that is 100% procedural, the resulting file size is remarkably small. This has a significant impact on your projects, allowing you to dramatically reduce the amount of disk space dedicated to textures. This efficiency is particularly valuable in game development, where texture budgets are often a critical consideration.
When you are creating a material using Substance 3D Designer, you have the option to expose specific parameters. These could include the intensity of a particular element, a color value, or any other controllable aspect of the material. Once these parameters are exposed, they empower the user to modify them directly within the application where the material will be utilized. This includes applications like Substance Painter itself, game engines like UE4, or 3D modeling software such as Cinema 4D (C4D). This capability enables rapid material modification within the end application, leading to a diverse range of looks and applications from a single asset. For a deeper understanding of how to expose parameters in Substance 3D Designer, consult the official documentation.
Mastering Parameters and Presets for Versatile Materials
The ability to expose parameters is a cornerstone of Substance material versatility. When you are developing a material that incorporates a multitude of parameters, you might find it beneficial to create shortcuts to specific states of that material. For instance, you might want a straightforward method to transition from a pristine, clean version of a floor material to one that is dirty and dusty, or perhaps one with a different color scheme. Achieving these varied looks often involves adjusting several parameters simultaneously.
This is where the concept of presets becomes invaluable. Presets provide users with the ability to pre-configure specific values for a defined set of parameters. This allows for quick and easy switching between predefined material variations. Imagine having a "clean," "worn," and "damaged" preset for a metal material, all accessible with a single click. To learn more about the process of creating presets in Substance 3D Designer, refer to the relevant guides.
Performance Considerations: Balancing Complexity and Speed
When you are creating materials using Substance Designer, it's important to acknowledge the relationship between graph complexity and rendering performance. The more intricate your node graphs become, the more processing power is required to render them. While this might not always be a significant issue depending on your target platform, it can become a critical factor if your materials are intended for use on mobile devices or if they incorporate embedded bitmaps. In such scenarios, optimizing for a good user experience is paramount.
Ideally, you should strive to strike a careful balance between the complexity of your material graphs and their rendering speed. This ensures that your materials look great without unduly taxing the performance of the application or device they are used on. The Substance 3D ecosystem often provides guidelines and best practices to help you achieve optimal performance in your material creation. You can find some helpful guidelines to assist you in achieving the best performance on the official Adobe Substance 3D website.
Uploading to Substance 3D Community Assets: Quality Control and Requirements
The Substance 3D Community Assets platform serves as a vital hub for sharing and discovering Substance materials. When you upload a material to this platform, it undergoes an automatic check to ensure that the asset is functional, complete, and free from any potentially harmful elements for the end-user. This automated process verifies several key aspects of your material.
Essential Material Outputs
For a Substance material to be accepted on the platform, it needs to include a minimum set of essential outputs. These are:
- Base Color: This defines the primary color of the material.
- Normal: This map simulates surface detail and contours, adding depth and realism.
- Roughness: This parameter controls how light scatters off the surface, dictating its shininess or dullness.
- Height: This map is used for displacement or parallax mapping, adding actual geometric detail or the illusion of it.
While Metallic is also a crucial output for many materials, it is considered expected but not mandatory for the initial upload check. The inclusion of these outputs ensures that the material can be effectively utilized across various rendering pipelines.
Dynamic Output Size and Thumbnails
A critical requirement for uploaded materials is that their output size must be set as dynamic. This allows the material to scale to different resolutions without degradation. For all materials uploaded to the platform, a thumbnail is automatically generated during the upload process. This visual representation is the first impression users will have of your material, so ensuring it accurately reflects the asset is important.
Physical Size and Displacement
When creating materials that utilize displacement, the platform takes into account the physical size set within the Substance (.sbsar) file itself. Therefore, it is imperative to set this physical size when you create your material. This is typically measured in centimeters.
More critical than the absolute physical size for rendering purposes is the ratio between the material's width (x and y dimensions) and its height (z dimension). This ratio dictates how the displacement will be interpreted. For example:
- A flat parquet material might have dimensions like
200 200 0.5(representing 2 meters wide and half a centimeter of height variation). - A vinyl material, being completely flat, could be
25 25 0(25 cm wide, with no height variation). - An old, eroded stone wall might be represented as
150 150 9(1.5 meters wide with up to 9 centimeters of height variation).
Understanding and correctly setting these physical dimensions ensures that your displacement maps will function as intended in various applications.
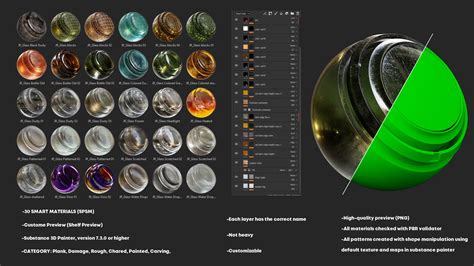
Exploring Smart Materials: Geometry-Aware Texturing in Substance Painter
Beyond standard Substance materials, there exists another powerful asset type: Smart Materials. A Smart Material is an asset specifically created within Substance 3D Painter. Its defining characteristic is its ability to generate textures that intelligently take into account the geometry of the targeted 3D asset. This means that if you apply a Smart Material to a different 3D model, the material will adapt its generated textures accordingly. This is an incredibly useful feature in a production environment, as it allows you to perform the texturing work once and then reuse it across multiple assets with minimal adjustments. Smart Materials typically have a .spsm file format.
When you add a Smart Material to the Substance Community Assets, the platform automatically detects the embedded image file within the asset and utilizes it as the thumbnail. This simplifies the process of providing a visual representation for your Smart Materials.
Creating Smart Materials can only be done within Substance 3D Painter, and consequently, they can only be used within that application. The creation process for Smart Materials is designed to be user-friendly. For instance, you can follow tutorials to learn how to create effects like peeled paint by utilizing simple fill layers and anchor points. More in-depth information on creating Smart Materials can be found in the official Substance 3D Painter documentation.
Substance Painter: Smart Materials (EXPLAINED!)
Leveraging Community Assets for Enhanced Workflows
The Substance Painter community is a vibrant ecosystem of artists sharing their creations. These community assets, whether they are standard Substance materials or Smart Materials, offer a multitude of benefits for both beginners and experienced professionals.
Accelerating Your Workflow
One of the most immediate advantages of using community assets is the significant acceleration of your workflow. Instead of spending hours creating a basic wood grain or a complex metallic rust from scratch, you can download a high-quality material or Smart Material and apply it in minutes. This frees up your time to focus on more unique and intricate details, or to tackle larger projects with tighter deadlines.
Learning and Inspiration
Community assets are also an invaluable learning resource. By examining the node graphs of procedural materials or the layer stacks of Smart Materials, you can gain insights into how experienced artists achieve specific effects. This can be a powerful way to expand your own technical knowledge and discover new techniques. Furthermore, browsing community assets can provide inspiration for your own projects, exposing you to styles and aesthetics you might not have considered otherwise.
Consistent Quality and Style
For teams working on a project, utilizing community-provided or internally developed Substance assets can help ensure a consistent visual style and quality across all assets. This standardization is crucial for maintaining a cohesive look and feel, especially in large-scale productions.
Customization and Iteration
As previously discussed, the parametric nature of Substance materials means that they are not rigid. When you download a community asset, you are not merely getting a finished product; you are getting a flexible tool. You can tweak exposed parameters to perfectly match the needs of your specific project. This iterative process of customization allows for a high degree of artistic control and ensures that the asset integrates seamlessly into your vision.
Practical Steps for Using Community Assets
Integrating community assets into your Substance Painter workflow is a straightforward process:
- Access the Substance 3D Community Assets Platform: Navigate to the official Substance 3D Community Assets website. You will likely need an Adobe account to access and download assets.
- Search and Filter: Utilize the search bar and filtering options to find the assets you need. You can search by keyword (e.g., "metal," "fabric," "concrete"), by asset type (material, smart material, brush), or by popularity.
- Download Assets: Once you've found an asset you want to use, click on it to view its details and download it. Assets are typically downloaded as
.sbsar(for Substance materials) or.spsm(for Smart Materials) files. - Import into Substance Painter:
- For Substance Materials (.sbsar): In Substance Painter, open the "Shelf" window. Navigate to the "Materials" tab. You can then drag and drop the
.sbsarfile directly into the Shelf, or use the "Import Resources" option (File > Import Resources) and select your downloaded material. - For Smart Materials (.spsm): The process is similar. Open the "Shelf" window, go to the "Smart Materials" tab, and either drag and drop the
.spsmfile or use the "Import Resources" function.
- For Substance Materials (.sbsar): In Substance Painter, open the "Shelf" window. Navigate to the "Materials" tab. You can then drag and drop the
- Apply to Your Model: Once imported, the material or Smart Material will appear in your Shelf. You can then drag and drop it onto your 3D model in the viewport, or apply it to a specific layer in your layer stack.
- Adjust Parameters: If you've applied a Substance material with exposed parameters, you will find these controls in the "Properties - Fill" or "Properties - Layer" panel. Adjust them to fine-tune the look of the material. For Smart Materials, you may also find adjustable parameters or the ability to edit the underlying layer stack.
Ethical Considerations and Best Practices
While the Substance 3D Community Assets platform is a treasure trove of resources, it's important to use these assets responsibly and ethically.
- Licensing: Always pay attention to the license associated with each asset. Some assets may be available for free for personal and commercial use, while others might have specific restrictions. Understanding the license will prevent potential legal issues.
- Attribution: If the license requires attribution, make sure to provide credit to the original creator as specified. This is a fundamental aspect of respecting intellectual property.
- Modification and Redistribution: Be mindful of the terms regarding modification and redistribution of downloaded assets. Unless explicitly permitted by the license, avoid re-uploading modified versions of other artists' work as your own.
- Contribution: As you become more proficient, consider contributing your own high-quality Substance materials or Smart Materials to the community. Sharing your work can help others and enrich the ecosystem for everyone.
By understanding the nature of Substance materials, the power of parametric control, and the benefits of the community asset ecosystem, you can significantly enhance your 3D texturing workflow. Whether you are a seasoned professional or just beginning your journey in 3D art, these tools and resources are essential for creating visually stunning and efficient digital assets.