Clipping masks in Adobe Photoshop are a powerful tool for controlling the visibility of layers. They allow you to confine the contents of one or more layers to the shape of a specific layer above them. However, users sometimes encounter issues where their clipping masks simply don't work as expected. This article delves into the common reasons why a Photoshop clipping mask might not be functioning and provides detailed solutions.
Understanding the Clipping Mask Mechanism
At its core, a clipping mask uses the transparency of the top layer (the "masking" layer) to determine which parts of the layer(s) below it are visible. If the masking layer is opaque, the layer(s) below will be fully visible within the boundaries of the masking layer's shape. If the masking layer has transparent areas, the layer(s) below will only be visible in the opaque areas of the masking layer. Importantly, the clipping mask itself does not alter the pixels of the clipped layer; it merely controls its visibility.
There are several primary methods to create a clipping mask in Photoshop:
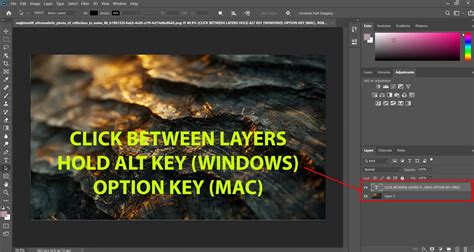
- Keyboard Shortcut: The most common and intuitive method, especially for those familiar with Photoshop's shortcuts, involves holding down the
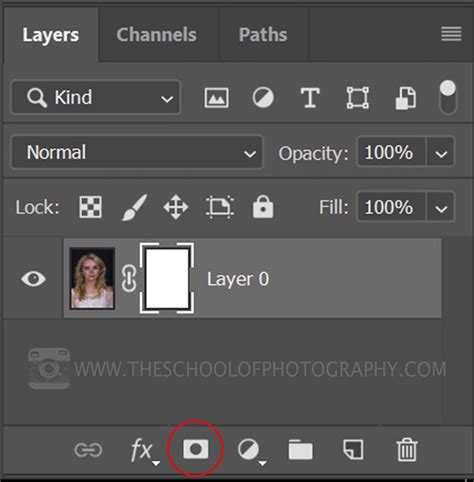
Alt(Windows) orOption(Mac) key. When you hover your mouse cursor between two layers in the Layers panel, the cursor will transform into a distinct icon - often described as a "snowman" (in older versions) or a square with a downward-pointing arrow (in newer versions). Clicking at this point creates the clipping mask, with the top layer acting as the mask for the layer directly below it. - Right-Click Menu: Another straightforward approach is to right-click on the layer you want to be the clipping mask (the one that will define the boundaries). In the context menu that appears, select "Create Clipping Mask."
- Layer Menu: For those who prefer navigating through menus, you can select the layer you wish to use as the mask and then go to
Layer > Create Clipping Mask.
It's crucial to remember that the layer you intend to use as the mask must be positioned directly above the layer(s) you want to clip.
Common Issues and Their Solutions
When a clipping mask fails to work, it can be due to a variety of factors, ranging from simple layer ordering to more complex path or selection issues.
Layer Order is Paramount
One of the most frequent reasons for a clipping mask not working is incorrect layer stacking order. As mentioned, the masking layer must be directly above the layer it is intended to clip. If there are other layers between them, or if the masking layer is below the clipped layer, the clipping mask will not function.
Problem: You've created a mask layer and the layer you want to clip, but nothing happens when you try to create the mask.Solution: In the Layers panel, ensure that the layer intended to be the mask is positioned immediately above the layer you want to clip. Drag and drop the layers to rearrange them if necessary. For instance, if you have Layer A (your mask) and Layer B (the image to be clipped), Layer A must be directly above Layer B.
Understanding "Load Path as Selection" vs. Clipping Masks
A user reported an issue where they create a path using the Pen Tool, then go to the Paths tab, create a "clipping path" with a flatness setting, and then try to "load path as selection" on their layer. While this creates a selection, it is not the same as creating a clipping mask. Loading a path as a selection allows you to manipulate pixels within that selection, but it doesn't inherently clip another layer.
Problem: You've created a path and loaded it as a selection, but the layer below isn't masked.Solution: To use a path for a clipping mask, you generally don't "load it as a selection" in the context of creating the mask. Instead, you would typically use the path to create a shape layer, or fill/stroke it on a new layer, and then use that layer as the mask. Alternatively, if you have the path active, you can create a new layer above your target layer, and then use the "Load Path as Selection" command. With the selection active, you can then fill this new layer with white (or any color) to create a solid mask, or use it as a basis for a more complex mask. However, the most direct method for using a path to clip is to convert the path into a selection, then create a new layer, fill the selection on that new layer, and then use that new layer as the clipping mask for the layer below.
A more direct approach when using a path:
- Ensure your path is active in the Paths panel.
- Create a new, blank layer above the layer you want to clip.
- With the new layer selected and the path active, click the "Load path as a selection" icon at the bottom of the Paths panel (or go to
Select > Load Selection...). - With the selection active, you can then fill this new layer with black (or any color) if you want to create a solid mask, or use it as a basis for a more complex mask.
- Now, create the clipping mask between this newly filled layer and the layer below.
Keyboard Shortcut Confusion: Ctrl+G vs. Alt/Option Click
Some users have experienced confusion with keyboard shortcuts. In older versions of Photoshop, Ctrl + G (Windows) or Cmd + G (Mac) was used for creating clipping masks. However, in more recent versions, this shortcut has been reassigned to "Make Group." This change can lead to unexpected behavior if users are accustomed to the older shortcut.
Problem: Pressing Ctrl + G or Cmd + G does not create a clipping mask.Solution: Rely on the Alt/Option click method between layers or the right-click menu option. Remember that Ctrl + G or Cmd + G now creates a layer group, which is a different organizational tool.
The "Make/Release Clipping Mask" Button
Users may notice different icons for creating clipping masks depending on their Photoshop version. The classic "circle inside a square" icon has, in some versions, been replaced by two overlapping squares labeled "Make/Release Clipping Mask." This button can also be a source of confusion if it appears greyed out.
Problem: The "Make/Release Clipping Mask" button is greyed out.Solution: This button typically becomes active when you select the layer you want to use as the clipping mask and that layer is positioned directly above the layer you intend to clip. If it's greyed out, re-check your layer order and ensure the correct layer is selected.
Pasting Clipped Images into Other Documents
A common scenario is creating a clipped image in one Photoshop document and then pasting it into another, only to find that the clipping mask is not preserved. This often happens when saving the clipped image as a TIFF or EPS.
Problem: A clipped image pastes into a new document without its clipping mask applied.Solution: When you save a layered Photoshop file (.PSD) that contains clipping masks, those masks are maintained within the file. If you need to transfer a clipped image to another program like InDesign or Illustrator, or even another Photoshop document, it's best to:
- Save as PSD: Save the original Photoshop document with the clipping mask intact as a
.PSDfile. Then, you can open this.PSDfile in other Adobe applications, and the clipping mask will generally be honored. - Flatten and Save (with caution): If you absolutely must save it as a flattened format like JPEG or TIFF, the clipping mask will be "baked in" to the image. However, this means you lose the flexibility of the mask.
- Exporting for Web: When exporting for web use (like JPEGs), the clipping mask will be applied, but the transparency information required for a true mask might be lost depending on the export settings.
The key takeaway is that clipping masks are a feature of Photoshop's layered structure. When you flatten an image or save it in a format that doesn't support layers, the clipping mask information is often lost. When pasting into InDesign or Illustrator, these programs have their own ways of handling linked Photoshop files and clipping paths, which can sometimes lead to discrepancies if not handled correctly. Ensuring the source PSD is saved properly is crucial.
How to create a Clipping Mask in Photoshop | Adobe Tutorial
Complex Paths and Selection Issues
When dealing with very complex paths, especially those created with the Pen Tool, issues can arise with selections not appearing as expected. This can be due to the complexity of the path itself or how it's being converted into a selection.
Problem: "Load Path as Selection" results in no visible selection, even though the History panel indicates a change.Solution:
- Verify Path: Double-check the path in the Paths panel. Ensure it's a closed path if intended to be a mask. Sometimes, stray points or open segments can cause issues.
- Flatness Setting: The "flatness" setting when creating a clipping path (e.g., 0.2 pixels) is primarily for older PostScript-based workflows and can sometimes introduce subtle rendering issues or complications. For general clipping mask purposes within Photoshop, it's often unnecessary and can be left at its default or a higher value if you're not exporting to specific print workflows. For creating a clipping mask, you typically don't need to set a clipping path this way; you would use the path to create a selection or a shape on a layer.
- Check Layer Visibility: Ensure the layer you are trying to load the selection onto is visible and not hidden.
- Reset Photoshop: While you've tried this, sometimes a full system restart or clearing Photoshop's preferences can resolve persistent glitches.
The "Versus Poster" Scenario
A user described a "versus" poster design where they wanted two images to occupy distinct halves of the canvas, separated by a line, without overlapping. They attempted to use clipping masks on colored shapes ("clip right" and "clip left") to achieve this.
Problem: When the image on the left overlaps the one on the right, the clipping part appears, which is not desired.Solution: The issue here likely stems from how the clipping masks are being applied and the expectation of how they function.
Layer Order is Key: The image layer must be below the colored shape layer that acts as the mask.
Separate Masks: For a "versus" design, you would typically have:
- Layer 1: Background (optional)
- Layer 2: Image for the Left Side
- Layer 3: Colored Shape for the Left Side (e.g., pink) - This layer would be clipped to Layer 2.
- Layer 4: Image for the Right Side
- Layer 5: Colored Shape for the Right Side (e.g., black) - This layer would be clipped to Layer 4.
- Layer 6: Angled Line (if it's a separate element)
The crucial point is that the colored shapes should not overlap each other if you want the images to be strictly separated. If the colored shapes themselves overlap, the images clipped to them will also appear to overlap in those areas. To prevent overlap, the colored shapes should be carefully aligned to meet perfectly at the dividing line, or one shape should extend slightly over the line and the other stop just before it, ensuring no visible overlap of the mask shapes themselves.
The user's comment, "your clipping mask is on top when it should be under the image it is clipping," is a misunderstanding. The masking layer (the shape) must be on top, and the image layer must be below it.
Exporting with Paths for Other Programs
When saving a Photoshop file with paths, and then opening it in programs like InDesign or Illustrator, the clipping path can sometimes be interpreted differently.
Problem: Images with clipping paths work fine in InDesign/Illustrator when pasted from Photoshop, but not when saved as TIFF/EPS and then imported.Solution: The .PSD format is generally the most reliable for transferring layered, masked artwork between Adobe applications. When you save a .PSD file, the clipping path information is embedded. If you save as TIFF or EPS, the way these formats handle embedded paths can vary. For seamless integration, especially with complex vector paths, consider:
- Saving as PSD: Always the preferred method.
- Vector Paths in Illustrator: If your mask is primarily vector-based, consider creating the mask directly in Illustrator using vector shapes.
- Exporting Layers to Files: Photoshop's "Export Layers to Files" feature can sometimes preserve mask integrity better than a simple save as TIFF/EPS, depending on the settings.
Ultimately, understanding that clipping masks are a dynamic, layer-based feature within Photoshop is key to troubleshooting when they don't behave as expected. Always verify layer order, understand the difference between selections and masks, and use the .PSD format for maximum compatibility when transferring complex artwork.