Dealing with unwanted color casts in photographs can be a frustrating experience for any photographer. Whether a picture suffers from an unusual color tint or excessive saturation, the challenge of correcting these issues without compromising the overall image quality is a common hurdle. Sometimes, a color cast is unavoidable due to external factors, such as the intense glow from a massive neon sign, or perhaps the color saturation in certain parts of an image is simply too strong. In such scenarios, the temptation to abandon these difficult images can be high. However, with the right techniques in Photoshop, these challenges become manageable, and you no longer need to give up on color-correcting your problematic photos. This tutorial will guide you through effective methods for neutralizing colors and exploring the art of colorization in Photoshop CS5 and beyond.
Understanding and Neutralizing Color Casts
Color casts are essentially unwanted color tints that overlay an image, making the colors appear unnatural. These can arise from various light sources during shooting, such as incandescent bulbs casting a warm, yellow-orange hue, or fluorescent lights introducing a greenish or bluish tint. The frustration of fixing these is amplified when you struggle to improve oversaturated parts without damaging the overall image.
There are several approaches to tackle color casts in Photoshop. Traditional methods include using the Curves or Levels adjustment layers. While powerful, these can sometimes be a "hit and miss" affair, requiring careful manipulation of individual color channels. Another option is to utilize the Auto feature in Adobe Camera Raw (ACR), which can sometimes provide a quick fix, though it may not always yield precise results. Where possible, the most effective preventative measure is to adjust your camera's White Balance (WB) settings at the time of capture to minimize color cast from the outset.
However, when these initial steps are insufficient, or the cast is deeply ingrained, Photoshop offers more advanced tools. One particularly effective method for neutralizing colors and dealing with problematic casts involves a technique that leverages luminosity selections. This method, though it might seem intricate at first, offers a high degree of control and can be a lifesaver for difficult images.
The Power of Luminosity Selections
A crucial, yet often overlooked, technique for advanced photo editing involves creating selections based on the brightness values of the pixels in an image. These "luminosity selections" are incredibly useful for high-end photo retouching techniques that would be extremely difficult to achieve otherwise. The beauty of this method is that it creates selection edges that are completely seamless, without the need to touch a single selection tool.
The first step in this process is to create selections for different luminosity values: highlights, midtones, and shadows. While there isn't a direct menu or tool for this, Photoshop provides keyboard shortcuts and channel-based methods.
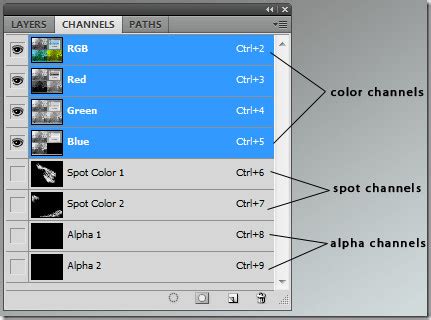
- Creating Luminosity Channels:
- The keyboard shortcut for selecting luminous values prior to Photoshop CS5 was
Alt-Control-~(tilde). In later versions like CS5 and beyond, the shortcut isAlt-Control-2. - A more accessible method is to navigate to the Channels panel. Here,
Control-clicking on the composite RGB channel will create a selection based on the overall luminosity. - To further refine these selections, you can save them as new channels. Click the "Save Selection as Channel" icon at the bottom of the Channels panel. This automatically creates a new channel, often named "Alpha 1."
- You can then create progressively brighter subsets of the highlights by holding down
Control-Alt-Shiftwhile clicking on the "Highlights" thumbnail in the Channels panel. This process can be repeated to generate selections for three different levels of highlights. - To obtain a shadow selection, you can
Control-click on the "Highlights" channel to load that selection. Then, go to Select > Inverse (Shift-Control-I). This inverts the selection, turning it into a shadow selection. - To isolate the midtones, start by selecting the entire canvas (
Control-A). Then, subtract the highlights from it by holdingControl-Altand clicking on the "Highlights" channel. Photoshop might display a warning about the selection edge not being visible if no pixels are more than 50% selected, which is perfectly normal for midtone selections. - It is always recommended to finish by returning to the composite RGB channel before proceeding with work in the Layers panel.
- The keyboard shortcut for selecting luminous values prior to Photoshop CS5 was
These steps, while detailed, work consistently across various images. For those who perform extensive photo editing and retouching, consider recording an Action to automate the generation of these channels, saving significant time and effort.
Applying Luminosity Selections for Color Correction
Once these luminosity selections are safely stored in the Channels panel, their practical application becomes clear.
Targeting Highlights:
Control-click the "Highlights" channel to create a selection. Then, in the Layers panel, add a Curves adjustment layer (Layer > New Adjustment Layer > Curves). Photoshop will automatically use the selection as a mask for this adjustment layer, ensuring that any changes made only affect the highlight areas. This allows for precise control over bright areas without impacting shadows or midtones.Targeting Shadows: Similarly, load the "Shadows" selection by
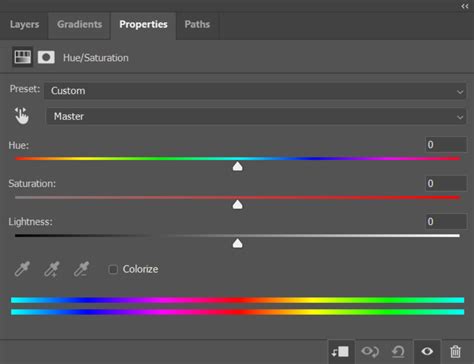
Control-clicking on that channel and add another Curves adjustment layer. This enables you to correct color casts or tonal issues specifically within the darker regions of your image.Targeting Midtones: The "Midtones" selection is invaluable for creating subtle lighting effects or applying color adjustments that primarily influence the middle range of tones. Load the "Midtones" selection and add a Hue/Saturation adjustment layer.
Photoshop Luminosity Masking 101
The Art of Colorization in Photoshop
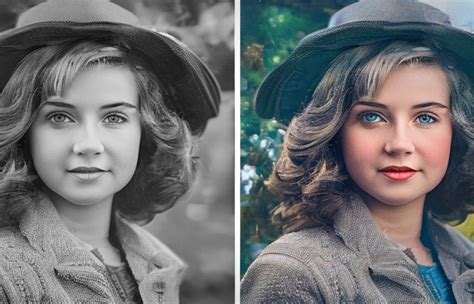
Beyond correcting existing colors, Photoshop also offers powerful tools for bringing life to black and white images through colorization. This process is often sought after when you want to see how a grayscale photo would look in color, or when you specifically aim to add color to a historical image.
Colorizing Grayscale Images
If you're starting with a grayscale image and wish to colorize it, a crucial first step is to ensure your image is in RGB color mode. This is essential because RGB is a color model that can receive and display color information, whereas grayscale only deals with shades of gray. You can check and change the color mode via Image > Mode > RGB Color.
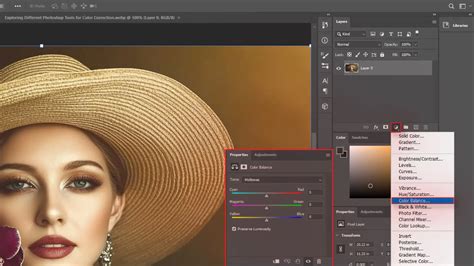
Once your image is in RGB mode, the process of colorization can begin. A straightforward method involves using the Colorize option within adjustment layers.
- Create a New Layer: Start by adding a new layer (
Ctrl+Shift+N) on top of your existing image. This ensures that your colorization is non-destructive. - Apply Hue/Saturation Adjustment: With the new layer selected, go to Layer > New Adjustment Layer > Hue/Saturation.
- Enable Colorize: In the Properties panel for the Hue/Saturation adjustment, check the box next to Colorize. This is where the magic happens.
- Adjust Sliders: You will immediately notice a color cast applied to your entire image. Now, you can use the Hue, Saturation, and Lightness sliders to fine-tune the color. The Hue slider determines the base color, Saturation controls its intensity, and Lightness adjusts its brightness.
- You might notice a Color Intensity Slider which functions similarly to the Saturation slider, allowing for fine-tuning of the color's strength.
- The Fade slider offers a way to gradually reduce the intensity of the applied color effect, blending it more subtly with the original image.
The result can be surprisingly effective, bringing a new dimension to black and white photographs. See how easy it is to apply a base color!
Refining Colorization and Handling Imperfections
While the "Colorize" feature is remarkably effective, you might notice that the colors aren't always perfect. There can be gaps or areas where the color doesn't quite reach, such as in the neck area or between fingers. This is a common occurrence, especially with complex subjects.
To address these imperfections:
- Create a New Layer for Refinements: Add another new layer on top of your colorized layer.
- Use Painting Tools: Select a brush tool (like the Brush Tool or Mixer Brush) and paint over the areas that need correction. You can sample colors from other parts of the image or use your desired hues.
- Masking for Precision: For more precise control, you can use layer masks. If your colorization layer has an automatic mask, you can refine it by painting with black on the mask to hide the color or with white to reveal it.
Example Scenario: Imagine you've colorized a portrait, and the background has also been colored. If you want to refine this, you could click on the background in the thumbnail representation of your layer and make adjustments specifically to that area. Yes! See how we can selectively colorize or adjust specific elements. This process creates a new layer for each adjustment, offering immense flexibility.
Advanced Colorization with Layer Blending Modes
For more sophisticated colorization effects, experiment with different layer blending modes. After applying a base color using the Hue/Saturation adjustment layer with "Colorize" enabled, you can change the blending mode of this layer (e.g., to "Color," "Overlay," or "Soft Light").
- Color Mode: This mode applies the hue and saturation of the adjustment layer while preserving the luminosity of the original image. This is often the most natural-looking option for colorizing black and white photos.
- Overlay Mode: This mode blends the colors in a way that preserves both the highlights and shadows of the original image, creating a more vibrant and contrasted look.
- Soft Light Mode: Similar to Overlay, but with a gentler effect.
By combining these blending modes with the Colorize feature and subsequent refinements, you can achieve remarkably realistic and artistic colorizations.
Further Exploration in Photoshop Essentials
The journey of mastering Photoshop is continuous, and there are always new techniques and effects to discover. Photoshop Essentials is dedicated to providing fun, exclusive, step-by-step tutorials for all skill levels, written with beginners in mind. Their offerings span from Photoshop Basics to Photo Editing and Retouching, Photo Effects, and Text Effects.
For those who prefer visual learning, their YouTube channel offers the latest Photoshop video tutorials. Additionally, you can download Photoshop tutorials as easy-to-read, ready-to-print PDFs.
Exploring Diverse Photo Effects
The provided information highlights a vast array of creative possibilities within Photoshop, extending far beyond color correction and basic colorization. These effects demonstrate the software's versatility for artistic expression and professional image manipulation:
- Selective Coloring Effect: This technique allows you to turn most of an image black and white while keeping the main subject in full color, creating a striking contrast.
- Radial Zoom Enhanced Eyes Effect: A fun effect that adds blur streaks zooming out from the center of eyes, while also enhancing their brightness and color.
- Faded Pixels Photo Border Effect: Creates a border where the image appears through scattered square pixel shapes that gradually fade into a solid background.
- Blend Textures with Photos: Essential for understanding how to quickly cycle through layer blend modes and blend textures while preserving original colors.
- Photo to Colored Dot Pattern: Transforms a photo into a pattern of colored dots using filters and layer masks.
- Vertical Photo Panels Effect: Creates the illusion that a photo is displayed as a series of vertical panels using layer groups and clipping masks.
- Shape Cluster Photo Display Effect: Arranges a single photo into a cluster of shapes, mimicking wall art displays.
- Classic Vignette Photo Effect: Adds a timeless vignette border, perfect for portraits.
- Photo to Sketch with More Detail: A method for converting photos into sketches, emphasizing fine details.
- Punch Through Image Effect: Creates the popular effect of a subject appearing to punch through the image plane.
- Color Grid Design: Turns a photo into a grid of randomly colorized squares using various selection and adjustment tools.
- Create a Starry Night Sky: A technique for filling night skies with stars, useful when camera capture is challenging.
- Realistic Cast Shadow Effect: Goes beyond simple drop shadows to create believable shadows for objects and people.
- Snowflakes Photo Border: A simple, festive border for winter or holiday photos.
- Dead Zone Blur Streaks Effect: Combines colorization with a motion blur effect by stretching a single column of pixels.
- Add a Realistic Rainbow: Creates natural-looking rainbows, including double rainbows, using gradients.
- Screen Jumping Effect: Replicates the dynamic effect of action seeming to jump off a screen.
- Overlapping Text with an Image: Mimics magazine cover designs where text and images interact dynamically.
- Worn, Torn Photo Edges Effect: Gives photos a vintage, distressed look using the Eraser Tool and layer styles.
- Film Strip Photo Collage: Creates collages using film strip frames, presented in a two-part tutorial.
- Creating Photo Borders with Photoshop Brushes: Explores the versatility of brushes for creating unique borders.
- High Key Glow Effect: Adds a romantic, magical glow to the highlights of an image.
- Halftone Pattern Photo Border: Creates a simple, editable halftone pattern border.
- Create Cinematic Panoramas with Photomerge: Utilizes Photoshop's Photomerge command for advanced panorama stitching.
Streamlining Workflow with Actions and Presets
For photographers and designers working with specific styles, Photoshop Actions can be invaluable. Actions are recorded sequences of commands that can be played back to automate repetitive tasks. For instance, "Dark Photoshop Actions Vol. 1" and "Dark Photoshop Actions Vol. 2" are mentioned as one-click, fully-automated actions designed to enhance portrait, fashion, or editorial imagery, providing high-quality results and saving considerable time. These are particularly useful for styles like those suited for travel photography or enhancing lifestyle, wedding, and newborn/children photography.
The ability to create seamless selections based on luminosity values also lends itself perfectly to automation. Recording an Action to generate these highlight, midtone, and shadow channels can significantly expedite workflows, especially for those who frequently engage in advanced photo editing and retouching. The process of creating these selections, though detailed, is foundational for applying targeted adjustments without affecting other parts of the image, all without using a single manual selection tool! This efficiency is key to professional output, whether you are aiming to enhance portrait, fashion, or editorial imagery.