Creating compelling visual illusions is a hallmark of digital art, and Photoshop offers a vast toolkit for achieving such feats. Among these, the "X-ray clothes" effect, which simulates transparency in garments to reveal what lies beneath, stands out as a technique that blends technical skill with creative vision. This method allows for the illusion of seeing through clothing, whether to reveal the background or the human form. It's a well-known image manipulation technique that can lead to strikingly artistic and intriguing photographs.
Understanding the "X-Ray" Concept in Photoshop
At its core, the "X-ray" effect in Photoshop is a sophisticated form of image manipulation. It's not about literal X-ray imaging but rather about creating the illusion of transparency. This is achieved through a careful orchestration of Photoshop's features, primarily involving layer manipulation, opacity adjustments, and blending modes. The goal is to make a layer of clothing appear translucent, allowing underlying details-be it skin, fabric, or background elements-to become visible. This technique should be visible on the pixel level to effectively remove or alter the appearance of a layer, such as clothing, within the photo, allowing hidden details to shine through.
The Foundation: Selecting the Right Image
The success of the see-through clothes effect hinges significantly on the initial image choice. While it's technically possible to apply this technique to a wide variety of clothing, certain conditions lend themselves to more realistic and impressive results.
Choosing Your Subject
For optimal results, it's advisable to select an image where the model is wearing light-colored apparel. Ideally, the fabric should possess a degree of inherent translucency, as this provides a more natural starting point for the effect. Images with lighter hues tend to react better to the transparency adjustments, making the illusion more convincing. However, don't be discouraged if your initial image features darker clothing; the technique can still be applied, but it will likely require more practice, skill, and meticulous editing to achieve a comparable level of realism.
The Importance of Pixels
A crucial disclaimer for achieving a convincing see-through effect is the presence of "hidden pixels." This means that to create the illusion of transparency, there must be some underlying detail-even if subtle-that Photoshop can manipulate. If the clothing is completely opaque with no discernible patterns or textures beneath, or if there's no information to reveal, the see-through effect will be impossible to achieve convincingly. Essentially, if there are no invisible pixels to work with, there can be no see-through effect.
Step-by-Step Guide to Creating the X-Ray Effect
The process of creating the see-through clothes effect in Photoshop is a sequence of precise steps that don't rely on a single tool but rather on the skillful combination of several.
Step 1: Opening Your Image
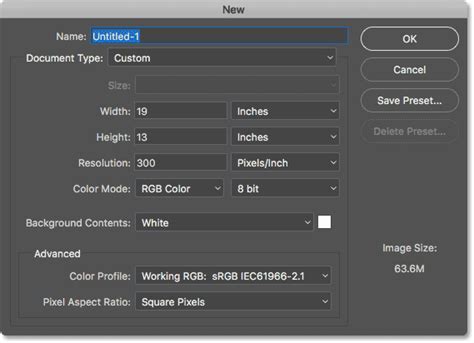
The first step is to bring your chosen image into the Photoshop environment. You can do this by navigating to the "File" menu at the top of the screen and selecting "Open." Alternatively, for a quicker approach, use the keyboard shortcut: Ctrl + O (or Cmd + O on a Mac).
Step 2: Isolating the Clothing Area
Once your image is open, the next critical phase is to accurately select the area of clothing you intend to make transparent. Precision here is paramount for a realistic outcome.
Utilizing Selection Tools
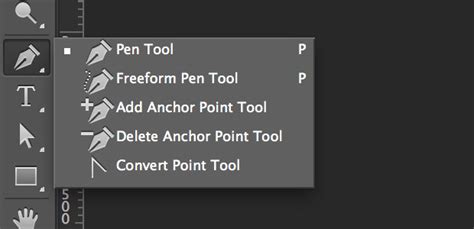
Several tools within Photoshop can assist with this selection process. The Lasso Tool (shortcut 'L') is a common choice for freehand selections. For more intricate and precise selections, the Pen Tool is highly recommended.
- Pen Tool Method: Activate the Pen Tool from the left-hand toolbar. Carefully draw a path around the edges of the clothing item. Zooming in on the image (use the zoom tool or Ctrl/Cmd + '+') will allow for greater accuracy, but avoid over-zooming, which can make the selection process difficult. Once the complete path is ready, right-click on your image. You can then choose "Make Selection" to convert the path into an active selection.
- Lasso Tool Method: If you opt for the Lasso Tool, you can manually trace around the clothing. While faster, it may require more refinement for complex shapes.
Step 3: Refining the Selection Edges
After making an initial selection, it's often necessary to refine its edges to ensure a seamless blend.
The "Select and Mask" Workspace
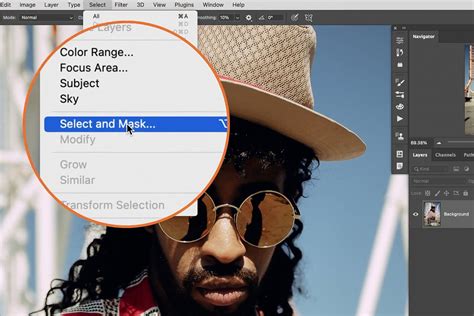
With your selection active, you can enter the "Select and Mask" workspace for advanced edge refinement. Press Ctrl + Alt + R (or Cmd + Option + R on a Mac) to open this powerful tool. Here, you can adjust sliders for "Radius," "Smooth," "Feather," and "Contrast" to perfect the selection's boundaries, especially around areas like hair or soft fabric edges.
Step 4: Creating a Separate Layer for the Clothing
To work on the clothing independently without affecting the rest of the image, it needs to be isolated on its own layer.
Duplicating the Selection
With the clothing area precisely selected, press Ctrl + J (or Cmd + J on a Mac). This command will copy the selected portion and place it onto a new, separate layer. This new layer will typically be named "Layer 1" or similar, depending on your Photoshop version and workflow.
Step 5: Adjusting Transparency and Tone
Now comes the core of creating the see-through effect. This involves manipulating the tonal values and opacity of the isolated clothing layer.
The Power of Adjustment Layers
To non-destructively edit the clothing layer, it's best to use Adjustment Layers.
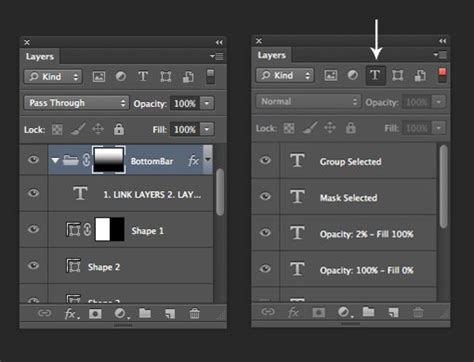
- Create a New Fill or Adjustment Layer: With "Layer 1" (your clothing layer) selected, click on the "Create a New Fill or Adjustment Layer" icon at the bottom of the Layers panel (it looks like a half-black, half-white circle).
- Select "Levels": From the dropdown menu, choose "Levels."
- Masking the Adjustment: To ensure this adjustment only affects the clothing layer, you need to create a clipping mask. Hover your mouse cursor between the "Levels" adjustment layer and the "Layer 1" clothing layer in the Layers panel. Hold down the Alt key (or Option key on a Mac), and a small down-pointing arrow will appear. Click to create the clipping mask. Now, any adjustments made in the "Levels" panel will only impact "Layer 1."
- Adjusting RGB Values: Within the "Levels" properties, you'll see an RGB color channel. By adjusting the sliders (particularly the midtones and highlights) for the RGB channel or individual Red, Green, and Blue channels, you can manipulate the brightness and contrast to create the illusion of transparency. Experiment by moving the sliders left and right to observe how the clothing becomes more transparent, revealing what's beneath. This step often requires patience and iterative adjustments to achieve the desired output.
Step 6: Fine-Tuning for Realism
While the transparency is established, further adjustments can enhance the realism of the effect.
Brightness and Contrast
To further refine the look:
- Select the Dress Layer: Ensure your "Layer 1" (clothing layer) is selected.
- Add Another Adjustment Layer: Click the "Create a New Fill or Adjustment Layer" icon again and select "Brightness/Contrast."
- Apply Clipping Mask: Repeat the process of creating a clipping mask for this new "Brightness/Contrast" layer so it only affects the clothing.
- Adjust Values: Reduce the "Contrast" slightly and, if necessary, increase the "Brightness." These adjustments can help the "see-through" portion blend more naturally with the rest of the image.
Step 7: Final Review and Enhancements
Zoom in closely and scrutinize the details. Ensure that the edges are well-blended and that the transparency looks as natural as possible within the context of the image. You might need to revisit the Levels or Brightness/Contrast adjustments, or even use subtle masking techniques to perfect the illusion.
Beyond the Basics: Advanced Considerations and Ethical Use
While the steps above provide a solid foundation for creating the see-through clothes effect, several other factors contribute to a truly convincing result.
Fabric Type and Complexity
The type of fabric significantly influences the difficulty and outcome of the effect. Smooth, light fabrics are generally easier to work with. More textured, patterned, or dark fabrics will require more advanced masking, color correction, and potentially the use of texture overlays to maintain a sense of depth and realism. For instance, achieving a convincing "see-through wet look" relies heavily on having subtle underlying pixel information to work with.
Blending Modes and Opacity
Beyond Levels and Brightness/Contrast, experimenting with different Blending Modes for the clothing layer can yield interesting results. Modes like "Screen," "Lighten," or "Soft Light" can create varying degrees of transparency and interaction with underlying layers. Adjusting the layer's Opacity slider directly is another fundamental way to control how transparent the clothing appears.
The Ethical Dimension of Image Manipulation
It is imperative to address the ethical implications surrounding the creation and use of images with a see-through effect. While Photoshop offers powerful tools for creative expression, their misuse can lead to serious consequences.
Respecting Privacy and Consent
Creating images that depict individuals without their clothing or in a sexually suggestive manner without their explicit consent is a violation of privacy and can have severe legal ramifications. Such actions are illegal and unethical. The ability to manipulate images should be wielded responsibly, with a strong emphasis on respecting individuals' rights and dignity.
Historical Context and Misuse
The desire to see through clothing has a history that predates digital manipulation. For instance, in the early 2000s, Sony faced controversy when it was discovered that some of their cameras, particularly those with advanced "night vision" or infrared capabilities, could inadvertently capture images that appeared to see through clothing under certain lighting conditions. While Sony eventually removed problematic filters, the incident highlighted the potential for technology to be exploited. Today, with accessible tools like Photoshop, the ease of image manipulation has increased, making responsible usage even more critical.
Legal Ramifications
In many jurisdictions, altering images of individuals without their consent, especially to create explicit content, is illegal. Laws regarding image manipulation, deepfakes, and non-consensual pornography are becoming increasingly stringent. Even subtle forms of body retouching that significantly alter a person's appearance can fall under legal scrutiny. Therefore, understanding and adhering to these legal boundaries is essential.
Creative Applications
Despite the ethical considerations, the X-ray clothes technique, when used responsibly, can be a powerful tool for artistic expression. It can be employed to:
- Create artistic illusions: Achieve unique visual effects for fashion photography or conceptual art.
- Showcase garment fit: In e-commerce or fashion design, an invisible mannequin effect (a related technique) can demonstrate how clothing drapes without needing a model or physical mannequin.
- Generate thought-provoking imagery: Explore themes of perception, reality, and hidden layers.
The X-ray effect in Photoshop is a testament to the program's capabilities. It's a technique that, when approached with skill, creativity, and a strong ethical compass, can elevate photographic work from ordinary to extraordinary. Remember, practice and patience are key; don't hesitate to experiment with different settings and approaches to master this intriguing form of digital artistry.