Adobe Photoshop, a titan in the realm of raster-based image editing software, has been empowering creatives since its inception. Originally developed by the American brothers Thomas and John Knoll in 1987 and later licensed for distribution by Adobe Inc. in 1988, Photoshop is available for both macOS and Windows operating systems. At its core, Photoshop operates on raster graphics, which are composed of pixels - a grid of tiny colored squares that form an image. This powerful application is indispensable for creating and editing images, posters, banners, logos, invitation cards, and a vast array of graphic design projects, making it a cornerstone in numerous industries. The default file format for Photoshop is the .PSD (Photoshop Document), a layered file that preserves editing capabilities.

The Photoshop toolbar is the primary gateway to its extensive functionality, housing a diverse array of tools designed for every conceivable editing task. Understanding and mastering these tools is paramount to unlocking the software's full potential, enabling users to achieve precise edits, sophisticated compositions, and polished final products. This guide delves into the intricacies of Photoshop's tools, from fundamental selection techniques to advanced manipulation methods, catering to both novice users and seasoned professionals.
The Power of Selection Tools: Isolating Elements Precisely
Selection tools are the bedrock of non-destructive editing in Photoshop. When a region is selected, any subsequent edits are confined to that specific area, leaving the rest of the image untouched. This granular control is critical for targeted adjustments, compositing, and detailed retouching. Adobe offers a robust suite of selection tools, ranging from general-purpose options to highly specialized instruments for intricate selections. These tools, typically found at the top of the toolbar, not only allow for initial selection but also offer functionalities for deselecting, intersecting selections, and refining boundaries to achieve the perfect, specified region.
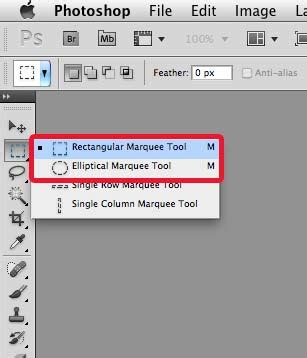
Marquee Tools: Geometric Selections
The Rectangular Marquee Tool is a standard selection tool found in many graphical applications. It's ideal for selecting large, box-like or rectangular chunks of your work. Its counterpart, the Elliptical Marquee Tool, performs the same function but creates selections in an elliptical or circular shape. These tools are fundamental for straightforward selections where precise, organic shapes are not required. A useful shortcut for these tools is to hold down OPTION/ALT while dragging to create a selection from a central point, offering more control over placement and size.
Lasso Tools: Freehand and Polygonal Precision
The Lasso Tool and its family of tools empower users to trace selections freehand with their mouse. This offers more flexibility for organic, rounder shapes that the Marquee tools cannot capture. For a more controlled approach, the Polygonal Lasso Tool allows you to click along the edges of your selection, creating vertices like those of a polygon. This method is superior to a shaky hand-drawn selection, enabling a steadier outline. While you can manually click vertices and even press DELETE to remove an accidental vertex, the tool also assists by recognizing edges in high-contrast areas, making the selection process more automated where clear boundaries exist.
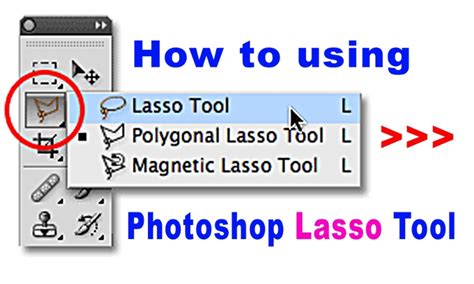
The Magnetic Lasso Tool further refines this process by automatically snapping to the edges of objects with high contrast. As you move your cursor near an edge, the tool "sticks" to it, simplifying the outlining of complex forms like hair or leaves. The accuracy of this tool can be adjusted by customizing its width and contrast settings in the options bar.
Quick Selection and Magic Wand: Intelligent Pixel Selection
The Quick Selection Tool is a highly efficient and intuitive tool, likely to be used frequently by most users. It functions like an intelligent brush; as you paint over an area, it automatically detects and expands the selection to encompass the object's edges. This tool is particularly adept at creating knowledgeable selections by sensing boundaries.
The Magic Wand Tool, often found grouped with the Quick Selection Tool, operates on a different principle. It automatically selects pixels of similar colors based on a defined tolerance level. By clicking on a color, the Magic Wand selects contiguous areas of that hue and brightness. This is exceptionally useful for tasks like creating a transparent background for a logo by selecting the surrounding whitespace and deleting it. The tolerance setting is crucial here: a lower tolerance selects a narrower range of similar colors, while a higher tolerance includes a broader spectrum.
The Object Selection Tool represents a significant advancement, leveraging artificial intelligence to automatically detect and isolate subjects within an image with remarkable accuracy. Users can simply draw a loose box around the desired object, and Photoshop's AI will intelligently identify and select it. This is incredibly powerful for portraits, products, or any distinct element within a scene.
Refining Selections: Adding, Subtracting, and Intersecting
Once an initial selection is made, Photoshop provides powerful options to refine it. You can add to your selection by holding down the SHIFT key while using any selection tool, allowing you to incorporate missed areas. Conversely, holding down the OPTION/ALT key enables you to subtract from your selection, removing unwanted areas that might have been inadvertently included. The ability to take the intersection of selections further refines complex areas. These modifiers are universally applicable across most selection tools, offering immense flexibility.
Feathering and Anti-aliasing: Softening Edges
Two key settings enhance the quality of selections: feathering and anti-aliasing. Feathering softens the edge of a selection, creating a gradual transition between the selected area and the rest of the image. This is crucial for making edits like color adjustments or blurs appear more natural and less abrupt. Anti-aliasing is a subtle yet important feature that modifies the edge pixels of a selection to create smoother, more defined boundaries. It doesn't alter the image details but makes it clearer for Photoshop where edges begin and end, resulting in cleaner selections. Anti-aliasing is a setting available on tools like the Magic Wand, Elliptical Marquee, and all Lasso family tools.
Inverting Selections
Sometimes, it's easier to select everything but your intended subject. The SHIFT + F7 shortcut inverts your current selection, meaning the previously unselected areas become selected, and vice versa. This is particularly helpful when the desired object occupies most of the image but is difficult to isolate directly.
Mastering Photoshop's selection tools is foundational to effective image manipulation. It directly impacts the quality of masks, fills, crops, adjustments, and ultimately, the control you have over this complex and powerful program.
Beyond Selections: Essential Photoshop Tools for Image Manipulation
While selection tools are critical for isolating areas, Photoshop offers a vast array of other tools that form the backbone of image editing and creation. These tools allow for everything from basic transformations to intricate artistic enhancements.
The Move Tool: Repositioning Elements
The Move Tool (shortcut 'V') is fundamental for repositioning selected areas or entire layers. By simply dragging with your mouse or using the keyboard arrow keys, you can move content precisely within your image. If an area is selected, the Move Tool will only move that selection; otherwise, it moves the entire active layer. Holding Ctrl (Windows) or Command (Mac) can also temporarily activate the Move Tool.
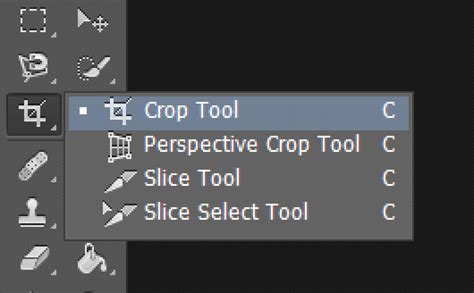
Crop and Slice Tools: Framing Your Composition
The Crop Tool (shortcut 'C') is essential for refining an image's composition by trimming unwanted edges. You can drag handles to adjust the crop area and even rotate the crop box to straighten horizons or align elements. Photoshop provides real-time previews, allowing you to see the results before committing. The Perspective Crop Tool is invaluable for correcting distortions, particularly in architectural photography, by allowing you to draw a grid over a skewed subject and have Photoshop automatically warp it to appear straight. The Slice Tool is primarily used for dividing images into sections for web export, optimizing loading times, though its use has diminished with modern web design practices.
Retouching Tools: Perfecting Your Images
Photoshop offers a suite of powerful retouching tools to enhance image quality and remove imperfections. The Spot Healing Brush Tool is remarkably easy to use; a single click on a blemish or dust spot allows it to automatically sample surrounding pixels for a seamless blend. The Healing Brush Tool requires you to Alt-click (or Option-click on Mac) a source area before painting, intelligently matching texture and lighting. The Patch Tool lets you select an area and drag it to a cleaner source area for intelligent blending. The Content-Aware Move Tool allows you to relocate objects while Photoshop intelligently fills the original space with generated content. For specific issues like red-eye in photographs, the dedicated Red Eye Tool offers a quick fix.
The Skin Retouching Technique That Makes You a Photoshop Pro
Painting and Brush Tools: Adding Creativity
The Brush Tool (shortcut 'B') is a versatile instrument that simulates real-world brushes, offering a wide range of customizable tips, opacities, flows, and hardness settings. This allows for everything from soft airbrushing to sharp, defined lines. The Pencil Tool creates hard-edged lines, ideal for pixel art or precise outlines. The Color Replacement Tool can change colors while preserving texture, making it excellent for recoloring objects without losing detail. For a more painterly effect, the Mixer Brush Tool blends colors like wet paint directly on the canvas. The History Brush Tool allows you to paint back to a previous state from the History panel, offering selective undos, while the Art History Brush Tool applies artistic stylization based on historical states.

Drawing and Vector Tools: Creating Shapes and Paths
While Photoshop is primarily a raster editor, it includes robust vector tools. The Pen Tool (shortcut 'P') is the most powerful for creating precise paths with anchor points. You can create straight lines by clicking or curves by dragging Bezier handles to control direction and shape. The Freeform Pen Tool allows for sketching paths freely, which can then be converted to vectors. The Curvature Pen Tool simplifies the creation of smooth curves. The Shape Tools (shortcut 'U') provide predefined vector shapes like rectangles, ellipses, polygons, and lines, which can be scaled without quality loss. These vector elements can be combined with raster elements, offering a bridge between the two worlds.
Type Tools: Incorporating Text
The Type Tool (shortcut 'T') is used to add text to your designs. You can create horizontal or vertical text, or even type along a custom path. Font properties, size, color, and alignment are all adjustable in the options bar. Text layers in Photoshop are inherently vector-based, ensuring scalability. Advanced typography effects can be achieved through warping text or applying layer styles like drop shadows and glows.
Navigation and Measurement Tools: Exploring Your Canvas
The Hand Tool (shortcut 'H') allows you to pan across large images, and double-clicking it fits the image to the screen. The Rotate View Tool (shortcut 'R') lets you rotate the canvas for a more comfortable working angle. The Zoom Tool (shortcut 'Z') magnifies or reduces the view of your image, with options for scrubby zoom enabling drag-based zooming. The Eyedropper Tool (shortcut 'I') samples colors from your image to set foreground or background colors, crucial for precise color matching.
Other Essential Tools
- Clone Stamp Tool (S): Copies pixels from one area to another, ideal for duplicating elements or removing blemishes with precision.
- Eraser Tools (E): Remove pixels from an image, with variations like the Background Eraser and Magic Eraser for targeted removal.
- Gradient Tool (G): Creates smooth color transitions between two or more colors.
- Paint Bucket Tool (G): Fills contiguous areas of similar color with a solid color.
- Dodge Tool (O): Lightens areas of an image.
- Burn Tool (O): Darkens areas of an image.
- Blur Tool: Softens edges and reduces detail.
- Sharpen Tool: Enhances edges and details.
- Smudge Tool: Blends pixels together, simulating a smudging effect.
Customizing Your Photoshop Workspace
Photoshop's interface is highly customizable to suit individual workflows. The toolbar itself can be switched between single and double-column views using the double-arrow icon at the top. You can rearrange tools, add hidden tools, or remove unused ones by accessing the Edit > Toolbar menu. Creating multiple toolbar presets allows you to switch between configurations optimized for different tasks, such as photo retouching or graphic design.
Keyboard shortcuts are indispensable for efficient workflow. Most tools have single-letter shortcuts (e.g., 'V' for Move, 'M' for Marquee, 'B' for Brush). Holding Shift with a tool's shortcut can cycle through related grouped tools. "Spring-loaded" shortcuts allow you to temporarily switch tools by holding down a key, returning to your previous selection upon release.
Palettes, such as Layers, Adjustments, and History, group related tools and controls. These can be docked, floated, or hidden to create a personalized workspace. The History Palette, in particular, is vital for non-destructive editing, allowing you to revert to previous states of your image.
Layers: The Foundation of Non-Destructive Editing
The concept of layers is central to Photoshop's power. Imagine stacking transparent sheets of glass, each with a different image or element. Changes made to one layer do not affect others, providing immense flexibility for editing and experimentation. You can edit, move, hide, or delete individual layers without impacting the rest of the composition. The Layers Palette is where you manage these sheets, allowing you to rename them, group them into sets for organization, adjust their opacity, and apply layer styles for effects like drop shadows or glows.
Color Adjustments and Image Enhancements
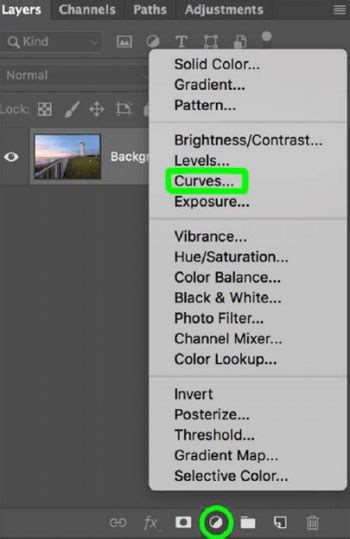
Photoshop provides a comprehensive suite of tools for color correction and image enhancement, accessible through the Adjustments Palette (Window > Adjustments).
- Brightness/Contrast: A straightforward adjustment for altering the overall lightness and darkness, and the difference between light and dark areas. The "Auto" button attempts to optimize these settings automatically.
- Color Balance: Allows you to adjust the color cast of an image by shifting the balance of cyan/red, magenta/green, and yellow/blue in the shadows, midtones, and highlights.
- Curves: A more advanced yet incredibly versatile tool. The curve represents the tonal range of an image, from black (bottom left) to white (top right). By adding points to the curve and manipulating them, you can precisely control brightness and color balance across the black point, shadows, midtones, highlights, and white point. You can even click and drag directly on specific areas of the image to adjust their corresponding tonal values on the curve.
Saving Your Work
Saving your work is crucial, both at the start and routinely throughout the editing process. The format in which you save depends on the intended use of the image. For web graphics, common formats include JPEG, GIF, and PNG. For ongoing Photoshop work, saving as a .PSD file preserves layers and editing capabilities. When saving for other purposes, choose formats like JPEG for photographic images (offering good compression), GIF for simple animations or images with limited colors, and PNG for graphics requiring transparency or lossless quality. The "Save As" dialog box allows you to name your file, select the correct format, and choose the save location.
Photoshop stands as the industry standard for image editing and graphic design, a testament to its powerful tools and flexible workflow. Mastering these elements, from the fundamental selection tools to advanced layer management and color adjustments, empowers users to bring their creative visions to life with unparalleled precision and artistic control.