Adding the right music to your video in DaVinci Resolve editing software is a powerful way to enhance its emotional impact and professional polish. Whether you're crafting a YouTube vlog, a captivating short film, or a compelling branded promo, the judicious use of audio can transform a good video into a great one. This guide will walk you through the entire process of incorporating music into your DaVinci Resolve projects, from basic import to advanced adjustments, ensuring your final output is both sonically rich and visually engaging.
DaVinci Resolve is a professional-grade video editor renowned for its advanced capabilities, including a robust audio suite. While it may appear daunting to newcomers, understanding its audio features unlocks a new level of creative control. This article aims to demystify the process, making it accessible for creators of all levels.
Importing Your Media and Music Files
The first crucial step in any editing workflow is getting your assets into the project. DaVinci Resolve supports a wide range of audio formats, including MP3, WAV, and AIFF, with WAV files being recommended for their uncompressed, high-quality sound.
To import your media:
- Launch DaVinci Resolve and open your existing project or create a new one.
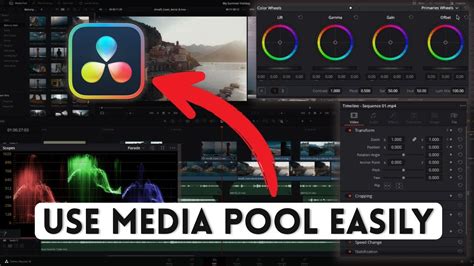
- Navigate to the Media Pool, typically located in the top-left corner of the interface.
- Right-click within the Media Pool panel and select Import Media. Alternatively, you can use the keyboard shortcut
Ctrl+I(Windows) orCmd+I(Mac). - Browse your computer for the video clips and audio tracks you wish to use, select them, and click Open.
Your imported files will now appear in the Media Pool, ready to be added to your project timeline. For larger projects, it's highly recommended to organize your files into bins (folders) within the Media Pool. This practice keeps your project tidy and streamlines the editing process, especially when dealing with numerous clips and audio tracks.
Adding Music to the Timeline
Once your media is imported, you can begin constructing your project on the timeline. The Edit page is where most of your timeline-based video editing takes place.
- Ensure you are on the Edit tab, accessible via the bottom navigation bar.
- Locate your desired music file in the Media Pool.
- Drag and drop the music file directly onto your project timeline. It’s generally best to place audio tracks below your video clips.
- DaVinci Resolve will automatically place the audio on Audio Track 1 (A1). If you need additional audio layers for music, sound effects, or voiceovers, you can create new audio tracks by right-clicking in the audio track area and selecting Add Track.
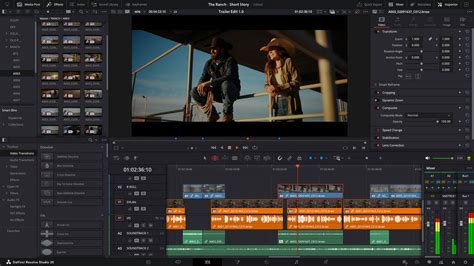
You can add multiple audio files to the same track or distribute them across different tracks, allowing you to build a rich and layered soundscape. Your audio clips will appear as visual waveforms on the timeline, making it easier to sync them with your video content.
Adjusting Timing, Volume, and Fades
With your music track in place, the next step is to refine its integration with your video. DaVinci Resolve offers intuitive tools for fine-tuning audio.
Timing and Synchronization
- Aligning: Drag the music clip left or right on the timeline to synchronize its key moments with specific actions or visual cues in your video.
- Trimming: To adjust the start or end of a music clip, hover over its edges until a trimming indicator appears. Click and drag to shorten or lengthen the clip.
Volume Control
- Basic Adjustment: A horizontal white line runs across each audio clip on the timeline. You can click and drag this line up or down to increase or decrease the clip's overall volume.
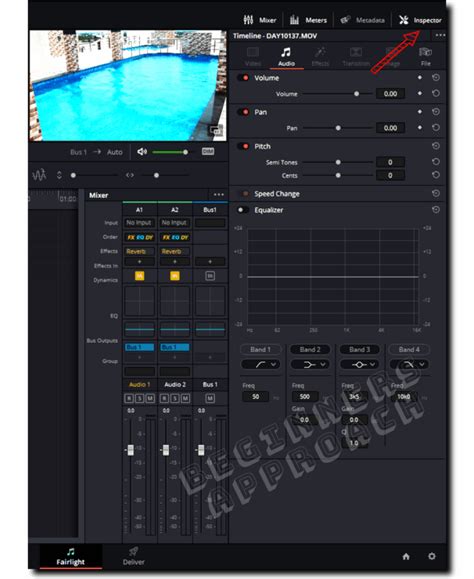
- Inspector Panel: For more precise control, select the audio clip. Then, open the Inspector panel (usually found in the top-right corner of the interface). Here, you can adjust the volume level and fine-tune the audio mix.
- Fairlight Panel: For advanced audio mixing, navigate to the Fairlight tab (bottom navigation bar). This dedicated Digital Audio Workstation (DAW) offers comprehensive tools for audio editing and mixing, including individual track volume controls within the mixer panel.
Creating Fades
Fades are essential for smooth transitions between audio elements, preventing abrupt starts or stops.
- Manual Fade Handles: Hover over the beginning or end of an audio clip on the timeline. Small fade handles will appear. Click and drag these handles to create a gradual fade-in (at the start) or fade-out (at the end) effect.
- Keyframes: For dynamic volume changes over time, use keyframes. In the Inspector panel, next to the volume control, you'll find a keyframe button. Set a keyframe at the desired point in time, move the playhead to another point, and adjust the volume. DaVinci Resolve will automatically create a smooth transition between these keyframes, allowing for nuanced volume automation, such as lowering music under dialogue.
Where to Find Copyright-Safe Music
A common concern for creators is the use of copyrighted music, which can lead to copyright strikes or monetization issues on platforms like YouTube. Fortunately, there are excellent resources for royalty-free and copyright-safe music.
Thematic is a platform specifically designed for creators, offering a vast library of free, copyright-safe music tracks curated for various video projects. Signing up for a free account on Thematic allows you to use their music in your videos, including sponsored or branded content, without worrying about copyright claims. This ensures your content remains legally compliant while sounding professional.
Advanced Audio Editing in DaVinci Resolve: The Fairlight Page
While the Edit page provides basic audio manipulation, the Fairlight page is DaVinci Resolve's integrated Digital Audio Workstation (DAW). This is where you can dive deep into professional audio engineering.

The Fairlight page offers a comprehensive suite of tools, including:
- Advanced Mixing: Detailed control over individual track levels, panning, and routing.
- Equalization (EQ): Shape the tonal characteristics of your audio by boosting or cutting specific frequencies. You can access the EQ by double-clicking the EQ graph in the track's mixer strip.
- Compression: Control the dynamic range of your audio, making quiet parts louder and loud parts quieter for a more consistent sound. Access compression by double-clicking the Dynamics graph in the mixer strip.
- Spatialization: Adjust the stereo field of your audio, panning it left or right, or widening/narrowing its stereo image. This is done via the Pan graph in the mixer strip.
- Effects and Plugins: Apply a wide range of built-in audio effects or integrate third-party VST/AU plugins for even more creative possibilities. You can manage these in the Preferences under the System > Audio Plugins section.
- Recording: Arm tracks for recording directly within DaVinci Resolve, allowing you to capture voiceovers or other audio directly into your project.
DaVinci Resolve's Fairlight Page for COMPLETE NOOBS!
While the Fairlight page is incredibly powerful, its advanced nature can be overwhelming for beginners. It's recommended to explore its features once you're comfortable with the basic editing and mixing on the Edit page.
Frequently Asked Questions About Using Music in DaVinci Resolve
Is DaVinci Resolve Free?
Yes, DaVinci Resolve offers a robust free version that includes all the essential tools for video editing, color grading, and audio mixing, including the ability to add music. For advanced features like 3D tools or multi-user collaboration, a paid upgrade to DaVinci Resolve Studio is available.
What Audio Formats Work in DaVinci Resolve?
DaVinci Resolve supports most common audio formats, including WAV, MP3, AAC, and AIFF. For the highest audio fidelity, WAV files are recommended.
Can I Use Copyrighted Music in DaVinci Resolve?
You can use copyrighted music in DaVinci Resolve projects, but you must secure the proper licensing for each song. Using unlicensed music without permission can lead to copyright infringement issues, including content takedowns and loss of monetization. For a risk-free approach, utilize copyright-safe music platforms like Thematic.
Why Can't I Hear My Music in the Timeline?
Several factors could cause this:
- Muted Track: Ensure the audio track containing your music is not muted. Look for a mute button (often indicated by an 'M') on the track header.
- System Sound Routing: Verify that your computer's audio output is correctly routed to your speakers or headphones.
- File Placement: Confirm that the music file is placed on an active audio track and not overlapping with other muted or disabled clips.
- Volume Levels: Check that the volume of the audio clip and the master output are not set too low.
Can I Adjust Music Volume in DaVinci Resolve?
Absolutely. You can adjust the volume using the horizontal line on the audio clip in the timeline, the Inspector panel, or the detailed controls within the Fairlight page's mixer.
Can I Add Multiple Songs to One Video?
Yes, you can add as many songs as your project requires. Simply drag each music file onto the timeline and arrange them as needed, either sequentially or layered.
Does DaVinci Resolve Include Built-in Music or Sound Effects?
DaVinci Resolve does not come with a built-in music library. However, it seamlessly supports importing any external audio files you download, making it easy to use music from sources like Thematic.
Editing and Trimming Audio Clips
Beyond adding music, effectively editing and trimming audio is crucial for a polished final product.
Trimming the End of an Audio Track
To remove unwanted sections from the end of an audio clip:
- Disable Snapping: Click the snapping tool icon at the top of your timeline to turn it off. This allows for more precise edits.
- Hover and Drag: Move your mouse cursor over the right edge of the audio clip in the timeline until it changes to a trim indicator.
- Trim: Click and drag the edge inwards to shorten the clip to your desired length.
Using In and Out Points for Precise Edits
For more controlled trimming:
- Set In Point: Move the playhead to where you want the audio clip to begin and press the 'I' key on your keyboard.
- Set Out Point: Move the playhead to where you want the audio clip to end and press the 'O' key.
- Trim: With these in and out points set, you can then trim the clip precisely to that selection. Using the zoom tool can help ensure accuracy.
Trimming Space Between Clips
If you have multiple audio clips on your timeline and need to remove the space between them:
- Disable Snapping: Turn off the snapping tool.
- Select Gap: Hover your cursor over the gap between the two clips until it changes to an arrow icon.
- Trim: Click and drag to reduce the gap.
Final Thoughts
Integrating music into your DaVinci Resolve projects is a straightforward yet impactful process. By following these steps, you can enhance the emotional resonance and professional quality of your videos, ensuring they capture and hold your audience's attention. Leveraging tools like DaVinci Resolve for editing and resources like Thematic for music ensures a streamlined workflow that is both creative and legally compliant. The ability to add music, adjust its nuances, and export a polished final product empowers creators to produce content that truly stands out.