Photographers frequently use motion blur to take their work to the next level. This technique works by setting longer exposure times. Motion blur can showcase movement and action within your shot in unique ways and add depth - so knowing when and how to apply it correctly is a must for every creative artist. This guide will explain how to add motion blur in Photoshop, the industry's leading digital photography-editing software, so without further ado, let's get right into it.
Understanding the Essence of Motion Blur
The motion blur effect occurs when a photographer uses a longer shutter speed to capture a moment from the real world. This means their camera's sensor will be exposed to light a bit longer than usual, so if an object is in motion during that time, it will come off as blurry in the final image. If you want a crisp image and to avoid getting any motion blur while taking the photograph, you should set your device's exposure time (shutter speed) to as fast (shorter exposure) as possible.
So, to conclude:
- Using a fast shutter speed (minimal exposure) means your sensor is exposed to light for a much shorter period, which results in "crispier" photography that represents the fraction of that moment much more accurately. This means no motion blur, as the camera captures the image so quickly that you can see the smallest detail as if it were frozen in time.
- Using a slower shutter speed (longer exposure) means your sensor is exposed to light longer, resulting in a more "drawn-out" photography that represents "multiple fractions" of that moment, therefore allowing any objects in motion during that time to appear blurry, smeared, or leave a trail, also known as "motion blur streaks" (car lights on a highway, lights on a Ferris wheel, etc.).
Give an object within your photo the appearance of quickness by applying the motion blur effect. Click Filter > Blur > Motion Blur to apply the effect, then manually adjust the Angle based on the object’s direction of movement. For a larger blur amount, adjust the Distance.
Adding Motion Blur with Photoshop's Built-in Tools
Here's how to do it step by step if you're new to photo editing in Adobe Photoshop.
Opening Your Image
To add motion blur to an image in Adobe Photoshop, you first need to open the software, create a new project (or use an existing one, but we recommend creating a new one for testing purposes) and import the image. So, load up Photoshop, click File > Open and double-click on the image you wish to add motion blur to from your Desktop or another location. This will import it into the program and then it's ready to be worked on.
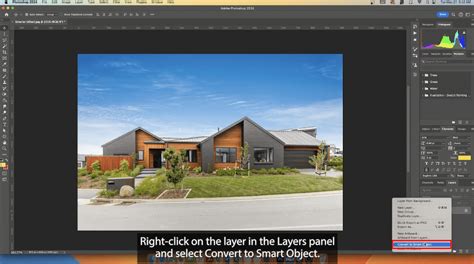
Preparing Your Layer for Editing
Before you can create motion blur for your image, it's best practice to convert your layer to a Smart Object. To do this, click on the image within the "Layers" section, then choose Convert to Smart Object. Now you can add effects to the entire image and modify it as you wish without changing or "damaging" the original background layer. You can also use the traditional way, which is just making a duplicate layer and working on it to keep the original one safe. Duplicating the background layer is achieved by clicking on the image within the "Layers" panel, then using the CTRL + J shortcut on your keyboard to duplicate it, or by right-clicking the original layer and choosing "duplicate layer." This ensures you have a safe copy to work on and revert changes if needed, allowing you to work on the image carefree.
Applying the Motion Blur Effect
From the top-bar menu in Photoshop, click "Filter," then hover with your cursor over the "Blur" category to expand the options menu, and finally, choose Motion Blur. This will add motion blur to your image, and you'll be immediately able to tell the difference by comparing it with the original photo. The process is the same if you wish to experiment with other effects, like the Radial or Gaussian Blur.
Fine-Tuning the Motion Blur Parameters
Now the only thing left is to modify the parameters of this Adobe Photoshop motion blur filter and get the result you need for the photo. The "Distance" slider will determine how strong the motion blur is, and the "Angle" will change the direction of the motion blur, so you can use this to fake the effect of someone driving downhill or falling off a cliff. To get the most natural motion blur look, match the angle with the movement of the object within your shot. That's all there's to it!
Exploring Advanced Blur Techniques in Photoshop
Photoshop offers a diverse range of blur filters that cater to various artistic needs. When working with blur in Photoshop, you can create greater depth and control in your images by manipulating depth of field and implementing techniques such as layer masks and texture adjustments.
The Blur Gallery: Beyond Simple Motion Blur
Photoshop's Blur Gallery provides an even more sophisticated approach to creating blur effects, especially when aiming for realism or specific artistic styles. There are several options within the Blur Gallery to choose from, each offering unique capabilities.
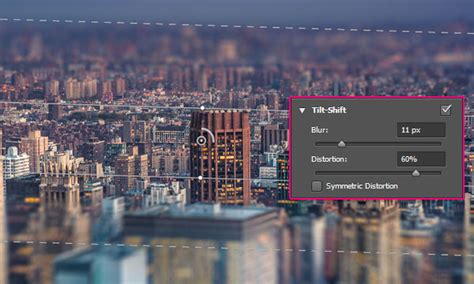
Tilt-Shift Blur for Miniature Effects
The Tilt-Shift Blur is excellent for simulating the look of tilt-shift photography, often used to create a miniature effect. To use it, duplicate your image layer (Control/Command-J) as a backup. Then, go to Filter > Blur Gallery > Tilt-Shift. You can click on the canvas to add a new focal point, and the original focal point will stay and interact with the newly placed point. This allows you to define areas of sharpness and then fade to a blur at the edges, creating a selective focus effect.
Field Blur for Gradient Blurring
Field Blur allows you to build a gradient of blurs across your image by defining multiple blur points with different amounts of blur. The final result is a combined effect of all these blur pins on the image. You can place a Field blur pin on the image and drag the blur handle to increase or decrease the blur. This is useful for subtly blurring specific areas while keeping others sharp.
Iris Blur for Shallow Depth of Field
The Iris blur simulates a shallow depth-of-field effect, irrespective of the camera or lens used. The default Iris blur pin is placed on the image, with a sharp area in the center, a fade area, and then the blurred region. You can drag the blur handle to increase or decrease the blur. This is a fantastic tool for isolating a subject and making the background appear naturally out of focus.
Path Blur for Directional Movement
Using the Path Blur effects, you can create motion blurs along defined paths. You can also control the shape and amount of blurring. In the Blur Tools panel, under the Path Blur section, you can specify whether you want to apply a Basic Blur or a Rear Sync Flash blur. Adjust the Speed slider to specify the amount of path blur you want to apply to the image, and adjust the taper slider for a tapering effect. Optionally, adjust the blur shape guides. Using the controls, you first define a path for the blur (typically shown in blue). You can then define a curve for the path, thereby creating new curve points in the path. Opt/Alt-click an endpoint to view the red blur shape guides. Opt/Alt-click a curve point along the blur path to convert it into a corner point.
Easy Motion Path Blur in Photoshop
Spin Blur for Rotational Effects
The Spin Blur effect allows you to rotate and blur the image around one or more points. The spin blur is a radial blur measured in degrees. In the Blur Tools panel, under the Spin Blur section, use the Blur Angle control to vary the amount of blurring. You can either specify an angular value (0-360°) or adjust the slider. You can also determine how much blurring is displayed between strobe flash exposures.
Incorporating Noise for Realism
Sometimes, after applying a Blur Gallery effect, the blurred area of the image might look synthetic or unnatural. To combat this, you can add noise. In the Blur Effects panel, on the Noise tab, ensure that the checkbox in the top-right corner is selected. You can then adjust the Amount, Roughness, Color, and Highlight settings to match the noise with the non-blurred areas of the image, making the blur appear more integrated and realistic.
Utilizing Layer Masks for Selective Blurring
If you don't want the motion blur you just added to apply to the entire image, you can use layer masks. After applying a blur effect, you can add a layer mask to the layer. Then, use a soft white round brush to mask back in any areas you want the blur to be applied to, or a black brush to reveal the blur. This allows for precise control over where the blur effect is visible, enabling you to draw attention to your subject while softening the background. To create a blurred background and keep the subject sharp, first select your subject using tools like the Quick Selection tool. Refine its edges and then create a layer mask on a duplicated layer. You can then apply a blur effect to the background.
Leveraging Third-Party Plugins for Enhanced Effects
While Photoshop's built-in tools are powerful, third-party plugins can offer even more specialized and advanced blur capabilities.
Boris FX Optics: A Professional Solution
Adding motion blur in Photoshop is relatively simple. Adding motion blur with the help of a renowned plug-in is even better. For this task, we recommend Optics by Boris FX. It uses the same effects from their industry-leading Sapphire package. Optics contains a blur image effect that you can use in Photoshop. There's a free trial version available for Optics, and it comes both as a standalone software or a plug-in if you prefer having all tools in one place.
Download it, install it, and load up Photoshop (or Lightroom). After inserting the image into Photoshop and duplicating the background layer, launch Optics by clicking "Filter" and then hovering over "Boris FX" and choosing "Optics." Within Optics, use the search bar to type in "Motion" and choose the "S_BlurMotion" effect from the list. You can select a preset from the left-side Presets panel or customize it further using the myriad of settings available in the "Parameters" section on the right side. Simply move the sliders and you'll preview the motion blur changes in real-time. When done, click Apply in the bottom-right corner, and the effect will be saved on your image.
Creating Layer Masks within Optics
Optics also offers built-in tools to easily create layer masks and isolate specific objects or areas within your shot. To do this, click on "Add Mask" within the Optics panel, then choose your preferred method of adding a mask. After creating the layer mask, make sure the effect is applied to it, then choose to merge layers if you have multiple for better organization.
Understanding Different Blur Types in Photoshop
Photoshop offers several types of blur effects, each with its unique application and characteristics.
- Gaussian Blur: This is a widely used blur filter for softening edges, reducing noise, and blending elements. It creates a natural blur based on a bell-shaped curve, making the effect more intense near the epicenter.
- Box Blur: Similar to Gaussian Blur, but it focuses on edges in an image to retain more detail. It identifies edges created by contrasting colors.
- Lens Blur: This filter mimics a shallow depth of field and uses a depth map to determine pixel positioning. You can control the blur detail and choose different aperture shapes, such as triangular or hexagonal.
- Motion Blur: As discussed, this simulates movement in a static photograph by applying a blur along a specific angle.
- Radial Blur: This creates a sense of rotation or movement around a central point, much like paint being thrown from the center of a spinning canvas. You can set the point of rotation and choose between a spin or zoom effect.
- Shape Blur: This filter allows you to form your own shapes for the blur, providing more control over the blur's appearance.
Practical Applications and Creative Considerations
Blur effects are commonly used to create a sense of depth, enhance focus, or simulate the natural limitations of certain camera lenses. They help highlight subjects while artistically blurring less significant areas.
- Depth of Field: Altering the depth of field is a popular method to improve image composition and emphasize the subject.
- Adding Movement: Motion blur can add a sense of speed to static objects or people.
- Softening and Smoothing: Blur can be used to soften harsh edges, reduce noise, or blend elements for a smoother appearance.
- Artistic and Stylistic Effects: Blur can create dreamy, vintage, or abstract looks, adding an artistic touch to photographs.
When working with blur effects, it's important to find a balance. Too much detail in the blurred areas might detract from the subject, while too little can make the image appear flat. Experimentation is key; test each filter on the same image to understand its nuances and how it affects your specific photograph. The blur tool itself allows you to manually paint a blur effect onto specific areas, offering granular control.
By mastering these techniques, you can effectively use blur in Photoshop to create more impactful, dynamic, and visually appealing images, enhancing both the technical quality and artistic expression of your photography.