For those new to the powerful selection capabilities within Adobe Photoshop, understanding the foundational tools is paramount. The Rectangular Marquee Tool and the Elliptical Marquee Tool, collectively known as Photoshop's geometric selection tools, are indispensable for drawing precise selection outlines in either rectangular or elliptical shapes. This tutorial will guide you through the process of making selections with these fundamental tools, and crucially, demonstrate how to combine basic selections into more complex, nuanced shapes. While this tutorial uses Photoshop 2022, the principles and techniques apply to any recent version of the software.
Locating and Understanding the Marquee Tools
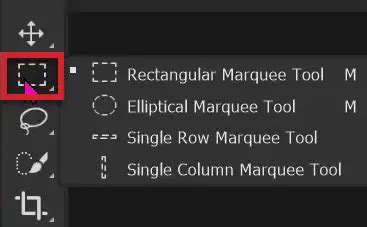
The Rectangular Marquee Tool and the Elliptical Marquee Tool reside together in the Photoshop toolbar, positioned directly below the Move Tool. To access the Elliptical Marquee Tool, you typically need to click and hold on the Rectangular Marquee Tool's icon. Also present in this group are the Single Row Marquee Tool and the Single Column Marquee Tool, which, as their names suggest, select only a single row or column of pixels, respectively.
A convenient aspect of these tools is their shared keyboard shortcut: the letter 'M'. To toggle between the Rectangular and Elliptical Marquee Tools, you can hold down the Shift key on your keyboard while pressing 'M'. This allows for rapid switching between these two essential selection methods.

The core functionality of the Rectangular and Elliptical Marquee Tools is remarkably similar. The fundamental difference lies in the shape of the selection they create: one draws rectangular outlines, while the other draws elliptical ones. We will begin by exploring the basic operations of these tools, using a plain white background to ensure the selection outlines, often referred to as "marching ants," are clearly visible.
The Rectangular Marquee Tool: Precision in Rectangles and Squares
The Rectangular Marquee Tool is your go-to for creating rectangular or square selection outlines.
Drawing Basic Selections
To draw a freeform rectangular selection, simply click and drag with the Rectangular Marquee Tool. The resulting selection will be immediately visible as a moving dashed line, the "marching ants."
If you click and drag inside an active selection, you will notice that you are moving the outline itself, not the pixels contained within it. This is because you are still using a selection tool. To actually move the pixels, you would need to switch to the Move Tool.
A helpful technique for repositioning the selection outline while you are drawing it is to hold down the spacebar on your keyboard. This allows you to drag the outline to a more suitable location before releasing the mouse button.
Deselecting and Starting Anew
When you have finished with a selection outline, you can remove it by navigating to the Select menu in the Menu Bar and choosing Deselect. Alternatively, you can use the keyboard shortcut: Ctrl+D on a Windows PC or Command+D on a Mac.
Drawing from the Center
By default, selections are drawn from a corner outwards. However, you can draw a selection outward from its center. To achieve this, start dragging with the tool, then hold down the Alt key on a PC or the Option key on a Mac, and continue dragging.
Creating Perfect Squares
To draw a selection as a perfect square, begin dragging with the Rectangular Marquee Tool. Then, hold down the Shift key on your keyboard and continue dragging. It is crucial to release your mouse button before releasing the Shift key. Releasing the key first would revert the square back into a freeform rectangle.
Controlling Selection Size and Ratio
By default, the Rectangular Marquee Tool allows for freeform selections at any size or aspect ratio. This is because the Style option in the Options Bar is set to Normal.
- Fixed Ratio: If you need a specific aspect ratio, select
Fixed Ratiofrom theStyledropdown. You can then enter the desired ratio into theWidthandHeightfields. A ratio of 1:1 will produce a perfect square. For example, setting the Width to 4 and the Height to 6 will create a selection with a 4x6 ratio. - Fixed Size: For precise dimensions, choose
Fixed Sizefrom theStyledropdown. Enter your desired width and height values in pixels, inches, or your preferred measurement unit. Once these values are set, a single click in your document will instantly create a selection outline of that exact size. You can then click and drag to reposition this fixed-size selection.
Combining Selections: Building Complex Shapes
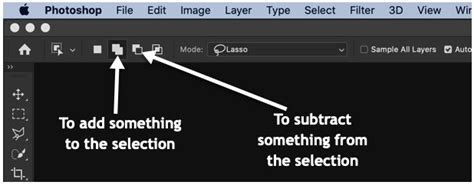
Photoshop's selection tools are most powerful when used in combination. You can create intricate selections by merging or subtracting from existing ones. The Options Bar provides four crucial icons for managing selections:
- New Selection: This is the default mode, where each new drag creates a fresh selection, discarding any previous ones.
- Add to Selection: This mode allows you to add new areas to an existing selection. To activate this, you can either click the icon or, more efficiently, hold down the
Shiftkey while drawing your next selection. A small plus sign will appear next to your cursor, indicating that you are adding to the active selection. The areas to be added do not need to overlap the existing selection. - Subtract from Selection: This mode enables you to remove areas from an existing selection. The shortcut is to hold down the
Altkey on a PC or theOptionkey on a Mac. A minus sign will appear next to your cursor. Releasing the mouse button after drawing will subtract the selected area. - Intersect with Selection: This option retains only the area where the new selection overlaps with the existing selection. The shortcut for this is
Shift+Alton a PC orShift+Optionon a Mac, indicated by a small 'x' next to your cursor.
It's important to note that the selection mode icons in the Options Bar are "sticky," meaning they remain active until you manually choose a different one. Using the keyboard shortcuts (Shift for Add, Alt/Option for Subtract, Shift+Alt/Shift+Option for Intersect) is often more efficient as they are temporary modifiers.
The Feather Option: Softening Edges
The Feather option in the Options Bar adds a soft, blurred edge to your selection. However, a critical limitation is that the Feather value must be set before you draw the selection; changing it afterward has no effect. If you are unsure of the exact feather amount needed, it's often best to leave this value at 0 and apply feathering later using other methods, which we will explore with images. For most initial selections, leaving Feather at 0 is advisable.
Practical Applications of the Rectangular Marquee Tool
Cropping Images
While Photoshop offers a dedicated Crop Tool with advanced features, the Rectangular Marquee Tool can be used for quick cropping. Drag a selection outline around the area you wish to keep, and Photoshop will effectively crop away everything outside this selection.
Tips and Techniques for Cropping in Photoshop
A useful tip when defining a crop area: if your initial selection isn't quite right, you don't need to start over. You can simply drag any of the handles of the selection outline to resize it. By default, the aspect ratio is locked, meaning that resizing one handle affects all others proportionally.
Understanding Layer Behavior with Selections
When you drag inside a selection with a selection tool, you move the selection outline. However, if you were to move the selection on a Background layer and Photoshop needed to reveal the area beneath, it would fill the gap with your current background color, as Background layers do not support transparency. To avoid this, it's best practice to copy the selection to its own layer. Go to the Layer menu, choose New, and then Layer via Copy. This creates a new layer containing only your selected area, surrounded by transparency.
Non-Destructive Editing with Layer Masks
Selections can also be converted into layer masks, a powerful non-destructive editing technique. When you create an adjustment layer above your image and use a selection to define its mask, the selection outline dictates which parts of the image the adjustment will affect. White on a layer mask reveals the layer's content (or the effect of an adjustment layer), while black conceals it. Inverting a layer mask can be necessary to achieve the desired outcome. Feathering a layer mask replaces hard edges with smooth, gradual transitions.
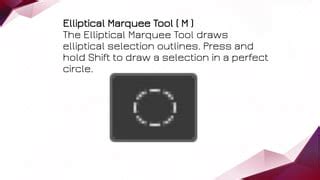
The Elliptical Marquee Tool: Ovals and Circles with Ease
The Elliptical Marquee Tool operates in a manner virtually identical to its rectangular counterpart, with the sole distinction being its ability to create elliptical selection outlines.
Drawing Ovals and Circles
To draw an oval selection, click and drag from the desired starting point. Releasing the mouse button completes the selection. Like the Rectangular Marquee Tool, you can reposition an elliptical selection by clicking and dragging inside the outline. To remove the selection, use Select > Deselect or the Ctrl+D / Command+D shortcut.
To create a perfect circle, begin dragging with the Elliptical Marquee Tool, then hold down the Shift key while continuing to drag. To draw a circle from its center outward, hold down the Alt key (PC) or Option key (Mac) after you start dragging. Combining both Shift and Alt/Option allows you to draw a perfect circle from its center.
Tool Options for Elliptical Selections
The Options Bar for the Elliptical Marquee Tool mirrors that of the Rectangular Marquee Tool, with one addition:
- Anti-alias: This option applies a slight blur to the selection edges, preventing them from appearing jagged or pixelated. It's particularly useful for creating smoother, more natural-looking selections.
The New selection, Add to selection, Subtract from selection, and Intersect with selection options function identically to their counterparts with the Rectangular Marquee Tool.
The Style option also works the same:
- Normal: Allows for freeform elliptical selections of any size or aspect ratio.
- Fixed Ratio: Constrains the selection to a specific height-to-width ratio. A 1:1 ratio will result in a perfect circle.
- Fixed Size: Allows you to click once in the document to create an elliptical selection of a precise, predefined size. Remember to reset the
StyletoNormalwhen you are finished with fixed dimensions to avoid unintended constraints on future selections.
The Feather option behaves as described previously, affecting the softness of the selection edges, and should ideally be set before drawing. For most scenarios, leaving Feather at 0 is recommended.
Advanced Uses of the Elliptical Marquee Tool
Elliptical Cropping and Transparency
While the Rectangular Marquee Tool can be used for cropping, using the Elliptical Marquee Tool for this purpose yields a different result. If you select an elliptical area and then crop, Photoshop will still crop to a rectangle defined by the outermost points of your elliptical selection, not the ellipse itself. To achieve an elliptical crop where the area outside the selection becomes transparent, you'll need to:
- Ensure your image is on a regular layer (not a
Backgroundlayer) by clicking the lock icon. - Invert your selection (
Select > Inverse). - Delete the selected area.
Alternatively, to truly crop to an elliptical shape with transparency, you might use the Trim command (Image > Trim) after creating an elliptical selection and inverting it, specifying Transparent Pixels.
Creating Vignettes
The Elliptical Marquee Tool is excellent for creating classic vignette effects. By drawing an oval selection around the subject and then feathering it significantly, you can create a smooth transition between a darkened or lightened edge and the central focus of the image. This is often done on a separate layer filled with a solid color (e.g., white for a light vignette, black for a dark one), with the central area then deleted or masked out.
Applying Strokes and Effects
You can add visual elements like strokes around elliptical selections. By creating an elliptical selection, converting it to a layer via copy, and then applying a stroke layer style, you can outline the selected area with a chosen color and thickness.
Masking and Isolating Areas
The Elliptical Marquee Tool is invaluable for isolating specific circular or oval elements within an image, such as a moon, a face, or a decorative element. This isolation can then be used for targeted adjustments, compositing, or applying effects.
Combining Tools for Complex Selections
The true power of these tools is unlocked when combined. For instance, you can create a ring shape by drawing a large circle, then holding Alt/Option and drawing a smaller circle inside it to subtract the inner area. Similarly, you can combine rectangular and elliptical selections using the Shift and Alt/Option keys to construct highly customized shapes.
For example, to select a shape that is a circle with a rectangle attached:
- Use the Elliptical Marquee Tool with
Shiftto draw a perfect circle. - Hold down
Shiftto activate "Add to Selection." - Switch to the Rectangular Marquee Tool (or use
Shift+Mto toggle). - Draw a rectangle that overlaps or connects to the circle.
This demonstrates how even basic geometric tools can be orchestrated to achieve complex selection outcomes, which can then be used for tasks like removing backgrounds, isolating objects, or creating intricate compositions. The ability to combine these selection types, alongside other selection tools like the Lasso tools, forms the bedrock of advanced image manipulation in Photoshop.
Conclusion: A Foundation for Image Editing
The Rectangular Marquee Tool and the Elliptical Marquee Tool, though seemingly simple, are fundamental to mastering Photoshop. Their straightforward functionality for creating geometric selections, coupled with their ability to be combined and modified using modifier keys and Options Bar settings, provides a robust foundation for a vast array of image editing tasks. From precise cropping and object isolation to creating sophisticated masks and effects, a thorough understanding of these tools is an essential step in any Photoshop user's journey towards proficiency. As you become more comfortable, you'll discover countless ways to leverage these tools to streamline your workflow and achieve professional-quality results.
tags: #photoshop #elliptical #marquee #tool