When you embark on your photographic journey, one of the most significant decisions you'll make is how to capture your images. While the convenience of JPEGs is undeniable, serious photographers often opt for RAW files, recognizing them as the digital equivalent of undeveloped film. This choice unlocks a world of creative control and image quality that would otherwise remain inaccessible. However, shooting in RAW is only the first step; understanding how to process these files, particularly within a powerful tool like Adobe Photoshop, is crucial to realizing their full potential. This article delves into the intricacies of Photoshop RAW files, explaining what they are, why they matter, and how to leverage them for superior image editing.
The Essence of RAW: Unprocessed Data from Your Sensor
At its core, a camera RAW file is a container for the unprocessed, unadulterated data captured directly by your digital camera's image sensor. Unlike JPEGs, which are processed and compressed within the camera to produce a ready-to-share image, RAW files are essentially digital negatives. Each brand may assign its own proprietary extension to these files (such as .CR2 for Canon, .NEF for Nikon, or .ARW for Sony), but the fundamental principle remains the same: they hold a wealth of information that has not yet been interpreted or altered by the camera's internal processors.
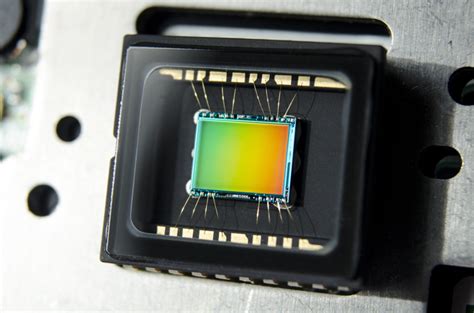
The process begins with the camera's sensor, which uses a Color Filter Array (CFA) to capture analog red, green, or blue light values at each photosite. Subsequently, the camera's Analog-to-Digital (A/D) converter transforms these analog values into digital data. This digital data, however, is still in a "mosaic" of red, green, and blue pixels and requires a process called "demosaicing" to produce full color data for each pixel. RAW files are not finished images; they are the raw ingredients from which an image is constructed.
This unprocessed nature is the source of many of RAW's advantages. For instance, RAW files typically possess a higher bit-depth than JPEGs. While JPEGs are usually 8-bit images (meaning 8 bits of data describe each color component for every pixel), cameras commonly capture 14-bit RAW files. This significantly higher bit-depth translates to a greater range of tonal values and a richer color palette, allowing for more subtle gradations and fewer banding artifacts. Furthermore, RAW files can be either compressed or uncompressed, with most modern cameras employing lossless compression to reduce file size without sacrificing image quality.
The Camera Raw Interface: Your Gateway to RAW Editing
When you open a RAW file in Photoshop, it doesn't immediately present the familiar Photoshop interface. Instead, it launches into a dedicated window known as Adobe Camera Raw (ACR). This is where the magic of RAW processing begins. ACR acts as a powerful raw converter, providing a suite of tools to interpret and manipulate the sensor data before it's even brought into Photoshop's main editing environment.
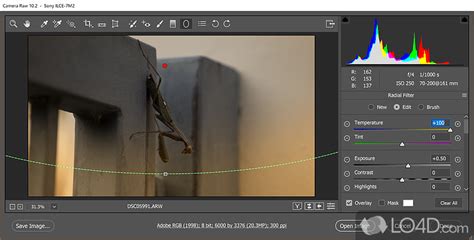
It's crucial to understand that opening a RAW file without engaging with ACR's capabilities means missing out on a vast array of editing opportunities. The non-destructive nature of ACR is one of its most significant benefits. Any adjustments you make within ACR are not applied directly to the original RAW data. Instead, these adjustments are stored as instructions, either within the ACR database, embedded in the file's metadata, or in a separate XMP sidecar file. This ensures that your original RAW data remains intact, allowing you to revisit and alter your edits at any time without degrading the image quality.
Key Adjustments within Camera Raw
ACR offers a comprehensive set of sliders and tools to refine your images. Let's explore some of the most fundamental ones:
Exposure: This is often the first slider encountered and is akin to adjusting your shutter speed or aperture in the camera. It controls the overall brightness of your image, allowing you to brighten dark areas or recover detail in blown-out highlights, often by several stops.
Contrast: This slider governs the relationship between the lighter and darker areas of your photograph. Sliding it to the right increases contrast, making the blacks blacker and the whites whiter, while sliding it to the left reduces contrast, yielding a flatter, softer image. A plus (+) sign appears when increasing contrast, and a minus (-) sign when decreasing it.
Clarity: A powerful tool, Clarity enhances local contrast, making details appear sharper and more defined. It can add a significant "punch" to your photos, but it's essential to use it judiciously, as overdoing it can lead to unnatural-looking results.
Highlights and Whites: These sliders work in tandem to control the brighter areas of your image. The Highlights slider primarily affects the mid-to-high tonal range, while the Whites slider sets the white point of the image, influencing the brightest areas. Adjusting the white point can have a cascading effect on the overall highlights.
Shadows and Blacks: Complementing the highlight controls, the Shadows slider targets the darkest parts of your image, allowing you to bring out detail in underexposed areas. The Blacks slider, conversely, sets the black point, influencing the deepest shadows and providing a wider tonal range adjustment than the Shadows slider.
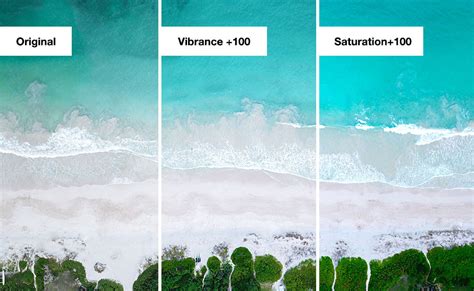
Saturation: This slider affects all the colors in your image equally, increasing or decreasing their intensity across the board. It's important to monitor the entire image while adjusting saturation, rather than focusing solely on a specific detail or zoomed-in portion, to avoid unnatural color shifts. Sliding it all the way to the left will render the image completely black and white.
Vibrance: Similar to saturation, Vibrance also adjusts color intensity, but with a more intelligent approach. It selectively targets less saturated colors, boosting them more than already vibrant ones. This helps to prevent skin tones from becoming overly saturated or unnatural, making it a more nuanced tool for color enhancement. However, like saturation, it can still lead to unnatural colors if pushed too far.
Beyond these core adjustments, ACR offers a wealth of other controls. The "Curve" panel allows for fine-tuning the tonal scale with precision. "Color Grading" provides sophisticated control over hues in shadows, midtones, and highlights using color wheels. The "Optics" panel can correct chromatic aberration, distortion, and vignetting, while the "Geometry" panel addresses perspective and level corrections. You can also access a library of "Premium Presets" for portraits, cinematic looks, travel, and vintage styles, and save your own custom presets for future use.
RAW vs. JPEG: The Unseen Difference
The distinction between RAW and JPEG extends beyond simple file processing. When you shoot in JPEG, the camera applies a series of irreversible processes: white balance, sharpening, color saturation, and contrast are all "baked in." While cameras offer various picture styles or creative effects that can be applied to JPEGs, these settings are embedded in the image data and cannot be easily undone or significantly altered later.

In contrast, RAW files preserve the camera's original sensor data, including all the information about exposure, white balance, and color. The camera may record the chosen settings within the RAW file, but these are merely suggestions for the raw converter. This is why, when you first open a RAW file in editing software, it might look different from how it appeared on your camera's LCD screen. The camera's screen shows a preview that approximates the JPEG output, while the RAW file itself contains the raw data waiting to be interpreted.
The primary advantages of shooting in RAW are:
- Higher Image Quality: RAW files contain more image data, leading to greater detail, a wider dynamic range, and a richer color depth.
- Finer Control: RAW converters allow you to manipulate a far greater range of parameters with much more precision. For example, you can adjust the white balance to any value, not just discrete presets.
- Greater Flexibility in Post-Processing: Large transformations of data, such as significantly increasing the exposure of an under-exposed photo, result in fewer visible artifacts when performed on RAW files compared to JPEGs.
- Non-Destructive Editing: As mentioned, edits made in RAW converters are non-destructive, preserving the original data.
The trade-offs for these benefits include larger file sizes, which consume more storage space on memory cards and hard drives, and the necessity of post-processing. RAW files are not directly viewable or printable without conversion.
The DNG Format: A Move Towards Standardization
The proliferation of proprietary RAW formats has raised concerns among photographers about the long-term accessibility of their images. If a camera manufacturer discontinues support for a particular RAW format, or if the software used to process it becomes obsolete, those valuable RAW files could become inaccessible.
To address this, Adobe developed the Digital Negative (DNG) format. DNG is a non-proprietary, publicly documented, and widely supported format for storing raw camera data. It's based on the TIFF standard and aims to provide a universal RAW format that hardware and software developers can easily support. By converting proprietary RAW files to DNG, photographers can ensure greater compatibility and long-term archival security for their images. Adobe provides a free DNG Converter tool for this purpose, and many cameras now offer DNG as an optional native RAW format.
The Advantages of the DNG File Format | Adobe Lightroom
Opening and Saving RAW Files in Photoshop
To open a RAW file in Photoshop, you typically use Adobe Bridge, which acts as a file browser and management tool. When you select a RAW file in Bridge and click to open it, it will launch into the Camera Raw dialog box. From here, you have several options:
Open Object: Pressing "Open Object" (or simply "Open Image" if Shift is not pressed) will apply your Camera Raw settings and open a copy of the processed RAW file as a Smart Object in Photoshop. The original RAW file remains untouched. Using the Shift key while clicking "Open Image" transforms it into "Open as Smart Object," which is highly recommended for maximum flexibility.
Save Image: This option applies the Camera Raw settings to the images and saves copies in JPEG, PSD, TIFF, or DNG format. You can access further save options by holding down the Alt (Windows) or Option (Mac OS) key, which changes the button to "Save Options."
Done: This button applies the Camera Raw settings but does not open the file in Photoshop. It saves the settings in the Camera Raw database or sidecar file.
When saving processed files from Camera Raw, you can choose from various formats, including DNG, JPEG, TIFF, or Photoshop's native PSD format. Each format has its own advantages depending on your intended use. For example, TIFF is excellent for preserving quality for further editing, while JPEG is ideal for web use and sharing due to its smaller file size.
The Importance of Shooting RAW from the Beginning
For aspiring photographers, the best time to learn to shoot RAW is from the very beginning, before developing ingrained habits with other formats. By starting with RAW, you establish good practices for image capture and post-processing from the outset. This allows you to fully appreciate the benefits of RAW and develop a workflow that maximizes image quality and creative control.
While the initial learning curve might seem steeper, the rewards of shooting and processing RAW files are substantial. It empowers you to extract the maximum potential from your camera's sensor, offering unparalleled flexibility and control over the final image. Whether you're a professional striving for perfection or an enthusiast looking to elevate your photography, understanding and utilizing Photoshop's Camera Raw capabilities is an indispensable skill. The journey from an unprocessed RAW file to a stunning, polished image is a testament to the power of digital photography and the creative possibilities that lie within your camera's data.