In the dynamic world of portrait photography, Adobe Photoshop stands as an indispensable tool, empowering photographers and digital artists to elevate good images into truly great masterpieces. This tutorial embarks on a comprehensive journey through the realm of retouching and enhancement, beginning with a foundational understanding of Photoshop’s robust feature set. As we explore the vast capabilities of this software, we will delve into essential techniques such as layer manipulation, nuanced skin retouching methods, and the intricate tasks of hair and background editing. Adjusting color and tone will emerge as a critical step in our process, ensuring that each portrait effectively conveys the desired mood and aesthetic.
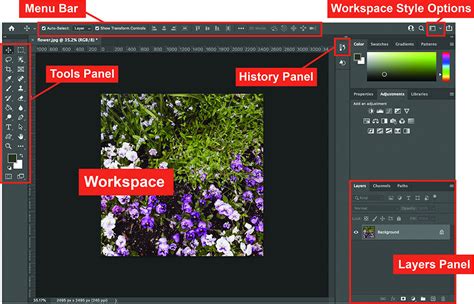
Setting Up Your Photoshop Workspace for Portrait Editing
When we open Adobe Photoshop, our journey in enhancing portrait photography begins. The first crucial step is to ensure our workspace is set up effectively for optimal workflow. Before making any modifications to the image, it is paramount to always duplicate the background layer. This is achieved by pressing Ctrl+J (or Cmd+J on a Mac). This fundamental practice ensures that our original image remains intact, allowing for non-destructive editing. Remember, the key to achieving professional-looking portraits lies in moderation; as we proceed, we will aim to strike a delicate balance between realism and aesthetic improvement.
The Power of Layers in Non-Destructive Editing
When we edit portraits in Photoshop, layers are the very foundation of our workflow. By creating new layers, we isolate adjustments, ensuring that any changes made do not directly affect the original image data. This non-destructive approach provides unparalleled flexibility and control.
New Layer for Imperfection Healing
To address minor imperfections, we can add a new layer and utilize tools like the Spot Healing Brush. This is done non-destructively, as all changes are confined to this new layer, leaving the original image untouched.
Harnessing Layer Masks for Precision
Layer masks are incredibly powerful tools that allow us to apply adjustments and effects to specific areas of an image. For instance, if we are adjusting the skin tone, a layer mask can precisely limit this adjustment to just the skin, leaving other details like hair or clothing unaffected. This granular control ensures that edits are targeted and natural-looking.
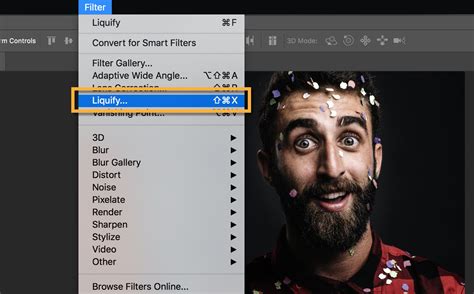
Smart Objects for Transformative Edits
To adjust facial features or apply filters like Liquify without permanently altering the underlying pixels, transforming a layer into a Smart Object is essential. This allows us to apply filters non-destructively. Using layers and masks in conjunction with Smart Objects allows us to maintain the integrity of our work, tweak adjustments on the fly, and ultimately achieve professional results.
Refining Facial Features for Expressive Portraits
In portrait photography, refining facial features is key to creating a memorable and impactful image. The eyes, brows, nose, and mouth all play crucial roles in conveying emotion and character.
Enhancing the Eyes
Eyes are universally recognized as the focal point of any portrait. With the Face-Aware Liquify tool, we gain the ability to subtly enlarge or reduce the size of the eyes, adjust their height, and modify their tilt to convey specific emotions. Even minor adjustments can significantly impact the overall expressiveness of the portrait.
Sculpting the Brows
Brows are critical to facial expression, framing the eyes and influencing the perceived mood of the subject. Subtle adjustments to their shape and arch can enhance the subject's natural character and add depth to their expression.
Subtle Nose Shaping
Adjusting the nose involves delicate shaping to align it with the subject’s natural contours. Using the Face-Aware Liquify tool, we can carefully modify the width of the nose bridge and nostrils to enhance the nose's appearance without distorting the face's overall proportionality. The goal is always to enhance, not to drastically alter.
Defining the Mouth and Lips
The mouth and lips hold significant power in changing the portrait's mood and conveying personality. We can utilize the Face-Aware Liquify tool to refine the mouth's width and height, giving a slight lift to the corners to suggest a smile or adjusting them for other expressions. Precision is key here to maintain a natural appearance.
Achieving Flawless Skin: Retouching Techniques
In portrait photography, skin retouching is a critical step to achieving a polished and professional look in our final images. The objective is to smooth imperfections while preserving the natural texture and character of the skin.
Removing Blemishes with Healing Tools
To remove blemishes, spots, and minor imperfections, we commonly utilize the Healing Brush Tool and the Spot Healing Brush Tool. These powerful tools work by intelligently blending the imperfection with the surrounding skin tones and textures, creating a seamless result. We zoom in closely on the portrait and carefully click on each blemish, allowing the Healing Tool to seamlessly blend the areas.
Smoothing Skin Texture with Frequency Separation
For smoothing skin texture while meticulously maintaining skin detail, we employ non-destructive techniques. Frequency Separation is a widely used method that separates the skin's texture from its color and tone information. This separation allows us to smooth out skin tones without affecting the underlying texture, preventing a common pitfall of overly smooth, plastic-like skin.
Correcting and Enhancing Skin Tone
Adjusting the skin tone can be achieved using various adjustment layers, such as Curves and Hue/Saturation. Our focus here is on achieving a uniform and pleasing skin tone while diligently preserving the natural shadows and highlights that give the skin dimension. Using these adjustment layers, we can correct color inconsistencies and enhance the overall warmth and vibrancy of the skin tone.
Modern Frequency Separation: So Much Easier! - Photoshop
Mastering Hair and Background Editing
Beyond the subject's face, the hair and background play vital roles in framing and complementing the portrait.
Polishing Hair Details
When it comes to hair editing, our primary focus is on maintaining its natural texture while making it appear well-groomed and healthy. We often make use of the Healing Brush and Clone Stamp tools to remove stray hairs, flyaways, and fill in any minor gaps. For more intricate work, such as separating fine hair strands from a complex background or dealing with wispy textures, we employ advanced techniques like refined selections and layer masks.
Enhancing the Background
We pay close attention to backgrounds, as they frame and complement the subject, influencing the overall mood and context of the portrait. The Liquify filter can be strategically applied to subtly adjust elements in the backdrop, perhaps to soften distracting lines or smooth out uneven areas, all without compromising the integrity of the portrait. When replacing or significantly adjusting the background, it is essential to match the new backdrop’s blurriness, color temperature, and lighting with that of the subject to ensure a cohesive and believable final image.
The Art of Color and Tone Adjustment
In portrait photography, mastering color and tone adjustments is crucial for achieving a pleasing aesthetic and true-to-life results. These adjustments breathe life into the image and set the overall mood.
Correcting Color Imbalances
We often begin by correcting any inherent color imbalances present in the image. This might involve neutralizing color casts caused by ambient lighting or the camera's white balance.
Utilizing Hue/Saturation Adjustments
The Hue/Saturation adjustment layer is a versatile tool that allows us to adjust the hue to correct color casts and subtly change overall color tones. We can also use it to boost or desaturate specific colors to achieve a desired look.
Fine-Tuning with Selective Color
For more precise control over color, we can manipulate individual color channels using the Selective Color adjustment. This allows us to target specific color ranges (like reds, blues, or greens) and make fine adjustments to their saturation, hue, and lightness.
Enhancing Depth with Contrast
Adjusting contrast is essential for accentuating the differences between lights and shadows, which adds depth and dimension to the portrait. A well-balanced contrast can make the subject pop from the background and give the image a more impactful feel.
Advanced Techniques and Final Touches
As we move into the final stages of perfecting a portrait in Photoshop, we emphasize the importance of subtlety and precision. It’s crucial that the final touches both honor the subject’s natural features and align with the client's expectations.
The Precision of Puppet Warp
With the Puppet Warp tool, we gain granular control over specific areas of the face. By strategically placing pins on key points of the face, we are able to meticulously rotate, scale, and adjust elements to subtly perfect a subject's look, ensuring anatomical accuracy and natural positioning.
Leveraging Frequency Separation for Detail
As mentioned earlier, frequency separation is a technique that separates the texture of the skin from its color and tone. This allows us to edit these elements independently, providing precise control over skin smoothing and detail enhancement.
The Art of Subtlety in Final Edits
First, using the Spot Healing Brush, we carefully remove any remaining unwanted blemishes or distractions that may have been missed. This tool is invaluable for maintaining skin texture while clearing up minor imperfections. Next, we review the retouching tools at our disposal, such as the Clone Stamp or the Patch Tool, to blend and refine areas that require a bit more attention. For a cohesively enhanced look, we sometimes apply a filter to adjust color balance or add a soft, ethereal glow. In our role as photographers and digital artists, we strive to deliver a portrait that feels both polished and authentic. Lastly, we perform a final check of the overall image for any inconsistencies in exposure, color, or sharpness.
Saving and Exporting Your Masterpiece
When we reach the final stages of portrait retouching in Photoshop, it's essential to ensure our work is showcased at its best and saved in a way that preserves our edits.
Choosing the Right File Format
We usually save the file as a PSD (Photoshop Document) to preserve all layers and enable future edits. This is crucial for client work or if you anticipate needing to revisit the image later.
Exporting for Different Platforms
To share your work, we utilize 'Export As' or 'Save As' options through the File menu. 'Export As' provides more control over the final size, resolution, and optimization of the image for web or print. For those seeking more detailed guidance on these steps, we highly recommend exploring video tutorials from reputable sources like Phlearn.
Frequently Asked Questions in Portrait Editing
In our exploration of portrait editing within Photoshop, we've gathered some of the most commonly asked questions about enhancing facial features and applying filters.
Reshaping Facial Features
We often use tools like the Liquify filter’s ‘Push Left’ tool to subtly adjust the chin and neck area. The Burn and Dodge tools are our allies for defining the jawline and adding contour. Yes, the Face-Aware Liquify feature allows us to make adjustments to facial features with a high degree of realism. We typically use the Liquify tool for reshaping noses, employing the 'Forward Warp' tool to push and pull specific areas to subtly change the shape while maintaining natural proportions. Professional edits often involve a combination of tools like the Liquify tool, Healing Brush, Clone Stamp, and frequency separation for skin textures, alongside careful color grading.
Sharpening for Detail
We start by using subtle amounts of Unsharp Mask or Smart Sharpen to enhance details without introducing harshness or artifacts. The goal is to bring out the crispness in the eyes, hair, and textures.
Exploring Photoshop's Neural Filters for Portraits
Photoshop's Neural Filters offer a suite of AI-powered tools that can significantly streamline and enhance portrait retouching.
Skin Smoothing with Neural Filters
A notable Neural Filter is Skin Smoothing. When applied, often on a new layer with a mask, it can provide subtle skin smoothing, particularly effective in managing shadows and variations in skin tone.
The Smart Portrait Neural Filter
Photoshop’s Smart Portrait Neural Filter allows for significant changes to a subject's appearance using artificial intelligence. This filter can adjust facial expressions, alter perceived age, and even modify hair thickness. It's important to note that Smart Portrait processes images in the cloud, leveraging Adobe's servers for rendering, which can lead to more robust results compared to purely local processing. As of Photoshop 2022, Smart Portrait has been upgraded from a beta filter to an official release.
Adjusting Happiness and Facial Age
The Happiness slider can make a subject appear happier, though subtle adjustments usually yield the most believable results. The Facial Age slider is particularly impressive, capable of making subjects look significantly younger with smoother skin and softer lighting, or older with finer details and altered hair characteristics.
Modifying Hair Thickness and Expressions
The Hair Thickness slider allows for adjustments to the perceived thickness of a subject's hair. The Expressions group within Smart Portrait includes sliders for Surprise and Anger, enabling the manipulation of these emotions. However, extreme settings can sometimes lead to distorted or unnatural results, underscoring the need for careful application.
Global Adjustments: Head and Light Direction
The Global group contains sliders for Head Direction and Light Direction. The Head Direction slider can subtly turn a subject's head, with the Fix Head Alignment slider helping to correct any resulting misalignment. The Light Direction slider allows for repositioning the light source to match the new head orientation, ensuring realistic lighting.
Fine-Tuning with Settings Sliders
The Settings group includes sliders like Retain Unique Details and Mask Feathering. Retain Unique Details controls how much freedom Photoshop has to alter the image; lowering this value can enhance the result but may also reduce recognizability. Mask Feathering adjusts the softness of the effect's transition; leaving it at the default setting is often recommended for balanced results.
Working with Smart Portrait Masks
After applying a Neural Filter, you can refine the effect using layer masks. By painting with the Subtract from selection brush, you can selectively remove the filter's effect from specific areas, restoring the original image where desired. This allows for precise control over where the AI-generated enhancements are applied.
Understanding Smart Filters
Any filter applied to a Smart Object in Photoshop is recognized as a Smart Filter. These Smart Filters appear in the Layers panel below the Smart Object layer. A key advantage of Smart Filters is that they are editable; you can adjust their settings, blending options, or even remove them at any time without permanently altering the underlying image data.
The Broad Spectrum of Photoshop Filters
Photoshop's filters are an essential suite of tools for photographers, designers, and digital artists, offering a vast array of options to modify and enhance images. Understanding the different categories and applications of these filters is vital for achieving specific artistic and retouching goals.
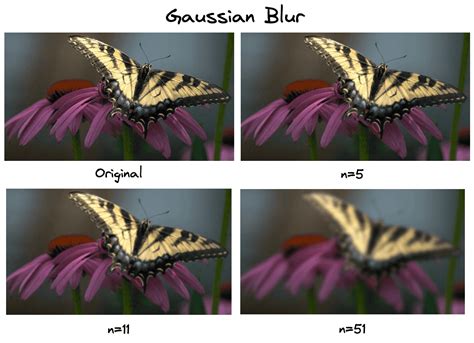
Blur Filters for Softness and Depth
Blur filters are used to soften or blur specific areas of an image, creating a sense of depth, adding a dreamy effect, or reducing distracting details. Common examples include Gaussian Blur for general softening, Motion Blur to simulate movement, and Radial Blur for a spinning effect. Surface Blur is particularly useful for smoothing skin while preserving edges.
Distort Filters for Creative Transformations
Distort filters allow for various creative distortions and transformations, enabling unique visual effects. Filters like Ripple, Spherize, and Wave can warp and bend image elements, opening up possibilities for abstract and surreal imagery.
Render Filters for Natural Elements
Render filters help generate natural-looking elements and textures within images. Filters such as Clouds, Fibers, and Lens Flare can be used to enhance the atmosphere, create dynamic backgrounds, or add stylistic lighting effects.
Noise Filters for Texture and Reduction
Noise filters are employed to either add texture (graininess) to an image or reduce unwanted noise. The Add Noise filter can introduce a film-like grain, while the Reduce Noise and Despeckle filters are invaluable for cleaning up images captured in low light or at high ISO settings.
Artistic Filters for Stylistic Expression
Artistic filters offer a broad range of creative effects that can transform photographs into various artistic styles. Filters like Paint Daubs, Watercolor, and Poster Edges can give an image the appearance of being hand-painted, drawn, or printed, achieving impressively dynamic results.
Pixelate Filters for Abstraction
Pixelate filters manipulate images by working with individual pixels, often used to create abstract or retro looks by reducing detail. They can also be used for stylized censoring purposes.
Essential Tools and Techniques for Professional Retouching
Beyond filters, several core tools and techniques are indispensable for professional portrait retouching.
Layer Masks and Smart Objects
As previously discussed, layer masks enable non-destructive application of effects, while Smart Objects allow for non-destructive filter application and transformations. These are foundational for a flexible and iterative editing process.
The Filter Gallery for Exploration
The Filter Gallery is an excellent feature for exploring and previewing a wide range of filters simultaneously. It allows users to experiment with different filter combinations and settings before committing to an effect, making it easier to fine-tune creative choices.
Mastering Blend Modes
Understanding Blend Modes is crucial for creatively combining layers and achieving seamless transitions or unique visual effects. By adjusting how layers interact, we can create depth, add textures, and achieve sophisticated results.
Non-Destructive Editing Workflow
The overarching principle of non-destructive editing, achieved through layers, masks, and adjustment layers, is paramount. This approach ensures that the original image data is preserved, allowing for maximum flexibility and the ability to revisit and refine edits at any stage.
Working with RAW Files
Working with RAW files provides unparalleled control over image data. Editing RAW files allows for significant adjustments to exposure, white balance, contrast, and other settings without the quality degradation often associated with editing JPEGs.
Resources for Further Learning
For those seeking more in-depth guidance, there are numerous resources available. Comprehensive learning paths, such as PHLEARN's 44-hour Retouching Learning Path, cater to both amateur and professional levels. Tutorials focusing on specific techniques like frequency separation, dodge and burn, and advanced sharpening are widely accessible. Collaborations with photographers like Ymke Myrte and Azzurra Piccardi provide valuable insights and real-world examples.
Understanding Specific Filter Applications
Photoshop's filters serve a multitude of purposes, from subtle enhancements to dramatic transformations.
Sharpening for Detail Enhancement
Sharpening is a critical step in portrait retouching, helping to enhance the details that matter most and guide the viewer's eye. Filters like Unsharp Mask and Smart Sharpen are employed to bring out the crispness in eyes, hair, and textures. The enhanced Smart Sharpen filter, with its adaptive sharpening technology, is particularly effective at minimizing noise and halo effects.
Artistic and Stylized Effects
Filters like Oil Paint can give a photograph an artistic, painted appearance. Others can help create different moods and atmospheres; for instance, a Lens Flare can add a dramatic effect, or a warming filter can create a more inviting ambiance. Filters like Clouds and Fire can be combined with custom brushes to design interesting backgrounds and textures.
Creating Borders and Textures
Filters can also be used to create unique artworks, borders, and textures. For example, the Pixelate filter can create a mosaic look, and the Halftone Patterns filter provides a retro, print-inspired appearance. Filters like Textured Surface can add a tangible feel to an image, simulating materials like canvas or brick.
Installing and Utilizing Filter Plugins
For expanded functionality, users can install new filter plugins. This typically involves downloading the plugin file and copying it to the Plug-ins folder within the Photoshop installation directory. After restarting Photoshop, the new plugin should appear in the Filter menu.
Troubleshooting Filter Gallery Issues
The Filter Gallery may be grayed out if the image is in a color mode that doesn't support filters, such as Indexed Color or Bitmap. To resolve this, the image needs to be converted to a compatible mode, like RGB or CMYK, via the Image > Mode menu.
Conclusion: The Continuous Evolution of Portrait Editing
Photoshop's filters and tools are constantly evolving, with AI-powered features like Neural Filters offering new avenues for creativity and efficiency. Mastering these tools, from fundamental layer-based adjustments to advanced filter applications, empowers photographers and retouchers to achieve exceptional results, ensuring that each portrait tells a compelling story. The key lies in practice, experimentation, and a deep understanding of how each tool can be used to enhance, rather than detract from, the subject's natural beauty.