Photoshop stands as a testament to the evolution of digital artistry, a powerful suite of tools that has consistently redefined the landscape of photo editing. For nearly three decades, it has empowered creators to transform ordinary images into extraordinary visual narratives. This enduring legacy is built upon a foundation of innovative features and a vast array of techniques that continue to inspire and enable users worldwide. As we delve into the intricacies of this software, we uncover a treasure trove of tips and tricks, particularly those that can elevate your Instagram presence. From subtle enhancements to dramatic transformations, Photoshop offers a spectrum of possibilities for every user, whether you're a seasoned professional or just beginning your creative journey.
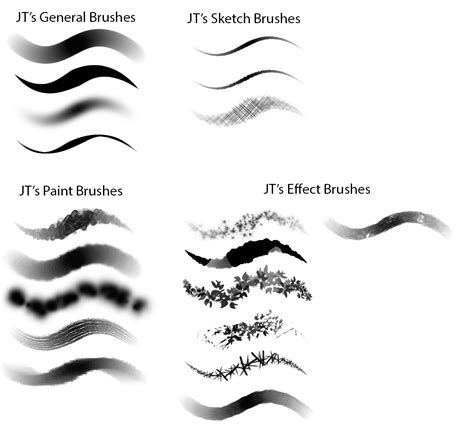
Beyond Default Palettes: Expanding Your Brushwork
The pre-installed brushes in Photoshop are a starting point, offering a diverse range of textures and effects. However, the true potential of brushwork unfolds when you venture beyond these defaults. Photoshop's extensibility allows for the creation and importation of custom brushes, opening up a universe of unique artistic possibilities. You can sculpt intricate textures, mimic natural elements, or even design entirely new artistic mediums. Experimenting with different brush settings, such as shape dynamics, scattering, and color dynamics, can further refine your control and lead to unexpected, yet delightful, results. This freedom to personalize your toolkit ensures that your creative vision is not limited by the software's initial offerings, but rather amplified by its adaptability.
Crafting the Perfect Atmosphere: Simulating Rainfall
Nature's elements can be capricious, often not aligning with our creative intentions. When the sky refuses to cooperate for that perfect rainy-day shot, Photoshop offers the ability to conjure your own atmospheric effects. A compelling technique to simulate falling raindrops involves a few straightforward steps. Begin by creating a new layer and filling it with black. This dark canvas will serve as the base for your precipitation. Next, introduce some Noise to this layer, providing the granular texture that mimics water droplets. Following this, apply a slanted Motion Blur. This effect will give the impression of movement, the streaks of light indicating the speed and direction of the falling rain. Finally, change the layer's blend mode to Screen. This crucial step will make the black background transparent, leaving only the white "raindrops" visible against your image, effectively bringing a dramatic downpour to your scene.
Subtle Illumination: The Art of Light Bleed
Light bleed, a gentle diffusion of light that softens edges and enhances mood, can be a powerful tool for seamlessly integrating elements into an image or simply adding a touch of ethereal beauty. To achieve this effect, create a new layer above your existing image. Select a large, soft-edged brush - often referred to as a "fluffy" brush - and set its color to white. Gently paint towards the top of your image, allowing the white to gradually blend into the existing tones. The key here is subtlety. Once you've applied the light bleed, reduce the opacity of this new layer. This adjustment allows the effect to blend organically with the underlying image, creating a natural-looking glow rather than an overt overlay. The result is a more cohesive and atmospheric photograph, perfect for conveying a sense of dreaminess or softening harsh transitions.
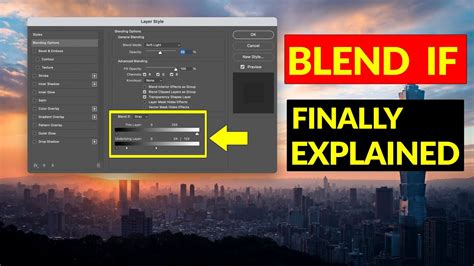
Seamless Integration: The Power of Blend If
Photoshop's "Blend If" feature is a remarkably versatile tool that allows for sophisticated blending of layers, enabling you to achieve effects that would otherwise be cumbersome or impossible. To harness its power, simply double-click on the layer you wish to blend. In the Layer Style dialog box that appears, navigate to the "Blend If" section. Here, you'll find sliders that control how the current layer interacts with the layers below it. By holding down the Shift key while adjusting these sliders, you can refine the blending process with greater precision, targeting specific tonal ranges within the layers. This feature is invaluable for everything from creating double exposures to subtly integrating textures or color overlays, offering a non-destructive and highly controllable method for advanced compositing.
Layer Styles: Effortless Replication and Application
When you've meticulously crafted a layer style - perhaps a complex stroke, a subtle shadow, or a vibrant inner glow - and need to apply it to multiple other layers, Photoshop offers an elegantly simple solution. Instead of painstakingly recreating the style on each new layer, you can employ a quick drag-and-drop method. Locate the "FX" icon on the layer that contains your desired style. Now, hold down the Alt (or Option on a Mac) key. With the Alt key pressed, click and drag this "FX" icon directly onto the target layers to which you want to apply the style. This action instantly copies the entire layer style, saving you considerable time and ensuring consistency across your design elements.
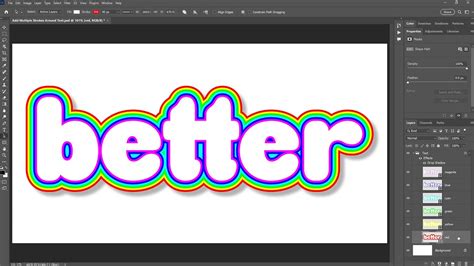
Enhancing Text: Multiplicity in Strokes
Typography is a critical component of visual design, and Photoshop provides extensive control over text elements. A common requirement is to add a stroke to text for emphasis or stylistic flair. However, the basic stroke effect can often be limiting. Photoshop allows you to go beyond a single outline by enabling multiple strokes on a single text layer. To achieve this, double-click on your text layer to open the Layer Style dialog box. Apply an initial "Stroke" effect. Then, within the same Layer Style window, locate the plus (+) icon next to the "Stroke" option. Clicking this icon will add a second stroke, each with its own independent settings for size, color, position, and blend mode. You can add as many strokes as your design demands, creating intricate and visually rich typographic treatments.
The Art of Double Exposure: Merging Realities
The double exposure effect, a classic photographic technique that superimposes two images to create a dreamlike, layered aesthetic, is readily achievable in Photoshop. The process often begins with a high-contrast black and white image as the base. This provides a strong foundation of light and shadow that will interact effectively with the second image. The second image, which can be anything from a portrait to a landscape, is then placed on a layer above the black and white image. To integrate them, you can use clipping masks. By clipping the second image to the first, its content will only appear within the non-black areas of the base image, creating a seamless and artistic merge. This technique is particularly effective for storytelling, allowing for the juxtaposition of different concepts or moods within a single frame.
Streamlining Custom Shapes: Merging for Versatility
Photoshop's shape tools are fundamental for creating vector-based graphics, offering scalability and editability. When you've meticulously constructed a complex shape by combining multiple individual shapes, you might want to consolidate them into a single, manageable entity. Photoshop makes this straightforward. Select all the shape layers that constitute your desired combined shape. Then, right-click on the selected layers and choose "Merge Shapes." This action flattens these individual shapes into a single vector shape layer, simplifying your layers panel and making it easier to manipulate the combined form as a unified element. This is a crucial step for efficient workflow, especially when dealing with intricate graphic designs.
Vintage Aesthetics: The Mustard-Yellow Filter
Achieving that coveted vintage or retro look, often associated with old film photography or lo-fi aesthetics, can be done with a simple yet effective color adjustment. Instead of searching for specific Instagram filters, you can replicate a similar mood within Photoshop. Create a "Color Fill" layer and set its color to a warm, mustard-yellow hue. This specific shade often evokes a nostalgic feel. Then, change the blend mode of this Color Fill layer to "Multiply." This blend mode will darken and saturate the underlying image, while the yellow tone will impart a warm, aged cast. The result is an instant vintage effect, reminiscent of classic film stocks, that can be easily adjusted by modifying the opacity of the Color Fill layer.
Photoshop grain effect make your photo look vintage || AMAZING
Beyond Image Editing: The Multifaceted Nature of Photoshop
It's a common misconception that Photoshop is solely dedicated to manipulating photographs. While image editing is its primary function, the software's capabilities extend far beyond this. Its powerful tools for graphic design, digital painting, web design, and even 3D modeling make it a truly all-encompassing creative suite. The tips and tricks discussed here, from advanced blending techniques to efficient layer management, highlight just a fraction of the software's potential. Understanding these diverse applications can unlock new avenues for creativity and problem-solving in various digital media.
Typography's Hidden Control: The T-Wavy Line Icon
When working with text in Photoshop, precise control over its appearance is paramount. Beyond basic formatting, there are often hidden controls that can significantly enhance typographic design. For text layers, with the Type Tool active, direct your attention to the top-right corner of the Type Tool's options bar. Here, you'll find an icon depicting the letter "T" with a wavy line underneath it. This icon controls the baseline shift of your text. Manipulating this setting allows you to vertically adjust the position of selected characters relative to the text's baseline, offering fine-tuned control over kerning and leading for exceptionally polished typography.
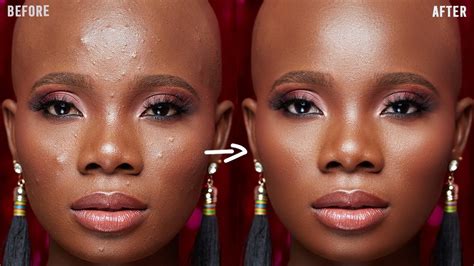
Enhancing Portraits: Imperfect Skin, Perfected
Achieving flawless, high-fashion skin in portraits is often a result of a technique known as "frequency separation." This powerful method allows you to edit tonal and textural details independently, leading to incredibly realistic retouching. The process involves duplicating your image layer twice. On one duplicated layer, apply a Gaussian Blur. This layer will capture the broad tonal and color information, smoothing out imperfections. On the other duplicated layer, apply a High Pass filter. This layer will retain the fine details and textures of the skin. Set the blurred layer to "Linear Light" blend mode and the High Pass layer to "Linear Light" as well. You can then use the blurred layer to correct color and tone variations, while the High Pass layer is used to refine and enhance texture, such as pores and fine lines, without introducing unnatural smoothness.
Adding Depth: Selective Background Blurring
To draw the viewer's eye to your subject and create a professional, polished look, adding depth through selective background blurring is highly effective. This technique mimics the shallow depth of field often achieved with professional camera lenses. Duplicate your main image layer. Navigate to the Filter menu, then select "Blur Gallery" and choose "Field Blur." Adjust the blur intensity to your liking. The crucial step here is to create a mask for this blurred layer. Use a soft brush to paint over your subject on the mask. By masking out your subject, you effectively remove the blur from them, while the background remains artfully blurred, creating a strong sense of depth and focus.
Retro Aesthetics: Simulating VHS Glitches
For those who appreciate the nostalgic charm of vintage technology, recreating the distinctive visual artifacts of old VHS tapes or early computer monitors can add a unique stylistic element to your images. Start by duplicating your image layer. Double-click the duplicated layer to access its Layer Style settings. Within the Advanced Blending options, uncheck the "R" (Red) channel. This effectively removes the red component from that layer. Then, with the layer still selected, use the move tool to offset it slightly - typically by 3 to 5 pixels - horizontally. This separation of color channels, combined with the slight displacement, mimics the analog distortions characteristic of old video formats, creating a compelling retro glitch effect.
Brush Control: Mastering Size and Hardness
Photoshop's brush tools are incredibly intuitive, and some of the most frequently used controls are accessible via keyboard shortcuts. The square bracket keys, [ and ], are your primary tools for adjusting brush size on the fly. Pressing the right bracket ] will increase the brush size, while the left bracket [ will decrease it. For even finer control, you can hold down the Shift key while tapping the bracket keys. Holding Shift and pressing ] will increase the brush hardness, making the edges sharper, while holding Shift and pressing [ will decrease the hardness, creating a softer, more diffused edge. Mastering these shortcuts can significantly speed up your workflow.
Isolating Layers: The Power of the Eyeball Icon
In complex compositions with numerous layers, it's often necessary to focus on a single layer without the distraction of others. Photoshop provides a simple yet effective way to achieve this. When working with layers, each layer has an "Eyeball" icon next to its name in the Layers panel, indicating its visibility. To isolate a specific layer, hold down the Alt (or Option on a Mac) key and click on the Eyeball icon of the layer you wish to see. This action will not only make that layer visible but will also hide all other layers in your composition. Clicking the Eyeball icon again (without Alt) will restore all layers to their previous visibility settings.
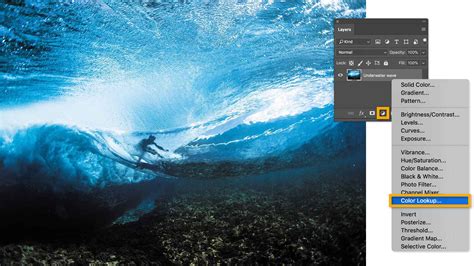
Color Grading: The Understated Power of Color Lookup
While adjustment layers like Curves and Levels are staples for color correction, Photoshop's "Color Lookup" adjustment layers offer a powerful and often overlooked method for applying sophisticated color grades. These layers utilize 3D LUTs (Look-Up Tables) - pre-defined color transformations - to instantly impart specific cinematic or stylistic looks to your images. You can select from a range of built-in LUTs, or import your own custom LUTs to achieve highly specific color palettes. This is an incredibly efficient way to achieve consistent color grading across multiple images or to experiment with diverse aesthetic styles quickly.
Navigational Aids: Creating Guides
For precise alignment and layout in your designs, Photoshop's guides are indispensable. Creating them is remarkably simple. Ensure that your rulers are visible by going to View > Rulers (or pressing Ctrl+R / Cmd+R). Once the rulers are displayed along the top and left edges of your canvas, you can create guides by simply clicking and dragging from either the horizontal or vertical ruler onto your image. These non-printing lines will appear on your canvas, providing visual cues for aligning elements, ensuring symmetry, and maintaining consistency in your design. You can create multiple guides and move or delete them as needed.
Combating Color Banding: Noise and Screen Blend
Color banding, the visible transition between shades of a color that should be smooth, can be a frustrating artifact, particularly in gradients or smooth tonal areas. Photoshop offers a simple yet effective workaround. Create a new layer above the area where you're experiencing banding. Fill this new layer with black. Then, apply a subtle "Noise" filter to this black layer (Filter > Noise > Add Noise). Finally, set the blend mode of this noise layer to "Screen." The noise, when blended in this manner, acts as a dither, subtly breaking up the harsh transitions and smoothing out the color banding, resulting in a more visually pleasing gradient.
Pressure Sensitivity: Unleashing Tablet Control
For artists and designers who utilize a graphics tablet, Photoshop offers a wealth of control through pressure sensitivity. This technology allows your brush strokes to vary in size, opacity, or flow based on how hard you press the stylus onto the tablet. This mimics the natural feel of traditional art tools like brushes and pencils. To ensure your brushes are utilizing this capability, make sure that your tablet drivers are correctly installed and that the brush settings in Photoshop are configured to respond to pen pressure. Many brushes, even simple ones, can be transformed into dynamic tools when pressure sensitivity is enabled, offering a more expressive and nuanced drawing or painting experience.
Expanding Undo History: The Power of State Management
The frustration of making a mistake and realizing you've passed the point of a simple "Undo" is a common creative woe. Fortunately, Photoshop offers a robust history panel that allows you to revert to multiple previous states of your document. By default, Photoshop keeps a significant number of undo states. You can access this history by going to Window > History. This panel lists every action you've taken since opening the document, allowing you to click on any previous state to revert your image to that exact point. For even more extensive history, you can adjust the "History States" setting in Photoshop's Performance preferences, potentially allowing for up to 1,000 undo steps, providing a vast safety net for experimentation.
Custom Brushes from Black and White: Versatile Creation
Photoshop's ability to transform any image into a custom brush is a powerful feature for unique artistic expression. This is particularly effective when working with black and white imagery. You can take a photograph, a texture, or even a simple graphic, convert it to black and white, and then define it as a brush. Go to Edit > Define Brush Preset. The white areas of your image will become transparent in the brush, while the black areas will define the opaque parts of the stroke. This opens up a world of possibilities for creating custom textures, patterns, and artistic elements that are entirely unique to your workflow.
Layer Styles Without the Layer: Streamlined Compositions
Sometimes, you might apply a complex layer style to an element, such as a bevel and emboss or a gradient overlay, and then realize you no longer need the original layer itself, but you want to retain the visual effect. Photoshop allows you to extract layer styles and apply them as separate entities. You can achieve this by right-clicking on the layer with the desired style, going to "Blending Options," and then copying the specific effects you want. These copied effects can then be pasted onto other layers, effectively applying the style without carrying over the original layer's content, thus streamlining your composition and reducing layer clutter.
Refining Selections: The Select and Mask Workspace
When precise selections are critical, such as isolating a subject with intricate edges like hair or fur, the Quick Selection tool can be a great starting point but often requires refinement. If the Quick Selection tool isn't yielding the desired results, or if you need more advanced control, Photoshop offers a powerful solution. After making an initial quick selection around your subject, add a Layer Mask to this selection. Then, double-click on the Layer Mask thumbnail to enter the "Select and Mask" workspace. Within this dedicated environment, you'll find tools like the "Refine Edge Brush." This brush allows you to paint over areas like hair, and Photoshop will intelligently analyze the edges to create a much cleaner and more accurate mask, significantly improving the quality of your selections.
Accelerating Workflow: Professional Resources
For those seeking to maximize efficiency and achieve professional-looking results quickly, leveraging pre-made professional resources can be a game-changer. Platforms like Envato Elements offer a vast library of Photoshop actions, styles, templates, and other assets that are updated weekly. These resources can provide sophisticated effects, complex layouts, and specialized tools at your fingertips, allowing you to bypass time-consuming manual creation processes. By incorporating these professional elements into your workflow, you can significantly reduce project timelines and elevate the overall quality of your output, especially when working under tight deadlines or aiming for a polished, high-end aesthetic.