Lightroom Mobile on Android has evolved into a powerful and versatile tool for photographers, offering a robust suite of features for capturing, organizing, and editing images directly from your smartphone or tablet. Whether you're a seasoned professional looking to integrate mobile editing into your workflow or a budding enthusiast seeking to enhance your mobile photography, this tutorial will guide you through the essential functionalities of Lightroom Mobile for Android. Adobe has added a multitude of new features, making it more useful than ever before. I can think of at least seven key areas where Lightroom for mobile excels, and we will explore them in detail.
Getting Started: Installation and Initial Setup
To begin your journey with Lightroom Mobile on Android, the first step is to download and install the application from the Google Play Store. Once installed, open the Lightroom app on your Android device and sign in using your Adobe ID. If you are a Lightroom Classic subscriber, you can seamlessly integrate Lightroom for mobile into your existing workflow. Even if you don't use Lightroom Classic, you can still download and use Lightroom for mobile to view and develop photos.
Importing and Organizing Your Photos
Lightroom Mobile offers flexible ways to bring your photos into the app. You can add photos that are already on your phone or tablet, or you can capture new images directly within the app.
Adding Existing Photos
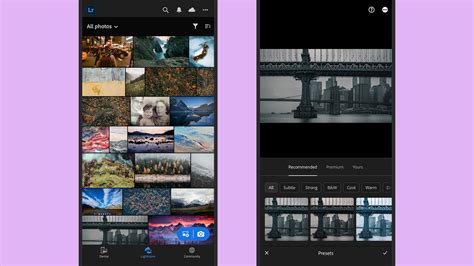
To add photos from your device, tap the image icon within the blue rounded rectangle on the main screen. This will open your device's gallery. Tap to select all the pictures you wish to add, and then tap "Add." These imported photos will be readily available in the "All Photos" collection on the main screen.
Capturing New Photos
For those moments when inspiration strikes and you want to capture an image on the go, Lightroom Mobile provides an integrated camera. Tap the camera icon on the main screen, and then tap the blue circle icon to take a picture.
Understanding "All Photos" and Sorting
When you add pictures to Lightroom, they are automatically organized under "All Photos" on the main screen. By default, these photos are listed in order of their capture date. To change this sorting order, tap the icon with the three dots located at the top right of the screen. This menu provides various options for filtering and sorting your files, including by newest to oldest or vice versa.
Leveraging Albums for Organization
Albums are an indispensable feature for keeping your photo library tidy and accessible. To create a new album or add photos to an existing one, navigate to the Albums section. You can then select photos from your device or from those already present in your Lightroom account to populate your new album. To add photos to a new album, tap the album name and select photos from your device or photos that are already in your Lightroom account.
Enhancing Your Images: Editing Tools in Lightroom Mobile
Lightroom Mobile empowers you to refine your photographs with a comprehensive set of editing tools. You can crop, adjust color and tone, or apply presets to your images using Lightroom for mobile.
Entering Edit Mode
To edit a photo, simply tap on the image you wish to modify. This action will open the photo in edit mode, presenting you with a range of powerful editing controls.
The Power of Synchronized Edits
A significant advantage of Lightroom Mobile is its synchronization capability. Any changes you make to your photos or albums in Lightroom for mobile are automatically reflected in Lightroom on all your devices. This ensures a consistent and seamless editing experience across your entire ecosystem.
Essential Editing Features
Lightroom Mobile offers a robust set of editing tools, including:
- Crop and Rotate: Adjust your photo's aspect ratio, perspective, and overall composition by resizing it using the Crop and Rotate tools. This crop is non-destructive in nature.
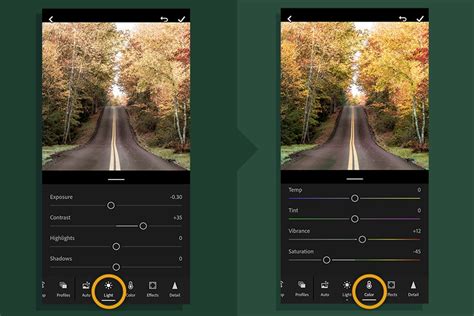
- Basic Adjustments: Enhance your photos with fundamental adjustments such as Exposure and Contrast, allowing you to fine-tune the overall brightness and tonal range.
- Color Adjustments: Manipulate the colors in your image with tools for white balance, saturation, and vibrance, achieving the desired color mood.
- Tone Adjustments: Control the highlights, shadows, whites, and blacks of your image to bring out detail and depth.
- Presets: Apply predefined group edit settings that offer a smooth editing experience on the go. The Presets panel lets you apply, manage, create, import, and export presets as you streamline your photo editing process on your mobile device. You can also tap the
()icon on the lower-right corner to display the Presets and choose any of the presets to apply it on your live capture.
Advanced Editing Techniques
Beyond basic adjustments, Lightroom Mobile provides sophisticated tools for more precise editing.
Masking for Selective Edits
Make precise edits to specific parts of your photo using the various Masking tools. The Masking tools allow you to create one or more masks and adjust the selected areas using the editing controls. AI-powered features like "Select Subject" and "Select Sky" will help you automatically select a subject or sky in a photo so you can adjust that selection quickly.
Object Removal with Generative Remove
Work with the "Remove" panel tools to eliminate unnecessary spots, power lines, people, objects, or other distractions from a photo. You can access AI-powered "Generative Remove" to remove complex objects from an image.
Quick Actions for Streamlined Editing
The "Quick Actions" tool in Lightroom on mobile streamlines the editing process by offering quick, AI-powered suggestions for specific parts of a photo.
Leveraging Lightroom Mobile for Workflow Integration
Lightroom Mobile is not just for editing; it's a vital component for photographers looking to enhance their overall workflow.
Synchronizing Collections
Lightroom for mobile makes it easy to upload photos to your mobile device. You can synchronize any Collection (but not Smart Collections or Collection Sets) with Lightroom for mobile by checking the appropriate box in the Collections panel. When you open Lightroom for mobile, it connects with Adobe's servers and downloads Smart Previews, allowing you to view the images on your device. You can even download the previews permanently so you can show your photos to other people without an internet connection. The best way to show your photos to somebody else is to click the ellipsis icon (the three-dot icon top right) and select "Start Slideshow," then let them swipe through. For the best viewing experience, tap the ellipsis icon next to the Collection name and select "Store locally."
Photo Selection and Development
Lightroom for mobile offers another way to edit your photos, such as selecting which ones are the best or which ones you'd like to develop. Start with a synced Collection of photos. Then, if you're not going to have an internet connection, take the time to swipe through the entire Collection beforehand. Tap the ellipsis icon in the top right of the app, then go to "Info overlays," tap the "Show info overlays" button (if it's not already activated), and select "Flags and ratings." Tap the first photo in the Collection, then tap the Star icon on the right. Swipe left and right to move through your photos.
AI-Powered Photo Selection
Do you find it difficult to select your best photos? Then why not let Lightroom for mobile do the work using AI? Lightroom gets to work, and after a few seconds (or minutes, depending on how many photos are in the Collection), it segments your photos into two categories: "Chosen" and "Other."
Developing Photos on Mobile
Once you've selected your best photos, why not develop them in Lightroom mobile? The latest updates mean it has nearly as much functionality as Lightroom Classic. The feature that makes Lightroom for mobile much easier to develop photos in, just like Lightroom Classic, is masking. However, it's important to note that mobile devices are not color calibrated, so serious editing should ideally be done in Lightroom Classic.
Mobile Backup Solution
The app is ideal for backing up your photos when you're away from home. Strictly speaking, you don't need the mobile app; you just need a device with enough storage space. For example, a 128GB iPad, with a Lightning to SD Card adapter, can import photos from your camera's memory cards. You can also use flash drives designed to work with your iPad using a lightning cable. With Lightroom for mobile, you can view those photos, arrange them into Collections, assign flags or star ratings, and develop photos.
Automatic Import from Device Camera
You can set Lightroom for mobile to automatically import photos taken with your mobile phone (including Raw DNG files with iOS and Android devices). When Wi-Fi is available, the mobile app uploads the photos to Adobe's servers. A recommended solution is to use the camera within the Lightroom for mobile app and disable the "Import from Camera Roll" feature.
Seamless Instagram Integration
Many photographers use Instagram, but you can't upload photos to it directly from Lightroom Classic. The solution is to put your Instagram photos in a synced Collection, then open the Lightroom for mobile app on your phone or tablet.
My Workflow || From SD Card to Instagram #photography #workflow #instagram
Advanced Camera Features in Lightroom Mobile
Lightroom Mobile's in-app camera offers a range of controls that go beyond the basic smartphone camera.
Camera Modes: Auto, Pro, and HDR
You can capture pictures in Auto, Pro, or HDR modes. In the Pro mode, you can use the in-app camera to adjust settings like shutter speed, focus, flash, and others.
Camera Controls and Customization
- Volume Key Shortcuts: Beginning with version 3.2 of Lightroom for mobile (Android), the app shortcuts feature has been added for devices running Android versions 7.1.1 or later. To access the app shortcuts, you need to launch the Lightroom app at least once. You can assign a function to your device's volume keys that you can use when accessing the in-app camera. Tap to choose "None," "Exposure Compensation," "Capture," or "Zoom."
- Maximum Brightness: Turn on to set the brightness of your device's screen to maximum while in the Capture mode.
- Tooltips: Turn on to enable tooltips while in the Capture mode. This setting is available in the HDR mode only.
- Save Unprocessed Original: Saves a copy of the original captured image on your device. This option is particularly useful when shooting in HDR mode.
- Raw/JPEG Capture Option: Choose to capture in Raw DNG format or JPEG. Beginning with version 2.0, Adobe Photoshop Lightroom for mobile supports DNG raw image capture on devices running Android versions 5.0 (Lollipop) and later, provided the device supports it. In the camera module, tap the capture file format badge (DNG, by default) at the top of the viewfinder and then choose DNG. Check whether "DNG Capture Supported" displays "Yes" or "No."
- On-Camera Flash Options: Automatically turn the device's flash ON or OFF based on the external lighting conditions. Tap the
()icon to toggle the flash options bar. - Switch to Front Camera: Easily switch between the rear and front-facing cameras for selfies or other shots.
- Viewfinder Overlay Options: Align areas of the subject being captured along or at the junction of the thirds with grid overlays.
- Additional Capture Settings: Access further customization for your shooting experience.
- Exposure Compensation Lock: Lock exposure compensation at its current value. You can lock the exposure compensation in Auto capture mode only. Tap the
()icon at the lower right corner to lock the exposure compensation at its current value. When you swipe across the viewfinder screen, the Exposure Compensation slider appears. - Capture Button: The primary button for taking photos.
- Capture Mode: Select between Auto, Pro, and HDR modes.
- Preview Last Shot Photo: Tap the thumbnail of the last shot photo to preview it.
- Crop Ratio Options: Tap the
()icon to display the crop ratios. Tap to choose any ratio to display it as an overlay in the viewfinder. - Timer Options: Introduce a few seconds of delay before a shot is captured. There is an option to introduce a delay of 2, 5, or 10 seconds in your capture. Tap the
()icon to toggle the timer options toolbar.
Manual Controls in Pro Mode
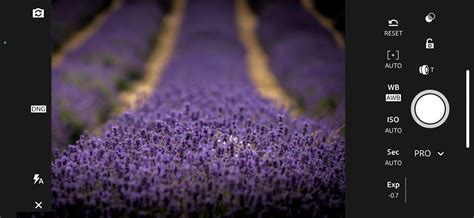
In the Professional capture mode, you gain granular control over your image capture:
- Shutter Speed: Manually control the duration for which your camera is exposed to light. For example, you can set a slow shutter speed to create motion blur or a light trail effect while capturing a fast-moving subject. Tap the
()icon to adjust the shutter speed slider. - ISO: Adjust the sensitivity of your camera's sensor to light. High ISO values can introduce noise in the captured photos. Tap the
()icon to adjust the ISO slider. - Focus Distance: Manually control the focus of your lens. Tap the
()icon to adjust the focus distance slider. - White Balance Options: Select from various presets (Incandescent, Fluorescent, Daylight) or use Automatic white balance.
- Reset: In the Professional capture mode, tap the Reset icon to reset the shutter speed, ISO, white balance, and manual focus distance to Auto.
When you adjust the shutter speed, the ISO value adjusts automatically to compensate and vice versa. This is to ensure that your photo is not overexposed or underexposed during the capture.
HDR Capture Mode (Technology Preview)
The HDR (High Dynamic Range) capture mode is available as a Technology Preview feature on compatible Android devices. This mode helps determine if your device should be permanently supported. The resulting raw HDR file is similar to the type of file you would get when using the HDR merge functionality within Lightroom on your desktop. The generated raw HDR files are large in size and require significant processing. To save the original unprocessed image along with the raw HDR image, tap the settings icon and enable the "Save Unprocessed Original" option. Processing your HDR capture to create a final raw HDR output is GPU-intensive and computationally complex.
Organizing and Viewing Your Photos
Lightroom Mobile provides sophisticated ways to view and organize your library.
The "Gallery" View
Opening the Lightroom app instantly gives you access to edit your device's photos in the "Gallery" view. To view the Albums on your device, select the dropdown menu and choose an album to populate the corresponding files into the Gallery view. You can select any photo to start editing.
"Lightroom" Tab: Your Synced Library
Select the "Lightroom" tab to view all the photos you've already edited in Lightroom or synced from Lightroom desktop or Lightroom Classic. You can specify the order in which files appear in the Lightroom view. The "All Photos" view for subscribed users is a collection of all your imported and edited photos across all Lightroom devices. For freemium users, it's a collection of all photos edited within the app.
People View: Intelligent Grouping of Faces
The "People" View in Lightroom for mobile (Android) recognizes and groups photos of the same person into clusters. Select "People" from the Library view to navigate to the People View. In this view, you can access clusters of photos detected for a particular person. All people clusters shown in the People View are selected by default. You can enable this feature under the "Privacy" section by selecting "Enable People View" in the Settings panel. When the People view feature is enabled, Lightroom for desktop (Mac and Windows) and Lightroom for mobile (iOS and Android) analyze photos in the cloud to create models of faces to group similar faces together. When you disable People view, all existing face model data is deleted from Lightroom servers.
- Showing and Hiding Clusters: In the "Show and Hide People" panel, select a hidden cluster to show it.
- Merging Clusters: You can combine photo clusters of the same person under separate people buckets using the "Merge" option. Tap the tick icon at the upper-right corner. In the "Are these the same person?" prompt, tap "Merge." All photos of the selected people clusters will merge together into one cluster.
- Automatic Merge Suggestions: Lightroom for mobile (Android) can detect if two clusters belong to the same person. In this case, you can view a suggestion in the top panel to merge the clusters when you open one of them. Tap "Yes" to merge the clusters or "No" to not merge. If you tap "No," the merge suggestion for the specific clusters will not be shown again. You can also tap the cancel icon to remove the suggestion.
- Naming People: In the People View, tap the unnamed cluster. In the open cluster, tap the "Add Name" field at the top of the cluster and enter the desired name. You can directly edit the name at the top of the named cluster. Tap the three-dot icon at the upper-right corner of the screen and select "Rename Person."
- Removing Photos: Select "Remove photos from person" to remove selected photos from the cluster. You can manually select and move photos from one people cluster to another if you feel any of the photos don't belong to that cluster. The move operation is valid for both named and unnamed clusters.
Community View: Inspiration from Fellow Photographers
The "Community" view provides photos by fellow photography members. You can browse through different categories of photos and select them to view how the photo was edited, step-by-step.
Grid View and Loupe View
- Grid View: This view is available when you are looking at the photos within an album. By default, Lightroom picks one of the pictures to be the cover photo for the album (you can't specify a cover photo for the "All Photos" album). Tap the three-dot icon located at the upper-right of the Grid view to access options such as segmenting photos by month or choosing sorting criteria like File Name and Star Rating. You can also use the "Custom Order" option to manually reorder your grid photos by tapping the edit icon beside it.
- Loupe View: This view is available when you select a photo in the Grid view, showing only one photo at a time. It is within the Loupe view where you will perform edits and modifications on a photo. To view the Exif information of a photo in the Loupe view (Edit panel and Rate & Review panel only), tap the three-dot icon at the upper-right corner and enable "Show Info" from the menu.
Settings and Preferences
Lightroom Mobile offers a range of settings to customize your experience and manage storage.
General Settings
- App Version: Check the App Version in "Device Info & Storage > Device Info."
- Use Cellular Data: Switch off to sync only over Wi-Fi, or switch on to sync using the bandwidth on your cellular data plan.
- Only Download Smart Previews: Switch on to download only reduced-resolution, editable proxies of your photos.
- Raw Default: Specify default settings to process raw photos during import.
- Auto Add From Device: Switch on to automatically import any new picture from the Camera Roll or Gallery.
Storage Management
- Manage Storage: Select to view a list of all the albums for which you've enabled the "Store Locally" album option.
- Clear Cache: Select to clear previews and temporary files from your mobile device. When you clear or purge the offline content of a locally stored album, Lightroom for mobile (Android) removes cache files stored for offline use in that album. Any images in the album that are also marked for offline use in another locally stored album are not removed. Clearing the cache removes any cache files stored for offline use by Lightroom for mobile (Android). However, the offline content of the albums that you've stored locally is not impacted.
Help and Support
- Contextual Help: Easily find help within Lightroom for using a tool or feature. The first section of the pop-up menu displays tutorials for specific tools and features. In the search bar at the top, enter a keyword relevant to your interest for search results to appear as you type.
- FAQs: Access frequently asked questions.
- Support Forum: Engage with the Adobe Lightroom community to ask questions or share ideas.
- Contact Adobe Support: Reach out for direct assistance.
- Request a Feature: Suggest improvements or new functionalities.
- Reset Coach Marks and Dialogs: Reset introductory guides and prompts.
Saving, Exporting, and Sharing
Lightroom Mobile allows you to save, export, and share your edited images.
Saving and Exporting
Lightroom automatically saves your edits internally. You can save a copy to your device and share and export your images. You can export original images.
Sharing Options
Share an album of pictures or a random selection of photos as a shareable link or to Adobe Portfolio. You can control whether details like copyright data, location data, and metadata are available to the viewer. "Sharing Options" have been moved from preferences to this section.
Conclusion
Lightroom Mobile for Android is a sophisticated and indispensable tool for modern photographers. Its intuitive interface, powerful editing capabilities, and seamless integration with the Adobe ecosystem make it an essential application for anyone looking to elevate their mobile photography. From capturing stunning images with its advanced camera controls to organizing and refining them with professional-grade tools, Lightroom Mobile empowers you to create and share your vision wherever you go. If you havenât used Lightroom for mobile before, then give it a try.