Digital drawing has become an indispensable part of the creative industry, regardless of your specific artistic goals. For those venturing into this realm, Adobe Photoshop, despite its initial appearance of complexity, offers a powerful and accessible platform to begin creating impressive digital artwork. Understanding some fundamental knowledge of Photoshop can help you take the first steps to creating impressive digital artwork using photos, textures, shapes, and line drawings. This guide is designed to demystify the process, focusing on sketching and laying the groundwork for your digital art journey, even if you're new to the software.
Setting Up Your Digital Canvas
Before you begin to draw, it's crucial to establish the right canvas size and resolution for your project. For a new image, set the dimensions to 16 x 11 inches with a resolution of 600 pixels per inch. While this file size may seem large, it ensures that you can print your work at any size with a high-quality 300 dpi output. This resolution is ideal for maintaining detail and allowing for flexibility in printing and scaling your artwork without significant loss of quality.
Mastering the Brush Tools for Sketching
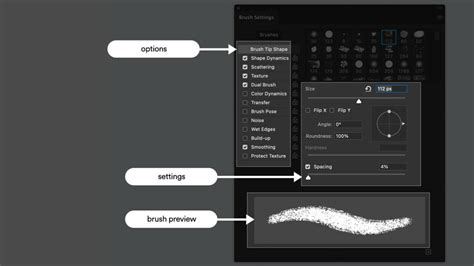
The brush tool is your primary instrument for sketching in Photoshop. While there are plenty of free brushes available online, creating your own can offer a more personalized drawing experience. For instance, a brush named "Fantastic 19" can be customized to suit your sketching needs. To achieve more dynamic linework, adjust the "Shape Dynamics" settings. Changing the "Minimum Diameter" to 20% and enabling "Transfer" can introduce variation in your strokes, mimicking the feel of traditional media. The "Build-up" tab can be activated to trigger a build-up effect, adding depth and texture to your lines. Once these adjustments are made, your brush is all set for sketching.
When you're sketching, you might notice that the lines you draw aren't perfectly straight, and curves aren't as smooth as you'd like. This is a common challenge for beginners in digital art. The key to overcoming this is practice and familiarity with the tools. Photoshop offers various ways to refine your strokes, and with consistent effort, your control will improve significantly.
The Power of Layers in Digital Art
Layers are a fundamental concept in Photoshop, acting like clear sheets that you can stack on top of each other or on top of background layers or images. Working in layers is essential because it allows you to add and adjust different elements of your artwork independently. You can add images, textures, colors, and text to one layer without affecting the content in the layers below it. This non-destructive workflow means you can easily undo or adjust any moves you make that you’re not happy with, providing immense flexibility.
To create a new layer, you can click the "Create a New Layer" icon, typically located at the bottom of the Layers palette, or choose "Layer › New › Layer" from the top menu. The Layers palette is usually found in the bottom right corner of your workspace.
Organizing Your Sketching Process with Layers
For sketching, it's beneficial to set up your layers strategically. You might start with a "Sketch" layer where your initial, rough drawing resides. This drawing is often quite rough and may contain crosshairs or extraneous marks. Once you're satisfied with the general form, you can create a new layer above it, perhaps named "Refined Sketch." On this layer, you can trace over your rough sketch, cleaning up lines and smoothing curves. This process is akin to drawing on tracing paper, where you build upon previous work without altering the original. Any unnecessary elements from the rough sketch layer can then be removed, leaving you with a cleaner, more defined sketch on the refined layer.
Importing and Manipulating Images
Photoshop isn't just for drawing from scratch; it's also excellent for incorporating existing images into your projects. To import a file, you can simply drag and drop a JPEG or PNG photo file from your desktop directly into your Photoshop project. Once imported, the image will appear on its own layer. You can then reposition and resize it by clicking and dragging the corners or edges of the photo to make it larger or smaller. Pressing Enter or Return will confirm these transformations. Photoshop will automatically convert the layer into a Smart Object layer, which preserves the original image data and allows for non-destructive scaling and transformations.
Using Layer Masks for Selective Editing
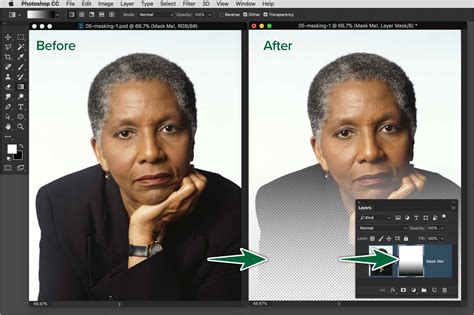
Layer masks are powerful tools that allow you to control what is hidden and what is shown on a layer without actually deleting any pixels. This is incredibly useful for compositing images. For example, if you want to add someone who wasn't originally in your beach postcard photo, you can use a layer mask. First, drag and drop the photo of the person you want to add onto your existing image. Then, select the layer with your subject (the layer you want to mask) in the Layers panel. Click "Select Subject" in the options bar, and Photoshop will attempt to automatically select the most prominent subjects in the image. A layer mask thumbnail will appear next to the image thumbnail in the Layers panel, showing a black and white representation of your mask. White reveals the layer's content, while black conceals it. You can then refine this selection using the "Add" or "Subtract" buttons to fine-tune the mask, and Photoshop's "Refine Hair" feature can help with intricate selections like hair.
One of the most practical applications of layer masks and selection tools is the removal of unwanted elements from your photos, such as garbage bins, power lines, or photobombers.
Adding Text and Creative Elements
Photoshop also excels at text manipulation. You can add text to your images by selecting the Type tool, clicking on the image where you want to place the text, and then typing. You can then highlight the text to make style changes. Beyond text, you can also paint or draw directly onto your images. Maybe you want to add a cartoon umbrella to a beach photo, or perhaps draw a shark in the water to add a touch of humor. The Brush tool and other drawing tools allow you to make your mark, paint, draw, or play with shapes directly on your canvas.
Saving and Exporting Your Work
When it comes to saving your work, Photoshop offers several options. You can go to the "File" menu and select any of the "Save" commands: "Save," "Save As," or "Save a Copy." You have the flexibility to save your work as cloud documents or directly to your computer. Additionally, you can export your Photoshop Document (PSD) file to other common file types like JPEG, PNG, or PDF, depending on your intended use. For web use, selecting "Export As" and choosing JPG or PNG is recommended, paying close attention to file size.
Exploring Advanced Features: Neural Filters
Photoshop's Neural Filters leverage the power of Adobe Sensei AI technology to enable quick, automatic edits to images. To use a Neural Filter, navigate to "Filter › Neural Filters" from the top menu. If a filter isn't already installed, you'll have the option to download it. Once installed, you can adjust its settings to achieve various effects, from color correction to stylistic changes.
From Paper to Digital: Transferring Your Drawings
For those who are more comfortable drawing on paper, Photoshop provides a straightforward way to transfer your traditional sketches into the digital realm. This process allows you to leverage the benefits of digital art while maintaining the feel of your hand-drawn work.
Navigating Photoshop for Beginners
Does the thought of using Adobe Photoshop intimidate you? With so many tools and drop-down menus, it's easy to feel lost. If you can draw on paper, you can certainly draw using Photoshop. The key is to break down the learning process into manageable steps. Many tutorials can feel overwhelming, but the goal is to make them engaging and easy to follow. You'll want to pause tutorials frequently to experiment with the tools yourself. Replaying, pausing, and rewinding are all part of the learning process, and that's perfectly okay. Even if you think you know Photoshop, there are always new shortcuts and techniques to discover.
Erika Wiseman, a freelance digital artist with a Bachelor’s in Fine Arts, developed a course specifically for 21 Draw, an online learning community. Her experience highlighted the lack of comprehensive guides for digital art when she was starting. Her lessons pack the most helpful principles and tips gathered from years of experience, showing students exactly which tools and features are important and which can be ignored. She walks through her process of creating an illustration from scratch, providing a valuable example for learners. The course covers basic tools and functions like transform, move, shape, selection, and painting tools. It also teaches how to transfer drawings from paper to Photoshop and demystifies digital color. The final adjustments to make artwork Instagram-ready are also covered, offering a complete workflow.
The 21 Draw platform offers hundreds of video lessons by industry legends who have worked for major animation studios like Disney, Marvel, DC, Dreamworks, and Pixar. Membership provides unlimited access to courses taught by world-class artists, with new courses added regularly. Each class typically includes 10-20 video lessons, averaging 7 minutes each. Many classes come with exercise sheets, assignments, and layered PSD or PNG files. Some even allow direct interaction with instructors in public forums. These courses are on-demand, allowing you to watch them on any digital device, anytime, and as many times as you need. They cater to all levels, including those with zero drawing experience, and many lessons apply to both digital and traditional art. While some tutorials require digital drawing software like Photoshop or Procreate for iPad, the foundational art principles are universally applicable.
Vector vs. Raster Graphics in Photoshop
Photoshop can be used for both vector and raster graphics, though it's primarily known for raster image editing. Drawing in Photoshop can involve creating vector shapes and paths using the shape tools, the Pen tool, or the Freeform Pen tool. Vector shapes are resolution-independent, meaning they maintain crisp edges when resized or printed. Paths are outlines that can be converted into selections, filled, or stroked with color. They can also be used as vector masks.
However, when you use painting tools like the Brush tool, you're creating raster images, which are made up of pixels. These pixel-based images can become blurry or pixelated when scaled up significantly. Photoshop is generally better for creating detailed, textured drawings and paintings due to its raster capabilities. For precise curves and shapes, the Pen tool is invaluable.
Refining Your Sketches and Images
Beyond basic sketching, Photoshop offers tools to refine your existing images. The Crop Tool, for instance, is essential for framing your images and removing unwanted areas, allowing you to focus on the main subject. Rotating and aligning images is also straightforward. If an image is slightly tilted, the Crop tool can be used to rotate it to the correct orientation before cropping.
Dealing with Photoshop's Quirks
Photoshop can sometimes present unique challenges. Occasionally, it might seem to "sulks" and become unresponsive if it disagrees with a setting or a mis-hit key. In such instances, working with another open image or selecting a different tool can often help regain control. This behavior, while frustrating, is part of the learning curve. Keeping a backup image open can be a helpful strategy.
Grids for Precision
Grids are invaluable for ensuring accuracy in your work. The "Rule of Thirds" grid, available through the upper menu bar, provides a default grid for cropping. Grid lines, in general, can be toggled on and off and are excellent for checking if something is as horizontal or vertical as it should be. You can modify grid settings to suit your needs, making them a powerful visual aid for precise alignment.
Flattening Images for Compatibility
Sometimes, you need to flatten an image, especially when saving files like JPEGs, which do not support layers. This combines all visible layers into a single background layer. A shortcut can be created for this operation to speed up the workflow.
Healing and Repairing Images
Photoshop's tools can also be used to repair and enhance images. For instance, the Spot Healing Brush tool is excellent for removing small blemishes or unwanted spots. The Lasso tool, combined with content-aware fill, can be used to remove larger distractions. Even filling in small gaps or unwanted colors can be achieved using selection tools and the fill command.
The Polygonal Lasso tool is particularly useful for outlining areas that need to be healed or modified. When combined with the Clone Stamp tool, it allows for precise retouching. By setting a slight feather on the Polygonal Lasso Tool and using the Clone Stamp tool to sample from a nearby area, you can seamlessly blend and repair damaged parts of an image. This is especially useful for removing elements like the supports of an object in a photograph, ensuring the edge of the object is maintained.
Removing Distortions
One of the most powerful capabilities of Photoshop is its ability to correct image distortions, which are common when photographing flat objects, especially in challenging environments like museums. Reflections from glass cases, uneven lighting, and camera angles can all introduce distortions.
When photographing objects in museums, you might need to take photos at an angle to avoid reflections. This inevitably leads to distortions that can be corrected in Photoshop. By using the "Transform" tools, particularly "Distort," you can manipulate the image's corners and edges to realign them with what would be their true perspective. This often involves dragging corners until the image lines up with a grid or until the object's lines appear rectilinear. You might need to increase the width or height of the image to fill in areas created by the transformation.
Adjusting Levels and Color
The Levels window ("Image › Adjustments › Levels" or Ctrl+L/Cmd+L) is crucial for correcting exposure and color casts. Adjusting the sliders can significantly improve the brightness and contrast of an image. Auto Color attempts to remove color casts and can be effective, especially for images with a wide range of natural colors.
Tips for Aspiring Digital Artists
- Start Simple: Begin with basic projects to familiarize yourself with the tools.
- Practice Regularly: Consistent practice is key to improving your digital drawing skills.
- Learn Key Concepts: Understanding layers, selections, and masks is crucial.
- Experiment with Brushes: Explore different brush settings and create custom brushes.
- Utilize Resources: Take advantage of tutorials, online courses, and communities.
- Don't Fear Mistakes: Photoshop's undo functions and non-destructive editing allow for experimentation.
Learning to draw in Photoshop can be an exciting and rewarding journey. By familiarizing yourself with the basic tools, understanding the importance of layers, and practicing consistently, you can unlock a world of creative possibilities and begin creating your own impressive digital artwork.