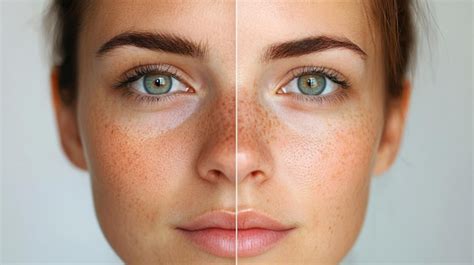
The allure of natural-looking freckles can enhance a portrait, adding character and a touch of sun-kissed charm without the need for actual sun exposure. This tutorial delves into the process of creating custom Photoshop brushes designed to replicate the organic variation of real freckles, offering a powerful tool for portrait artists and retouchers seeking to add depth and individuality to their subjects. While pre-made brushes are available for convenience, understanding the creation process unlocks a deeper level of control and artistic expression.
The Foundation: Designing Your Freckle Brush Shapes
The core of creating realistic freckles lies in the diversity of their forms. Naturally occurring freckles are not uniform; they vary in size, sharpness, and softness. To capture this, we will construct a series of custom brushes, each designed to mimic a distinct freckle type. This approach ensures that when applied, the resulting freckles will possess the organic irregularity that defines real skin.
Begin by selecting the Brush Tool (B) and creating a new layer within your Photoshop document. The initial step involves crafting the basic shape of a freckle. For this, utilize a soft brush with a small diameter, roughly approximating the size of a typical freckle. Employ a low flow setting to build up the shape gradually, allowing for subtle control over its intensity and appearance. At this stage, the color is secondary; focus solely on defining the shape. It is recommended to paint in black, as this high-contrast color will serve as the basis for defining the brush stroke.
Once a satisfactory freckle shape has been rendered, the next step is to prepare it for brush definition. Create a new layer and select the Rectangular Marquee Tool (M). Draw a square selection that encompasses your painted freckle shape. To ensure a perfect square, hold down the SHIFT key while dragging. Fill this newly created white square selection. At this juncture, you should have your black freckle shape positioned atop a solid white square.

Defining the Custom Brush: Harnessing Photoshop's Power
With the freckle shape isolated on its white background, you can now transform it into a custom Photoshop brush. Select the layer containing your painted freckle. Navigate to the 'Edit' menu and choose 'Define Custom Brush Preset'. This action opens a dialogue box where the true customization begins.
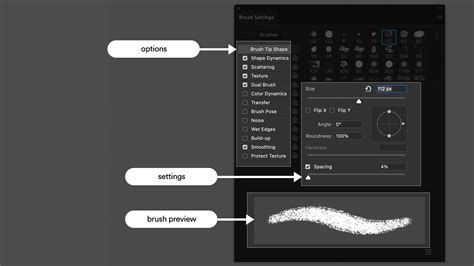
This 'Define Custom Brush Preset' dialog is where the magic of creating natural-looking freckles truly unfolds. The key to achieving realism is to introduce variation. This is accomplished by meticulously adjusting various brush settings. The primary parameters to focus on are 'Shape Dynamics', 'Scattering', 'Transfer', and 'Smoothing'.
- Shape Dynamics: This section controls the size, angle, and roundness jitter of your brush strokes. By adjusting the 'Size Jitter' and 'Angle Jitter', you can introduce randomness in the size and orientation of each applied freckle, preventing a uniform, repetitive pattern. 'Roundness Jitter' can also add subtle variations in the shape.
- Scattering: The 'Scattering' settings allow you to control how the brush instances are distributed. Increasing the 'Scatter' value will spread the freckles out more randomly across your brush stroke. You can also scatter them in both axes ('Both Axes') for a more organic spread.
- Transfer: This panel governs the opacity and flow of the brush. Adjusting 'Opacity Jitter' and 'Flow Jitter' ensures that each freckle has a slightly different intensity, mimicking the natural fading and darkening of real freckles.
- Smoothing: This setting can help to create a smoother brush stroke, which can be useful for certain types of freckles or for blending.
As you make these adjustments, it is crucial to test the results frequently. Paint on a new layer to observe how the brush behaves. This iterative process of adjusting settings and testing is vital to ensure that the generated freckles appear natural and not artificial. You can always revisit and refine these settings at any time.

Expanding the Freckle Palette: Multiple Brush Variations
To achieve a truly convincing freckled effect, it is essential to create a variety of custom brushes. The initial freckle brush might be small and well-defined. For subsequent brushes, repeat the entire creation process, but aim for slightly larger and softer initial shapes. This will result in brushes that produce freckles with varying degrees of blurriness and size.
A good starting point is to create at least three distinct freckle brushes: one for small, sharp freckles; another for slightly larger, softer freckles; and a third for even larger, more diffuse freckles. However, feel empowered to create as many unique freckle brushes as you deem necessary to achieve your desired aesthetic. The more variety you incorporate into your brush set, the more organic and believable the final freckled effect will be.
Applying the Freckles: Strategic Placement and Blending
Once your custom freckle brushes are ready, or if you've opted to use pre-made brushes, you can begin the process of applying them to your portrait. To ensure a natural integration with the skin tone, start by creating a new Curves adjustment layer above your subject's portrait layer. Within the Curves properties, pull the center of the curve downwards. This action will subtly darken the skin tones, providing a base upon which the freckles will appear to be a natural part of the skin's pigmentation.
Curves Adjustment Layer + PSD File Demonstrated [Photoshop Color for Beginners]
After darkening the skin tones, it's time to strategically reveal the freckles. Select the layer mask of the Curves adjustment layer. Invert this mask by pressing CTRL + I (or CMD + I on a Mac). This will hide the darkening effect. Now, using your custom freckle brushes, paint with white onto this inverted layer mask. As you paint, the underlying darkening effect will be revealed precisely where you paint, creating the appearance of freckles that are subtly darker than the surrounding skin.
Remember the fundamental cause of freckles: sun exposure. Therefore, placement is key. Concentrate your freckle application in areas that naturally receive more sunlight. These typically include the bridge of the nose, cheeks, forehead, and shoulders. Avoid applying freckles uniformly across the entire face; instead, think about where the sun would realistically cast its rays.
After you have applied freckles with your various brushes, switch to the Eraser Tool. Employ a very large, soft brush with a low flow setting. This tool will be instrumental in blending the applied freckles into the skin, softening their edges, and removing any instances that appear too prominent or out of place. This subtle blending step is critical for achieving a natural, integrated look.
Enhancing Portraits with Character
Adding freckles can be a simple yet highly effective technique to imbue a portrait with a greater sense of character and visual interest. Whether you're aiming for a subtle enhancement or a more pronounced "freckled" look, the ability to create and apply custom brushes offers unparalleled control. This method allows for a nuanced approach, ensuring that the added freckles appear authentic and harmoniously integrated with the subject's features.
The concept of "free" in this context refers to the creative freedom and the ability to achieve a desired look without resorting to potentially harmful methods like excessive sun exposure. It's about leveraging digital tools to simulate natural phenomena. This technique is particularly useful when a model needs to embody a different persona or when a specific aesthetic calls for a change in complexion that goes beyond makeup alone. The illusion of a different individual can be significantly enhanced by the addition of naturally rendered freckles, complementing changes in attire, hair, and makeup.
By mastering the creation of custom brushes and understanding the principles of their application, artists can elevate their portrait retouching to a new level, adding a touch of organic beauty and unique character to every image. The process, while requiring attention to detail, is ultimately rewarding, offering a powerful way to enhance realism and artistic expression within Photoshop.