The Adobe Photoshop Crop Tool is a fundamental yet powerful instrument for any image manipulator, whether you're a seasoned professional or a budding enthusiast. It's not merely about trimming the edges of a photograph; it's about refining composition, removing distractions, and preparing your images for specific outputs. This guide will delve deep into the functionalities of the Crop Tool, exploring its basic operations to more advanced techniques, ensuring you can wield it with precision and creativity.
Understanding the Basics of the Crop Tool
At its core, the Crop Tool allows you to remove unwanted portions of an image. When you select the Crop Tool from the left-hand side of the Photoshop Toolbar (or by pressing the 'C' key), a visible border, known as the cropping border, appears around your image. This border is defined by handles at the corners and along the sides, which you can click and drag to adjust the area you wish to keep. The area inside this border will be retained, while the darkened area outside will be cropped out.
It's crucial to understand that, by default, Photoshop's Crop Tool is set to "Delete Cropped Pixels." This means that once you confirm your crop (by pressing Enter or clicking the checkmark in the Options Bar), the pixels outside the selected area are permanently removed. This can be problematic if you later decide you need those pixels back. To avoid this, it's highly recommended to uncheck the "Delete Cropped Pixels" option in the Options Bar before you begin cropping. This ensures that Photoshop preserves the cropped areas, hiding them rather than deleting them. This non-destructive approach offers much greater flexibility for future adjustments.
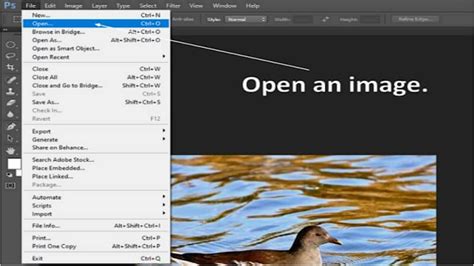
To begin, open your desired image file. For instance, let's use "staff photo.jpeg." Before making any changes, it's a good practice to save a backup. Navigate to File > Save As and save your image as a Photoshop file (PSD) with a modified name, such as "staff photo_adjusted.psd." This ensures you always have the original file intact.
Once the "Delete Cropped Pixels" option is unchecked, you can freely adjust the cropping border by dragging the handles. After you've achieved a crop you're satisfied with, press Enter or click the checkmark in the Options Bar to apply it. If you need to crop again, simply re-select the Crop Tool and adjust the border.
Resetting the Crop Tool
If you find yourself with a crop that isn't quite right, or if you want to start fresh, you can easily reset the Crop Tool. You can either click the "Reset" button found at the top of the Options Bar, or for a complete reset to default settings, right-click (or Ctrl+click on Mac) the Crop Tool icon in the Options Bar and select "Reset Tool," then press the Esc key.
Precision Cropping: Aspect Ratios and Specific Sizes
While freehand cropping is useful, Photoshop's Crop Tool offers robust features for precise cropping based on specific dimensions and aspect ratios.
Setting Aspect Ratios
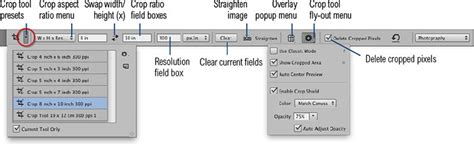
The "Ratio" option in the Options Bar is your gateway to controlled cropping. Here, you can select from a range of predefined aspect ratios, such as "Square" (1:1) or "16x9." Once you select an aspect ratio, the cropping border will automatically conform to these proportions. You can then drag the crop to center your subject or adjust its size while maintaining the chosen ratio. For example, selecting "Square" will ensure your crop remains a perfect square as you resize it.
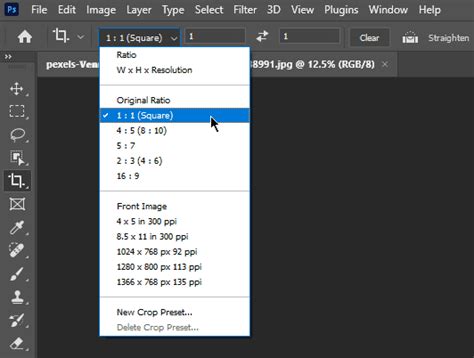
If you need to switch between portrait and landscape orientations for a given ratio, you can use the "Swap" icon in the Options Bar. This will flip the width and height values.
Custom Aspect Ratios
Beyond the presets, you can define your own custom aspect ratios. By entering specific values into the "Width" and "Height" boxes in the Options Bar, you dictate the exact proportions. You can even save these custom ratios as presets by selecting "New Crop Preset" from the Aspect Ratio drop-down menu and giving it a descriptive name. This is incredibly useful for repetitive tasks or for adhering to specific client requirements.
Cropping to Specific Dimensions and Resolution
For print or high-resolution online use, you often need to crop to a precise size and resolution. In the Options Bar, select "W x H x Resolution" from the Aspect Ratio drop-down. You can then enter your desired width and height, including units like "in" for inches or "cm" for centimeters. Crucially, you can also specify the resolution, typically 300 pixels per inch (ppi) for print. When you apply this crop, Photoshop will resize the image to these exact dimensions and resolution. You can verify this by going to Image > Image Size, where your custom crop settings should be reflected.
Enhancing Composition with Crop Overlays
Composition is key to impactful imagery. Photoshop's Crop Tool includes various overlays to help you align subjects and create visually appealing arrangements.
Understanding Overlay Options
When you activate the Crop Tool, you'll often see a grid overlay. By default, this is typically the "Rule of Thirds," a grid that divides your image into nine equal parts with two horizontal and two vertical lines. Placing key elements along these lines or at their intersections can lead to more dynamic and engaging compositions.
You can access a variety of other overlays by clicking the "Overlay" icon (often represented by a gear or similar symbol) in the Options Bar. These include:
- Diagonal Grid: Useful for aligning subjects along diagonal lines.
- Golden Ratio: Similar to the Rule of Thirds but with a more aesthetically pleasing spiral-based grid.
- Golden Spiral: A precise spiral that guides the viewer's eye towards a focal point.
- Triangle: Helps in creating triangular compositions.
You can cycle through these overlays directly from your keyboard by pressing the 'O' key.
Using Overlays for Alignment
These overlays act as visual guides. For instance, when composing a portrait, you might align the subject's eyes with the intersection points of the Rule of Thirds grid or position their gaze along a Golden Spiral. For landscapes, you might use the grid to place the horizon on a horizontal line. The "Diagonal Grid" can be particularly helpful for images where a subject is naturally positioned on a slant. By adjusting the crop box and aligning elements with these guides, you can dramatically improve the balance and flow of your image.
Advanced Cropping Techniques
Beyond basic cropping and ratio setting, the Crop Tool offers advanced functionalities that can significantly elevate your image editing workflow.
Straightening Images
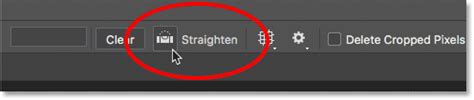
A common issue in photography is a tilted horizon or a skewed subject. The Crop Tool has a built-in Straighten Tool to correct this. Select the Crop Tool, and then within the Options Bar, locate and click the "Straighten Tool" icon (often looks like a level or a wavy line). Click and drag a line along an element that should be straight, such as a horizon or a building edge. Photoshop will automatically rotate and straighten the image based on the line you drew. The cropping border will then reappear, allowing you to refine the crop around the now-straightened image.
Perspective Crop Tool
While not explicitly detailed in the provided text as a separate tool, the concept of perspective correction is often handled by the Crop Tool or its related features. The "Perspective Crop Tool" (available in newer Photoshop versions) allows you to correct for converging lines in an image, such as those seen when photographing buildings from a low angle. You can draw a perspective grid over your image, and Photoshop will transform the image to make the lines parallel. This is incredibly useful for architectural photography or when correcting distorted subjects.
Non-Destructive Cropping and Repositioning
As mentioned earlier, unchecking "Delete Cropped Pixels" is key to non-destructive cropping. When this option is off, Photoshop hides the pixels outside the crop area instead of discarding them. This means you can:
- Reposition the Image: After applying a crop with "Delete Cropped Pixels" unchecked, you can still select the Move Tool (V) and drag the image within the cropped area. This allows you to recompose your shot without re-cropping.
- Expand the Crop: If you decide you need to include more of the original image, you can simply re-select the Crop Tool, and the previously cropped pixels will become visible again as you expand the crop border. This offers immense flexibility, especially when you're unsure of the final dimensions or aspect ratio needed.
It's important to note that saving a non-destructively cropped image in formats like JPEG will still result in the cropped pixels being deleted upon saving. To retain this flexibility, save your work as a Photoshop (.PSD) or TIFF file, which support layers and extended image data.
Practical Cropping Tips and Best Practices
To truly master the Crop Tool, consider these practical tips:
- Avoid Cropping Joints: When cropping figures, a general design principle is to avoid cutting off joints such as ankles, knees, hips, or elbows. Cropping at these points can make the image feel awkward or uncomfortable. Instead, crop between joints or at a point that emphasizes the figure's form or expression.
- Focus on the Subject: Use cropping to eliminate distracting elements and draw the viewer's eye to your main subject. Whether it's a person's face, a specific detail in a landscape, or a product, cropping helps isolate and emphasize what's important.
- Consider the Purpose: Before you crop, think about where the image will be used. Is it for a website banner, a social media post, a print advertisement, or a portfolio? Each medium has different aspect ratio and resolution requirements.
- Save Presets: If you frequently use specific aspect ratios or dimensions, save them as presets. This will save you significant time and ensure consistency across multiple images.
- Experiment with Overlays: Don't just stick to the Rule of Thirds. Experiment with the Golden Ratio, diagonals, and other overlays to discover new compositional possibilities.
- Digital Zoom vs. Cropping: Be aware that "digital zoom" on cameras is essentially just cropping the image at a lower resolution. It's often better to shoot with the intention of cropping later in Photoshop, where you have more control and maintain higher quality.
By understanding and applying these techniques, the Photoshop Crop Tool transforms from a simple trimming device into a sophisticated instrument for image refinement, composition enhancement, and creative expression. Whether you're preparing a staff photo, an online portfolio, or a stunning landscape, mastering the Crop Tool will undoubtedly elevate your photographic and design work.