In the realm of digital imagery, resolution is a fundamental characteristic that dictates the level of detail and clarity an image possesses. For professionals and enthusiasts alike, understanding and manipulating image resolution in Adobe Photoshop is paramount to achieving high-quality results, whether for print or digital display. This guide delves into the intricacies of image resolution, exploring how to effectively manage and optimize it within Photoshop to ensure your visual projects stand out with exceptional clarity and detail.
Understanding the Fundamentals of Image Resolution
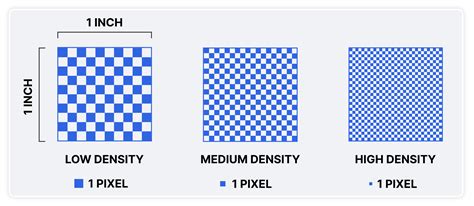
Image resolution refers to the amount of detail an image holds, typically measured in pixels. It indicates the number of pixels contained within a given area, such as inches or centimeters. Higher resolution means more pixels, resulting in sharper, clearer images. Common resolutions include 72 DPI (dots per inch) for web images and 300 DPI for print, ensuring high-quality output.
Resolution plays a crucial role in determining how images appear on different devices and mediums. For instance, a low-resolution image may look pixelated when enlarged, while a high-resolution image retains its clarity. Understanding image resolution is essential for photographers, graphic designers, and anyone working with visual media, as it directly affects the quality and professionalism of their work. In applications like Photoshop, adjusting image resolution is key to achieving the desired visual impact for both digital and printed images.
The Core Concept: Pixels, Resolution, and Document Size
Imagine you and a friend each having a bucket full of 5000 seeds to plant in a field. You must use all 5000 of your seeds by planting them in 1-inch squares in a field. Now imagine that you are allowed to plant only 150 of your seeds per inch, and your friend is allowed to plant 300 seeds per inch. This analogy helps illustrate the relationship between pixels and resolution.
Every digital image is composed of a fixed number of pixels, referred to as its pixel dimensions. When you change the resolution of an image in Photoshop, you are not altering the total number of pixels. Instead, you are changing how many of those pixels are displayed per inch. This is a critical distinction. Adding or subtracting pixels occurs when you resize an image to enlarge or shrink it. Changing resolution, however, involves reinterpreting the existing pixel data.
For example, if you have an image with a resolution of 300 PPI, it means that for every inch of the image, there are 300 pixels displayed. If you decide to increase the resolution to 600 PPI, you are essentially telling Photoshop to display twice as many pixels within the same physical inch. This does not add new pixels; it just packs the existing ones more densely. Consequently, the document's overall physical dimensions (width and height) will decrease. Conversely, halving the resolution will double the document's width and height, as the same number of pixels are spread over a larger area. The pixel dimensions, the total count of pixels in the image, remain constant throughout this process.
Reinterpreting Resolution: Optimizing for Print and Display
Often, images captured by digital cameras or sourced from the web might have large pixel dimensions but a low resolution, typically 72 PPI. While these images might appear to be of a usable size on screen, they lack the necessary density for high-quality printing. In such scenarios, you can "reinterpret" the resolution without altering the pixel count.
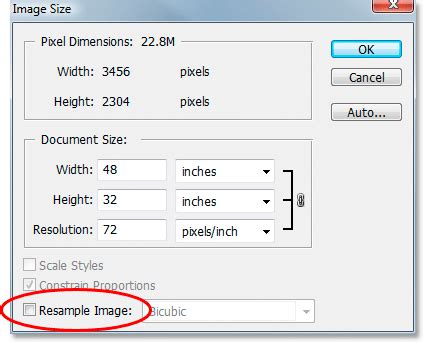
To do this, open your file in Adobe Photoshop and press Shift-Ctrl-I (or Shift-Cmd-I on Mac) to bring up the Image Size dialog box. Within this dialog, locate the "Document Size" section. If the width and height measurements are substantial, but the resolution is set to 72 pixels per inch, it's a strong indication that the image was likely created for screen display.

Crucially, deselect the "Resample Image" checkbox. This action ensures that Photoshop will not add or remove pixels. Now, change the resolution to a more print-friendly value, such as 300 PPI. You will observe that the "Pixel Dimensions" (width, height, and file size) remain exactly the same. However, the "Document Width" and "Height" values in the "Document Size" section will decrease proportionally. For instance, an 8-bit RGB image measuring 25 inches by 16.667 inches at 72 PPI will now measure 6 inches by 4 inches at 300 PPI, while the file size remains unchanged (e.g., 6.18MB). Clicking "OK" applies these changes. Your image's physical appearance on screen won't change because you've simply instructed Photoshop to display the existing pixels at a higher density. You now have a smaller, high-resolution image suitable for print.
Increasing Resolution: Upsampling with Photoshop's Tools
When you need to enlarge an image beyond its original pixel dimensions, you are engaging in upsampling. This process involves adding new pixels to increase the image's resolution, which inherently increases the file size. While this can sometimes lead to a loss of quality or introduce pixelation, Photoshop offers sophisticated tools to mitigate these issues.
Method 1: Traditional Resampling in Image Size
This method provides direct control over the dimensions and resolution, allowing you to specify exact values.
- Open your image in Photoshop.
- Navigate to
Image > Image Size(or pressShift-Ctrl-I/Shift-Cmd-I). - Ensure the "Resample Image" checkbox is ticked. This is essential for adding new pixels.
- Select an interpolation method from the dropdown menu. For enlarging images, "Bicubic Smoother (best for smooth gradients)" or "Preserve Details 2.0" (available in newer Photoshop versions) are excellent choices. "Preserve Details 2.0" is particularly effective at retaining sharpness and reducing artifacts when upscaling.
- Under "Dimensions," enter your desired new values for Width and Height. As you change these, Photoshop will automatically calculate the required number of pixels. Alternatively, you can set a target resolution (e.g., 300 PPI) and Photoshop will adjust the dimensions accordingly, or vice-versa.
- Observe the "Pixel Dimensions" at the top. You'll see these values increase, reflecting the addition of new pixels.
- Click "OK."
For example, an 8-bit RGB image that is 432 pixels wide by 288 pixels high at 72 PPI, when resampled to 300 PPI with "Resample Image" checked, will now have dimensions of 1800 pixels by 1200 pixels. The file size will also increase significantly. While this process adds pixels, the quality of the interpolation method chosen plays a vital role in how well the new pixels blend with the original, minimizing pixelation.
Method 2: Super Resolution (AI-Powered Enhancement)
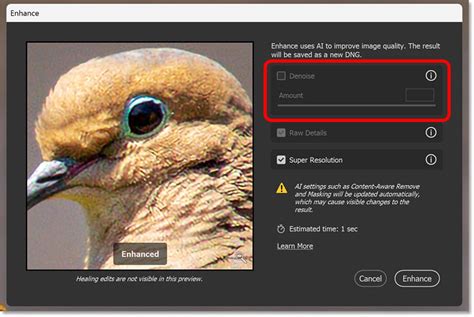
Recent advancements in Photoshop leverage Artificial Intelligence (AI) and Machine Learning (ML) to achieve superior results when increasing image resolution. The "Super Resolution" feature, available through the Camera Raw Filter, is a prime example. This technology intelligently analyzes the image content and generates new pixels that are contextually appropriate, leading to a dramatic increase in detail and clarity.
- Open your image in Photoshop. For the best results, use RAW files if available.
- Access the Camera Raw Filter: Go to
Filter > Camera Raw Filter. - Initiate Enhancement: In the Camera Raw interface, right-click on the image and select "Enhance…"
- Activate Super Resolution: In the "Enhance Preview" dialog box, check the "Super Resolution" option. This will typically double the linear resolution (i.e., quadruple the pixel count).
- Click "Enhance." Photoshop will process the image and create a new, higher-resolution version.
- Click "OK" in the Camera Raw Filter to apply the changes.
Super Resolution is particularly effective for enlarging photos without introducing noticeable pixelation or artifacts. It's a powerful tool for breathing new life into old or low-resolution photos, making them suitable for high-quality prints or larger displays. This feature can be applied to multiple images at once, streamlining your workflow.
Method 3: Photo Restoration Filter
For older or damaged photos, Photoshop offers a "Photo Restoration" filter that can help improve image quality, including resolution.
- Open your image in Photoshop.
- Go to
Filter > Other > Photo Restoration(the exact location may vary slightly depending on your Photoshop version). - Enable the filter and adjust the sliders for "Enhance Face" and "Photo Enhancement" to improve clarity and detail.
- Utilize the "Adjustments" dropdown to further refine settings like noise reduction and JPEG artifact reduction.
This filter works by intelligently analyzing and correcting imperfections, which can indirectly lead to an improved perceived resolution and overall quality.
Understanding Interpolation Methods
When you resample an image (upsampling or downsampling), Photoshop needs to decide how to create or discard pixel data. This is where interpolation methods come into play. Each method uses a different algorithm to calculate the color values of new pixels or to determine which existing pixels to discard.
- Nearest Neighbor: The fastest but least sophisticated method. It simply duplicates existing pixels or discards them, often resulting in jagged edges or blocky artifacts, especially when upsampling.
- Bicubic: A more advanced algorithm that considers a larger area of surrounding pixels to calculate new ones. It provides smoother results than Nearest Neighbor.
- Bicubic Smoother: Optimized for upsampling, it tends to produce smoother gradients and less harshness.
- Bicubic Sharper: Optimized for downsampling, it helps to retain sharpness when reducing image size. When used for upsampling, it can sometimes introduce over-sharpening artifacts.
- Preserve Details 2.0: This is Photoshop's latest and most advanced resampling algorithm, specifically designed for upscaling. It uses AI to intelligently analyze and reconstruct details, minimizing artifacts and preserving sharpness far better than older methods.
Choosing the right interpolation method is crucial for achieving the best possible quality when altering image resolution.
AI-Powered Upscalers and Alternatives
Beyond Photoshop's built-in features, a growing ecosystem of AI-powered image upscaling tools offers accessible and often impressive results. These tools leverage deep learning models trained on vast datasets to intelligently add detail and enhance clarity.
- Adobe Firefly: Adobe's generative AI platform includes features like "Generative Upscale" that can significantly improve image resolution while maintaining sharpness and natural appearance. It analyzes photos and adds realistic detail as it enlarges them. Firefly can be accessed online and offers a user-friendly experience.
- Wondershare UniConverter AI Image Enhancer: This tool is designed to easily improve image resolution and quality, quadrupling the size of pictures with AI algorithms to make them more detailed and high-resolution. It offers a side-by-side preview for comparison.
- Upscale.media, Let's Enhance, Deep Image, Waifu2x, Bigjpg, AI Image Enlarger, VanceAI Image Enlarger, PixBim Enlarge AI, Fotor: These are various online AI upscaling services that offer different approaches to enhancing image resolution. They often provide quick, user-friendly solutions for enlarging images without significant quality loss.
While these tools can be highly effective for quick enhancements or when Photoshop's complexity is not required, Photoshop remains the industry standard for professional users who need precise control, advanced editing capabilities, and the ability to integrate upscaling into complex workflows.
How To Use The Super Resolution Feature In Photoshop - 2025 (Tutorial)
Practical Considerations and Tips
- Start with the Best Source: Always begin with the highest-quality image available. The better the original, the better the results when upscaling.
- Sharpening Strategy: It's generally advisable to sharpen your image after increasing its resolution, not before. Sharpening an image before upscaling can amplify existing artifacts, which then become magnified. Sharpening afterward can help counteract some of the potential softening that occurs during enlargement.
- Client Communication: If a client requests an image resolution increase without fully understanding the implications, it's beneficial to demonstrate the process and its potential downsides. This helps manage expectations and ensures clarity.
- Check Client-Supplied Images: Be vigilant with images provided by clients, especially those from digital cameras. They often have large pixel dimensions at low resolution (e.g., 72 PPI). While they might appear large on screen, they will likely require resolution adjustments for print or professional layouts.
- Understand the Limitations: While AI has made significant strides, it's important to remember that it cannot create detail that was never present in the original image. Upscaling is an intelligent estimation and reconstruction process, not a magical creation of new, definitive information.
- GPU Acceleration: A faster GPU can significantly speed up image processing, including AI-driven features like Super Resolution, making your workflow more efficient.
By mastering these techniques and understanding the underlying principles of image resolution, you can effectively transform blurry, low-resolution photos into crisp, high-quality visuals, ready for any application, from web display to professional print production.
tags: #photoshop #increase #resolution