Creating a compelling logo is often the first step in building a recognizable brand. It serves as the visual cornerstone, a memorable symbol that communicates your business's essence to your audience. While professional graphic designers often leverage specialized vector software like Adobe Illustrator for logo creation due to its scalability, Adobe Photoshop remains a powerful and accessible tool for many, offering extensive creative control and a familiar interface. This tutorial will guide you through the process of designing a logo in Photoshop, from initial concept to final export, ensuring your brand's visual identity is effectively established.
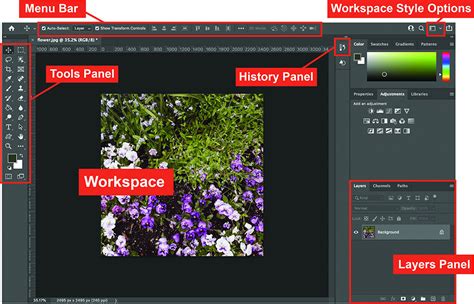
Understanding Photoshop's Role in Logo Design
Photoshop, developed by Adobe, is a versatile image editing software renowned for its advanced photo editing and manipulation capabilities. While not strictly a vector-based program, its robust set of tools makes it a competent platform for logo design, especially for those who are already familiar with its interface. Photoshop provides precise control through its layer-based workflow, allowing you to work on individual elements of your logo independently. Its extensive toolset fosters creative freedom, enabling experimentation with a wide array of colors, gradients, patterns, and effects to achieve unique visual styles. For a more streamlined experience or if vector output is paramount, alternatives like Adobe Illustrator or online logo makers such as LogoMaker exist, but Photoshop offers a deeply customizable and powerful environment for those who wish to dive deep into the design process.
Laying the Foundation: Canvas Setup and Initial Sketching
Before diving into the digital realm, it's crucial to establish the groundwork for your logo. This involves setting up your digital canvas and developing a conceptual sketch.
Setting the Canvas Dimensions:When creating a new document in Photoshop, precise dimensions are key. For a versatile logo, it's recommended to start with a square canvas. A size of 1000x1000 pixels or larger is a good starting point, offering ample space to work with without sacrificing detail. This ensures that your logo will be adaptable for various applications.
Choosing the Resolution:For print-quality logos, setting the resolution to at least 300 pixels per inch (ppi) is essential. This guarantees that your logo will appear crisp and clear when printed, whether on business cards, merchandise, or large-format signage. For web use, a resolution of 72 ppi is typically sufficient, but starting with a higher resolution provides greater flexibility.
Clicking "Create" will open your new canvas, a blank slate ready for your creative vision.
Brainstorming and Sketching Your Concept:The next critical step is to translate your brand identity into a visual concept through sketching. This process is iterative and involves several stages:
- Brainstorm Ideas: Take time to contemplate your brand's identity, target audience, and the core message you want your logo to convey. What emotions or associations should it evoke?
- Explore Different Styles: Consider various logo styles:
- Wordmarks: Full company names (e.g., Google, Coca-Cola).
- Lettermarks: Initials or abbreviations (e.g., IBM, CNN).
- Pictorial Marks: Iconic images or symbols (e.g., Apple's apple, Twitter's bird).
- Abstract Marks: Geometric or abstract shapes that represent the brand (e.g., Nike's swoosh).
- Combination Marks: A blend of text and symbols.
- Create Rough Sketches: Begin sketching your logo ideas on paper or using a digital drawing tablet. Don't aim for perfection at this stage; focus on quantity and exploration.
- Refine Your Sketches: Once you have several rough concepts, refine the most promising ones. Improve the lines, proportions, and overall composition.
- Get Feedback: Share your refined sketches with colleagues, friends, or potential customers. Their insights can help you identify the strongest concepts and make necessary improvements.
Building the Logo with Basic Shapes
With a clear concept in hand, it's time to bring your logo to life in Photoshop using the software's versatile shape tools. The key here is simplicity; start with basic forms and gradually build complexity.
Selecting and Drawing Shapes:Photoshop offers a variety of shape tools, including the Rectangle, Rounded Rectangle, Ellipse, Polygon, and Custom Shape tools. Choose the tool that best suits your design. Click and drag on your canvas to create the desired shape.
Adjusting Shape Properties:In the Options bar at the top of the Photoshop interface, you can modify the properties of your shapes. This includes setting the fill color, stroke color, and stroke width. For a clean logo, consider using minimal or no stroke.
Combining and Arranging Shapes:Create multiple shapes and arrange them to form the basic structure of your logo. The Path Selection Tool allows you to select and edit individual paths within a shape, offering precise control over curves and points. Utilize the Shape Modes in the Options bar (Combine, Subtract, Intersect, Exclude) to create more complex forms by manipulating overlapping shapes.
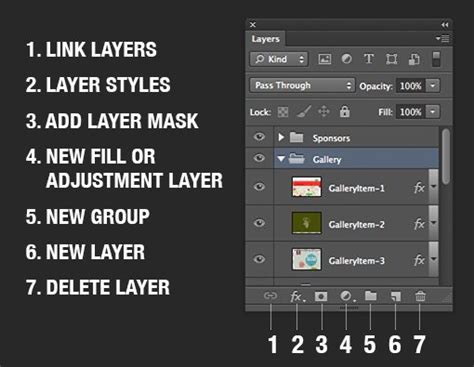
Organizing Your Layers:As you add more shapes, it's crucial to keep your Layers panel organized. Group related shapes together into folders. This not only helps you manage your design elements but also makes it easier to move, edit, or apply effects to entire sections of your logo.
Learn How to Work with Shape Tools in Photoshop CC | Adobe Creative Cloud
Typography: Adding Text to Your Design
Typography plays a pivotal role in a logo's overall impact, conveying personality and reinforcing brand identity.
Choosing and Applying Fonts:In the Options bar, click on the font dropdown menu and select a font that aligns with your brand's identity. Consider the message the font conveys - is it modern, classic, playful, or serious? The font size should be adjusted to ensure your text is proportionate to the logo's shapes.
Coloring Your Text:Click on the color swatch in the Options bar to open the Color Picker and select a font color that complements your design.
Creating and Positioning Text:Click on your canvas where you want to place your text and start typing. Use the Move Tool (V) to position your text in relation to your logo shapes. Experiment with different text styles, such as bold, italic, or all-caps, to find the most suitable style.
Transforming and Warping Text:For unique text effects, you can transform or warp your text. This can add a dynamic or stylized element to your logo. Experiment with placing your text inside, outside, or overlapping your logo shapes to create a cohesive and visually appealing composition. Remember, a well-chosen typeface can significantly enhance the memorability and professionalism of your logo.
Refining and Customizing Your Logo
Once the basic structure and text are in place, it's time to refine and customize your logo to achieve the desired visual impact and depth.
Color Palettes and Gradients:
- Color Picker: Double-click on the color swatch in the Layers panel to open the Color Picker and precisely select your desired colors. Consider using a limited color palette for a cleaner, more cohesive look.
- Gradients: Add depth and dimension by applying gradients. Select the layer you want to apply the gradient to, then choose the Gradient Tool (G). In the Options bar, select the desired gradient type (linear, radial, etc.) and colors. Experiment with different gradient combinations to create unique visual effects.
Patterns and Textures:Incorporate patterns into your logo design to add visual interest. You can apply patterns by going to Edit > Fill and selecting "Pattern" from the Contents dropdown menu.
Layer Styles and Blending Modes:
- Layer Styles: Right-click on a layer and select "Blending Options" to access a variety of layer styles. These include Drop Shadow, Bevel and Emboss, Gradient Overlay, and Stroke, which can add depth, texture, and definition to your logo elements.
- Layer Blending Modes: Change the blending mode of a layer to control how it interacts with the layers beneath it. This can create sophisticated visual effects and seamless integrations between elements.
- Layer Opacity: Reduce the opacity of a layer to create subtle transparency effects, adding nuance and visual interest.
Precise Editing with Masks and Tools:
- Vector Masks: Apply vector masks to your layers for precise, non-destructive edits. This allows you to mask out parts of a layer without permanently deleting them, offering flexibility for future adjustments.
- Anti-aliasing: When creating shapes or text, ensure that the "Anti-Alias" option is selected in the Options bar. This smooths out jagged edges, resulting in a cleaner, more professional appearance.
- Pen Tool: For intricate shape editing and precise path creation, the Pen Tool (P) is invaluable. It allows you to draw and manipulate vector paths with a high degree of accuracy.
Ensuring Scalability and Versatility
A well-designed logo must maintain its clarity and impact across various sizes and applications. This is where scalability becomes paramount.
Creating Multiple Size Variations:Duplicate your logo and scale it down to smaller sizes (e.g., 50%, 25%, 10% of its original size). This process helps identify potential issues with legibility at smaller scales.
Simplifying Intricate Elements:If certain elements of your logo become unclear or cluttered at smaller sizes, consider simplifying those parts. Fine lines, small details, and complex patterns may need to be adjusted or removed.
Adjusting Line Weights:Thin lines and delicate elements can disappear or become indistinct when scaled down. Adjust line weights to ensure they remain visible and impactful at all sizes.
Testing in Different Contexts:Place your logo on various backgrounds, such as dark, light, and textured surfaces, to assess its versatility. Ensure it remains legible and visually distinct in all scenarios.
Seeking Feedback on Scaled Versions:Show your scaled logo versions to colleagues or friends and gather their feedback. Ask if they can easily recognize and understand the logo at different sizes. A truly scalable logo retains its essence and impact regardless of its dimensions.
Exporting Your Logo for Various Uses
Once you are satisfied with your logo design, it's essential to export it in the appropriate file formats for different applications.
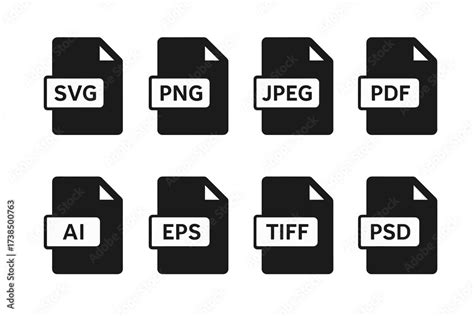
Saving Your Photoshop File:Always save your Photoshop file in its native format (.PSD). Go to File > Save As and choose "Photoshop (*.PSD)". This preserves all your layers and edits, allowing you to make future modifications easily. Remember to save your Photoshop file regularly throughout the design process to avoid losing any work.
Exporting as PNG:For web use and applications requiring a transparent background, PNG is the ideal format.
- Go to
File > Export > Export As. - In the Export As dialog box, select PNG from the Format dropdown menu.
- Choose a destination folder and click "Export".
- In the PNG Export Options dialog box, select the desired resolution (e.g., 72 ppi for web). Ensure "Transparency" is checked if you need a transparent background.
Exporting as JPEG:JPEG is suitable for web images where transparency is not required. It offers good compression but does not support transparency.
- Go to
File > Export > Export As. - Select JPEG from the Format dropdown menu.
- Choose a destination folder and click "Export".
- In the JPEG Export Options dialog box, select the desired quality and resolution.
Exporting as PDF:PDF is a versatile format that can be used for both print and digital applications. It can preserve vector information if created appropriately.
- Go to
File > Save As. - Select Photoshop PDF from the Format dropdown menu.
- Choose a destination folder and click "Save".
- In the Save Adobe PDF dialog box, select the desired quality settings. For logos, consider presets like "High Quality Print."
Testing Your Exported Files:Open your exported logo files in various applications and contexts to ensure they display correctly. Verify that colors are accurate, text is legible, and any transparency effects are maintained.
Final Review and Considerations
Before deeming your logo complete, take a step back and conduct a thorough review. Share your logo with trusted colleagues, friends, or family to gain fresh perspectives. Their feedback can highlight areas for improvement you might have overlooked.
The Power of a Strong Logo:Consider the impact of iconic logos like Coca-Cola or Google. These brands are instantly recognizable, and their logos encapsulate their identity. A well-designed logo tells a story, communicating what the brand is about and its core ideals. It's an exercise in narration, conveying significant meaning in a concise visual form.
Vector vs. Raster:It's important to reiterate that Photoshop is a raster-based program, meaning it works with pixels. While it can produce excellent results for many applications, for logos that require infinite scalability without any loss of quality (essential for certain print and large-format applications), vector-based software like Adobe Illustrator is generally preferred. If you create your logo in Photoshop and require a vector version, you may need to recreate it in Illustrator or use Photoshop's "Create Vector Mask" feature and export as SVG, though this process can be more complex.
Alternatives and the Future of Logo Design:While Photoshop is a capable tool, for those seeking a simpler or faster approach, online logo makers like LogoMaker offer user-friendly interfaces and pre-designed templates. These platforms can be excellent for beginners or for quickly generating logo ideas. However, for complete creative control and the ability to refine every detail, Photoshop remains a powerful choice. The landscape of digital design is constantly evolving, with new tools and techniques emerging regularly. Staying updated with the latest Photoshop features and design trends will further enhance your logo creation capabilities.
Remember, your logo is a critical asset. Investing time and effort into its design will pay dividends in establishing a strong and memorable brand identity.